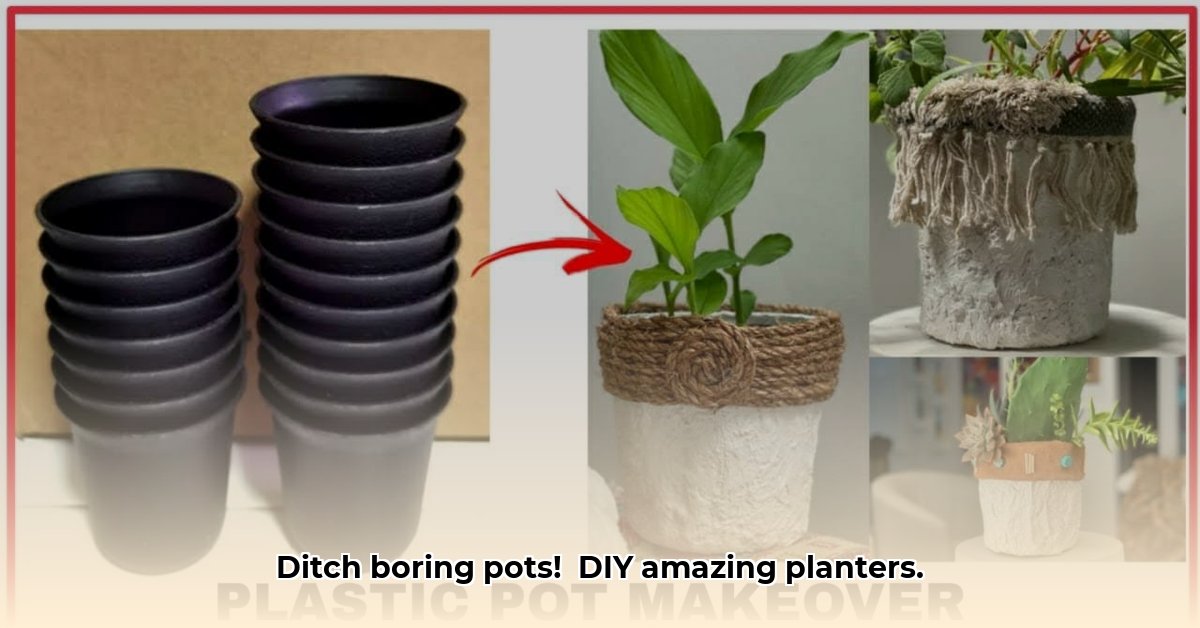
Let’s transform those boring plastic plant pots into stunning garden art! This guide provides easy-to-follow instructions, tips, and inspiration for various decorating methods, from simple painting to intricate mosaics. Get ready to unleash your inner artist and create planters that will be the envy of the neighborhood!
Prepping Your Pot Canvas
Before diving into the fun part, it’s essential to prepare your plastic pots. This ensures your chosen decorating method adheres properly and lasts.
- Clean: Scrub your pots with warm, soapy water, removing any dirt or debris. A paste of baking soda and vinegar can tackle stubborn grime. Rinse thoroughly and let them air dry completely.
- Sand (Optional): For smoother plastics, lightly sanding with fine-grit sandpaper can improve paint adhesion. Wipe away any dust with a clean cloth.
- Prime (Recommended for Painting): Priming creates a smooth base for paint, resulting in more vibrant colors and a longer-lasting finish. Use a primer specifically designed for plastic. Apply a thin, even coat and let it dry completely.
Painting Plastic Pots
Painting is a simple and versatile way to decorate your pots.
- Choose Your Paint:
- Spray Paint: Offers quick coverage for large areas. Ensure good ventilation.
- Acrylic Paint: Provides vibrant colors and works well for intricate designs.
- Chalk Paint: Creates a charming, matte finish, perfect for a vintage look.
- Apply Thin Coats: Whether using spray paint, acrylics, or chalk paint, apply multiple thin coats, letting each layer dry completely before the next.
- Seal (Especially for Outdoor Pots): A UV-resistant sealant protects your paint from fading and weathering.
Decoupage Delight
Decoupage allows you to personalize your pots with paper, fabric, or even photos.
- Prepare Materials: Cut out your chosen images or patterns. If using napkins, separate the plies.
- Apply Decoupage Glue: Apply a thin layer of Mod Podge (or similar glue) to the pot.
- Place and Smooth: Carefully position your cutout and smooth out any wrinkles or air bubbles.
- Seal: Once dry, apply a layer of decoupage sealant for protection and a nice finish. Multiple coats enhance durability, potentially even waterproofing your creation.
Mosaic Magic
Transform broken tiles, glass, or stones into stunning mosaic art.
- Adhere: Use a strong, weather-resistant adhesive to attach your mosaic pieces to the pot.
- Grout: Once the adhesive dries, grout the spaces between the pieces for a cohesive and durable design.
Rope & Fabric Accents
Adding rope or fabric introduces texture and visual interest.
- Rope: Secure the end of the rope with hot glue and wrap it tightly around the pot, securing at intervals.
- Fabric: Use strong fabric glue to adhere fabric to the pot, smoothing out wrinkles.
Beyond the Basics: More Creative Techniques
- Faux Stone Finish: Use joint compound for a textured, stone-like appearance.
- Hot Glue Embossing: Create raised designs with hot glue before painting.
- Natural Embellishments: Decorate with twigs, beads, shells, or stones.
- Repurposed Materials: Incorporate pallet wood or other recycled items.
- Yarn Bombing: Wrap your pots in colorful yarn for a cozy effect.
- Dip Dyeing: Create a gradient effect with paint.
Quick Reference Guide
| Method | Difficulty | Estimated Time | Key Materials |
|---|---|---|---|
| Painting | Easy | 1-2 hours | Paint (spray, acrylic, or chalk), primer, sealant |
| Decoupage | Medium | 2-3 hours | Decoupage glue, paper/fabric, scissors, sealant |
| Mosaic | Medium | 3-4 hours | Tiles/glass/shells, adhesive, grout |
| Rope Wrapping | Easy | 1 hour | Rope/twine, hot glue gun |
| Fabric Covering | Medium | 2 hours | Fabric, fabric glue, sealant |
Tips & Tricks
- Cleanliness is Key: Thorough cleaning ensures optimal adhesion.
- Priming Power: Priming plastic improves paint adhesion and vibrancy.
- Drainage Matters: Ensure drainage holes aren’t blocked.
- Sealant is Essential: Protect your designs, especially for outdoor use.
- Experiment: Don’t be afraid to try different materials and techniques!
FAQs
- What paint is best for plastic pots? Acrylic or spray paints designed for plastic work best.
- Do I need to prime? Priming is highly recommended for smoother plastic.
- Can I decorate pots with plants in them? Yes, protect the plant with a plastic bag or newspaper.
Exploring Further
While these methods are tried and true, the crafting world is always evolving. Ongoing research in material science may lead to new and improved techniques. Some experts, for instance, are exploring alternative priming methods and the impact of different plastic types on paint longevity. So while the techniques here are likely effective, it’s always good practice to test in a small area first, especially with novel approaches. Don’t hesitate to explore and discover your own techniques! You might even contribute to the next generation of crafting wisdom.
Remember, gardening is a journey of constant learning and experimentation. So, have fun creating your own unique garden paradise!
- How to Get Rid of Mushrooms in Your Lawn: A Complete Guide - April 24, 2025
- How to Get Rid of Ground Hornets: A Safe and Effective Guide to Eliminating Nests - April 24, 2025
- How to Get Rid of German Roaches Fast: DIY Methods for Quick Control - April 24, 2025


