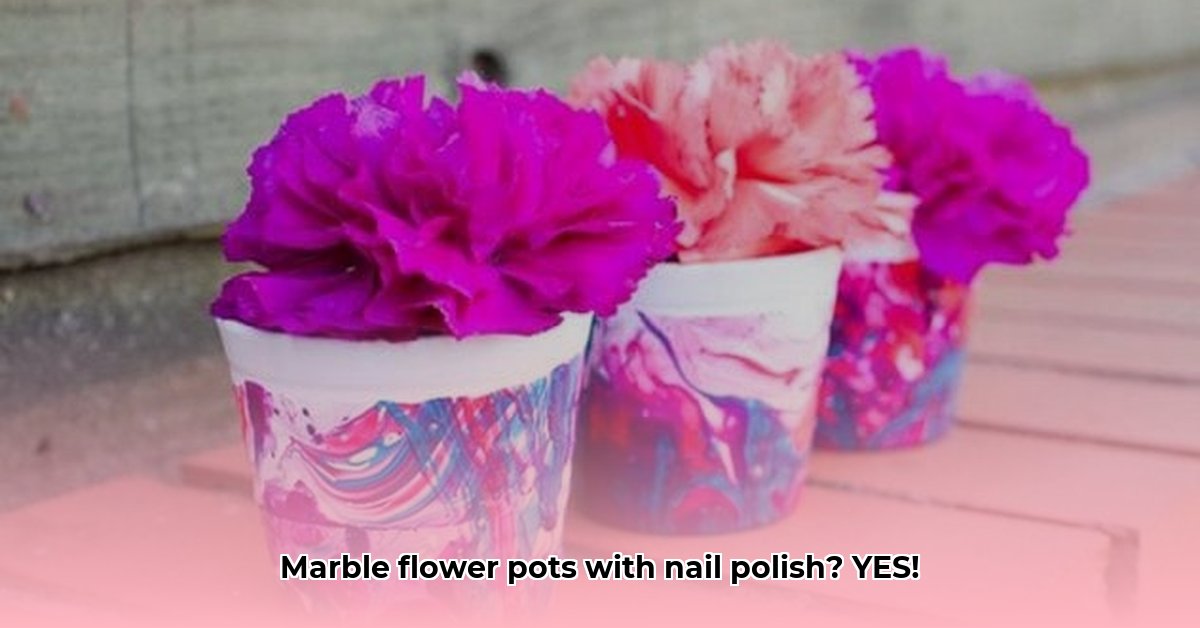
Got some boring terra cotta pots? Transform them into eye-catching art pieces with the magic of nail polish marbling! This easy technique requires just a few supplies and a dash of creativity. This comprehensive guide will take you step-by-step through the process, from prepping your pots to sealing your masterpiece, with troubleshooting tips and inspiring ideas to elevate your marbling game. Get ready to impress yourself and give your plants a stylish new home!
Prepping for Your Marbling Adventure
Before we dive into the swirling colors, let’s gather our supplies. Just like a chef preps ingredients, we need to have everything at hand for a smooth, creative process.
Essential Supplies
-
Terracotta Pots: Light-colored pots provide the best canvas for vibrant marbling. Having extras allows for experimentation!
-
Nail Polish: Fresh, thin polish is key. Avoid thick or old polish, which can clump and hinder smooth swirls. A variety of colors and finishes (matte, glitter, shimmer) opens up creative possibilities.
-
Container: A plastic bin, aluminum pan, or disposable container large enough to submerge your pot will work perfectly.
-
Water: Lukewarm water is the ideal temperature for this project. Temperature impacts how the polish spreads, and lukewarm water generally yields the best results.
-
Gloves: Protect your hands from stray polish with disposable gloves.
-
Paper Towels: These are essential for cleanup and drying your marbled creations.
Helpful Extras
These optional items can enhance your marbling experience:
-
Toothpicks or Skewers: These are your swirling tools for creating intricate patterns.
-
Nail Polish Remover (Acetone): Acetone can thin out thick polish, clean spills, and even be added to the water (a drop or two) to prevent clumping, although this isn’t always necessary. Research suggests this may affect different polish brands in varying ways.
-
Drop Cloth: Protect your work surface from spills with newspaper, plastic sheeting, or a drop cloth.
-
Clear Sealant Spray: A sealant protects your finished design and adds a glossy finish. An outdoor sealant provides extra weather resistance for pots destined for the garden.
-
White Enamel Spray Paint: A base coat of white enamel paint on darker pots creates a brighter canvas for vibrant marbling, though this depends on the desired final aesthetic.
| Item | Essential | Description |
|---|---|---|
| Terracotta Pots | ✅ | White or light-colored pots work best. |
| Nail Polish | ✅ | Fresh, thin polish is ideal. Avoid thick or old polish. |
| Container | ✅ | Large enough to submerge the pot. |
| Water | ✅ | Lukewarm water is recommended. |
| Gloves | ✅ | Protects your skin from nail polish. |
| Paper Towels | ✅ | For cleanup and drying. |
| Toothpicks/Skewers | ⬜ | For creating swirls and patterns. |
| Nail Polish Remover (Acetone) | ⬜ | Thins polish and cleans spills. |
| Drop Cloth | ⬜ | Protects your work surface. |
| Clear Sealant Spray | ⬜ | Protects the design and adds a glossy finish. |
| White Enamel Spray Paint | ⬜ | (Optional) Use as a base coat on darker pots for more vibrant colors, depending on the desired aesthetic. |
Unleashing Your Inner Artist: The Marbling Process
Now for the fun part! Transforming plain pots into marbled masterpieces is like creating a miniature work of art.
Creating the Marble Effect
-
Prep Your Canvas: Fill your container with room-temperature water. This is your canvas for the swirling colors.
-
Add the Polish: Gently drip or pour your chosen nail polish colors onto the water’s surface. Experiment with different colors and amounts – more polish creates a denser marble effect.
-
Swirl and Create: Use a toothpick or skewer to swirl the colors together, creating your desired patterns. Work relatively quickly, as nail polish dries on the water’s surface. There is debate on whether adding a drop of acetone affects drying time; some suggest it does, while others believe it primarily thins the polish. Further investigation is needed to understand the interaction between water temperature, acetone, and drying time.
-
Dip and Reveal: Slowly dip your pot into the swirling polish, rotating it slightly for an even coating. The angle and speed of dipping can create interesting variations.
-
Dry and Repeat (Optional): Lift the pot and let it dry completely. Repeat steps 2-4 with fresh water and different colors for a layered look.
Sealing and Protecting: The Final Touch
Sealing your marbled pot preserves your artwork and protects it from the elements. This step is especially crucial for porous terracotta.
Choosing Your Sealant
-
Acrylic Sealant: Ideal for indoor pots, offering easy application, quick drying, and low odor.
-
Polyurethane Sealant: Best for outdoor pots, providing superior durability, weather resistance, and often UV protection against fading. Some studies suggest polyurethane sealants may yellow over time, but results vary based on the product and environmental exposure.
Consider your pot’s location and desired finish (glossy or matte) when selecting a sealant.
Sealing Steps
-
Prep: Gather your dried pot, sealant, and a drop cloth.
-
Shake: Shake the sealant can thoroughly.
-
Apply Thin Coats: Spray thin, even coats, avoiding drips. Multiple thin coats are better than one thick coat. Allow each coat to fully dry before applying the next (usually 30 minutes to an hour).
-
Dry Completely: Let the final coat dry completely before handling. The drying time varies with the sealant and humidity.
Troubleshooting and Tips
-
Clumpy Polish: Add a drop or two of nail polish remover to the water or use fresh polish.
-
Fast Drying: Use room-temperature water. Adding acetone might thin the polish and potentially affect drying time, but results can vary, and more research is needed.
-
Uneven Marbling: Avoid over-swirling. Gentle motions often work best. Experimenting with dipping techniques may also help achieve a more uniform finish.
Beyond the Basics: Expanding Your Marbling Horizons
Once you’ve mastered the technique, the possibilities are endless! Experiment with:
-
Different Finishes: Explore matte, glitter, shimmer, or holographic nail polish.
-
Patterns and Stencils: Create geometric designs or stripes using stencils or tape.
-
Embellishments: Add beads, glitter, or other decorative elements.
Marbling flower pots isn’t just a craft; it’s an artistic expression. Embrace the creative process, experiment with different techniques, and enjoy transforming ordinary pots into personalized works of art!
- How to Get Motor Oil Out of Clothes: Proven Methods & Step-by-Step Guide - April 25, 2025
- How to Get Mothball Smell Out of Clothes: A Complete Guide - April 25, 2025
- How to Get Highlighter Out of Clothes: Easy & Effective Stain Removal Guide - April 25, 2025


