Ever wish you could control a light from three or more locations? That’s the magic of a 4-way switch! This guide provides clear, step-by-step instructions to help you wire a 4-way switch confidently and safely.
Understanding 4-Way Switches
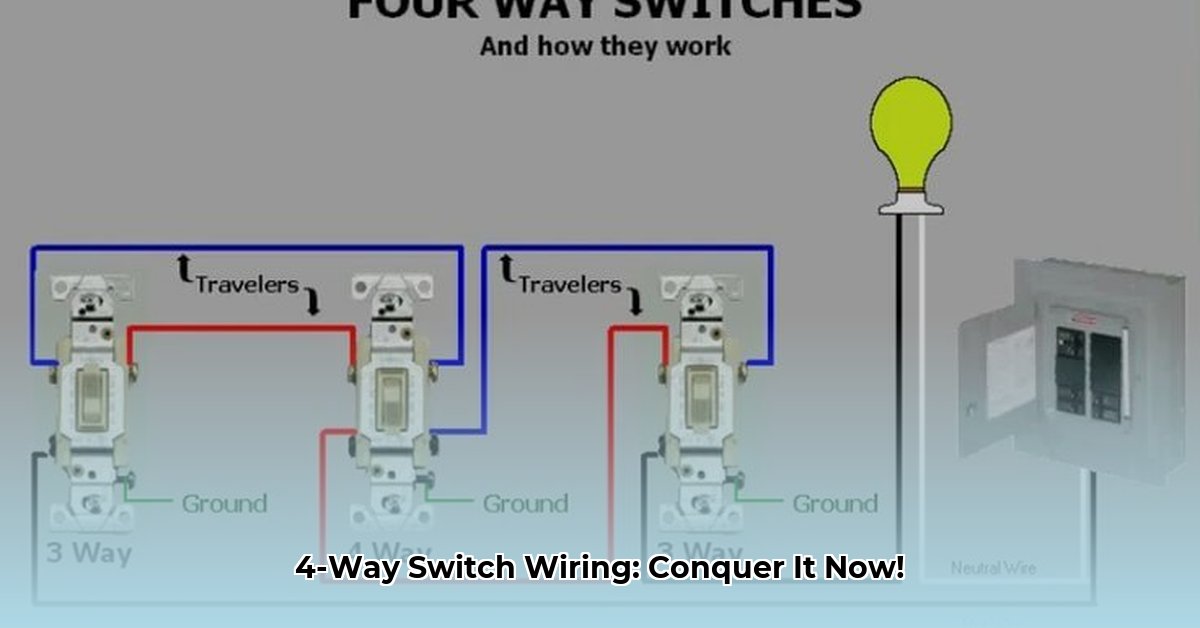
4-way switches work in conjunction with two 3-way switches to control a light from three or more locations. They’re perfect for hallways, stairways, or large rooms with multiple entrances. A 4-way switch acts as a “middleman,” rerouting the electrical current between the 3-way switches based on its position.
Tools and Materials
Before you begin, gather these essential items:
- Safety Gear: Non-contact voltage tester, safety glasses
- Tools: Wire strippers, screwdrivers (Phillips and flathead), needle-nose pliers, level, fish tape (optional, for running wires through walls)
- Switches: Two 3-way switches, one or more 4-way switches
- Wiring: 12/2 or 14/2 Romex cable (check local electrical code for requirements)
- Connectors: Wire nuts (choose appropriate size for wire gauge)
- Electrical Boxes: For housing the switches and connections
- Wall Plates: To cover the electrical boxes and provide a finished look
Wiring Configurations: Where Does the Power Enter?
The wiring setup depends on where the power originates: the light fixture, the first 3-way switch, or elsewhere. Understanding this is crucial for choosing the correct wiring diagram. Common scenarios include:
- Power at Light: Power comes into the light fixture first.
- Power at First 3-Way Switch: Power comes into the first 3-way switch box.
- Light Between Switches: Light fixture is located between the switches.
- Power and Light in Middle Box: Less common, power and light are in the same box.
While the specific wiring varies, the principles remain consistent across these scenarios. Always refer to a wiring diagram specific to your setup. Online resources and instructional videos can provide further clarity.
Step-by-Step Wiring Instructions (Power at First 3-Way Switch Example)
This example assumes the power enters the circuit at the first 3-way switch. This is a common scenario, but remember to consult a diagram matching your specific configuration.
1. Safety First! Turn off the power at the breaker box. Double-check with a voltage tester to ensure the circuit is dead.
2. Prepare the Wires: Strip the outer sheathing and about ½ inch of insulation from the ends of each wire.
3. First 3-Way Switch (Power Source):
- Connect the black (hot) wire from the power source to the common terminal screw.
- Connect the two traveler wires (e.g., red and black) to the remaining two screws.
- Connect the bare copper ground wire to the green grounding screw.
4. Four-Way Switch (The Middleman):
- Connect the two traveler wires from the first 3-way switch to any two screws on the 4-way switch.
- Connect two new traveler wires to the remaining two screws on the 4-way switch. These will go to the second 3-way switch.
- Connect the ground wire to the green grounding screw.
5. Second 3-Way Switch (Controlling the Light):
- Connect the two traveler wires from the 4-way switch to the two traveler screws.
- Connect the common terminal to the wire running to the light fixture.
- Connect the ground wire to the green grounding screw.
6. Light Fixture (The Destination):
- Connect the black wire from the second 3-way switch to the black wire on the fixture.
- Connect the white (neutral) wires together with a wire nut.
- Connect the ground wires together.
7. Test: Turn the power back on at the breaker box. Test the switches to ensure the light operates correctly from all locations.
Troubleshooting
If the light doesn’t work, try these steps:
- Check Connections: Ensure all wire nuts are tight and wires are securely connected.
- Test Switches: Use a multimeter to test the continuity of the 3-way and 4-way switches. A faulty switch may need replacing.
- Verify Wiring: Double-check that your wiring matches the correct diagram for your setup. Traveler wires and common wires must be connected properly.
- Circuit Issues: Determine if other lights or appliances on the same circuit are malfunctioning. An overloaded circuit could be the problem.
- Intermittent Problems: Jiggle the wires connected to the switches to see if the light flickers. This can help identify loose connections.
Tips and Tricks
- Labeling: Label wires with tape before disconnecting them to simplify reassembly.
- Color Coding: Use different colored wires or label them to make troubleshooting easier.
- Diagrams: Keep a copy of your wiring diagram for future reference.
Safety Reminders
- Always turn off the power at the breaker box before working on any electrical wiring.
- Double-check the circuit is dead with a voltage tester.
- If you are unsure about any part of the process, consult a qualified electrician.
Conclusion
Wiring a 4-way switch adds convenience and functionality to your home’s lighting. While this guide offers comprehensive instructions, electrical wiring can be complex. If you are not comfortable working with electricity, it is always recommended to consult a licensed electrician. They can ensure your wiring meets local codes and is completed safely. Ongoing research in electrical practices suggests always staying updated on the latest safety guidelines.

- How to Measure Your Belt Size (for Women): 3 Easy & Accurate Methods - April 27, 2025
- How to Remove Permanent Hair Dye From Hair: Safe & Effective Methods - April 27, 2025
- How to Remove Ink from Leather: Effective DIY Methods and Expert Tips - April 27, 2025