Welcome to the [Definitive Guide to Roof Valley Construction Details]! As an experienced roofer with over a decade of expertise in valley construction, I’ve compiled this comprehensive guide to provide you with all the insights you need to understand and execute exceptional roof valley installations and repairs.
Key Takeaways:
- Roof valleys guide water runoff, preventing damage.
- Closed-cut valleys balance water flow with protection.
- Valleys require at least four layers of shingles or flashing.
- Open valleys use durable metal sheets.
- Flashing and underlayment must be properly installed at connection points.
- The roof angle determines the angle of flashing and underlayment.
- Woven shingle valleys are specific to three-tab shingles.
- Properly installed and maintained valleys extend the life of a roofing system.
Essential Roof Valley Construction Details for a Leak-Free Roof
What is a Roof Valley?
A roof valley is a critical element in a roofing system, directing water runoff away from the roof. Proper construction ensures the structural integrity, weather resistance, and aesthetic appeal of your roof.
Types of Roof Valleys:
- Closed Valleys: Completely covered with roofing material, providing maximum protection from water penetration.
- Open Valleys: Partial openings allow water to flow while providing some protection from damage.
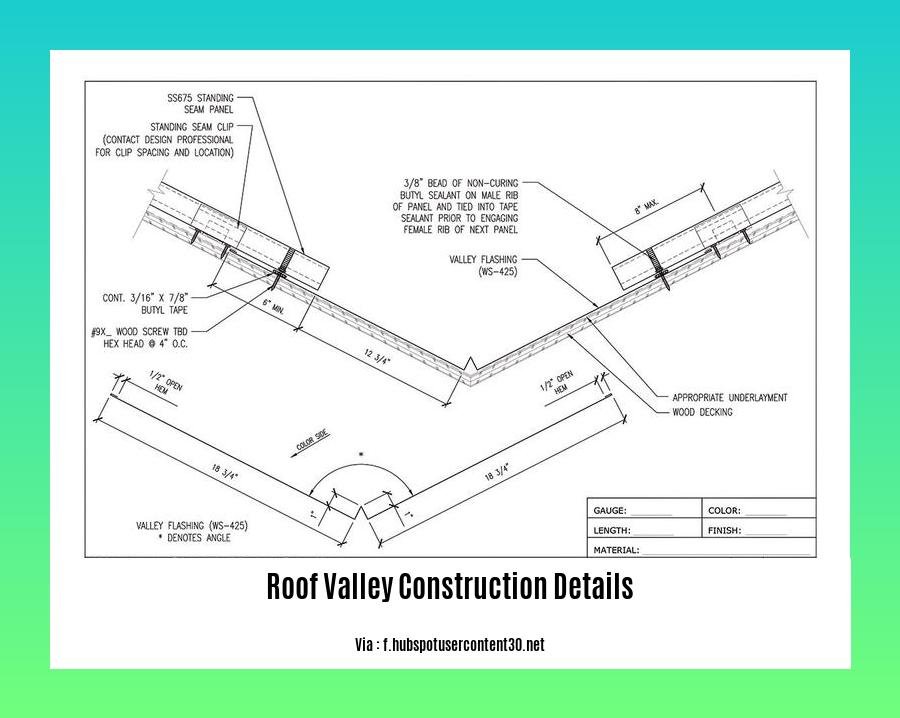
Key Construction Details:
- Materials: Roofing shingles or flashing material with a minimum of four courses.
- Flashing: Essential to prevent leaks at the roof’s connection points.
- Underlayment: Installed beneath flashing and roofing material for added protection.
- Angle: Determined by the roof’s slope, affecting the angle of flashing and underlayment.
- Woven Shingle Valleys: Suitable only for three-tab shingles, requiring specialized installation techniques.
Steps for Proper Valley Construction:
- Install underlayment at the valley’s center.
- Place flashing over the underlayment and secure it.
- Install roofing material on both sides of the valley, overlapping the flashing.
- Add additional layers of roofing material or flashing for increased protection.
Tips for Success:
- Inspect Regularly: Check for signs of damage, such as cracks or leaks, and repair them promptly.
- Clean Valleys: Remove debris and vegetation to prevent water blockage.
- Consider Climate: Choose valley construction methods suitable for your local climate conditions.
By following these essential construction details, you can ensure that your roof valley performs optimally, keeping your home protected from the elements for years to come.
Check out our extensive inventory of road construction equipment to find the perfect tools for your project.
Explore the various road construction materials we offer, ensuring durability and longevity for your infrastructure projects.
Access our road construction service to leverage our expertise in planning, design, and execution of your road projects.
Learn about the intricate steps involved in roof construction process and the factors to consider for a successful installation.
Discover the innovative techniques and materials used in roof truss construction, providing structural integrity and aesthetic appeal to your roofing system.
Delve into the technical details and best practices for roof valley gutter construction to ensure proper drainage and prevent water damage to your property.
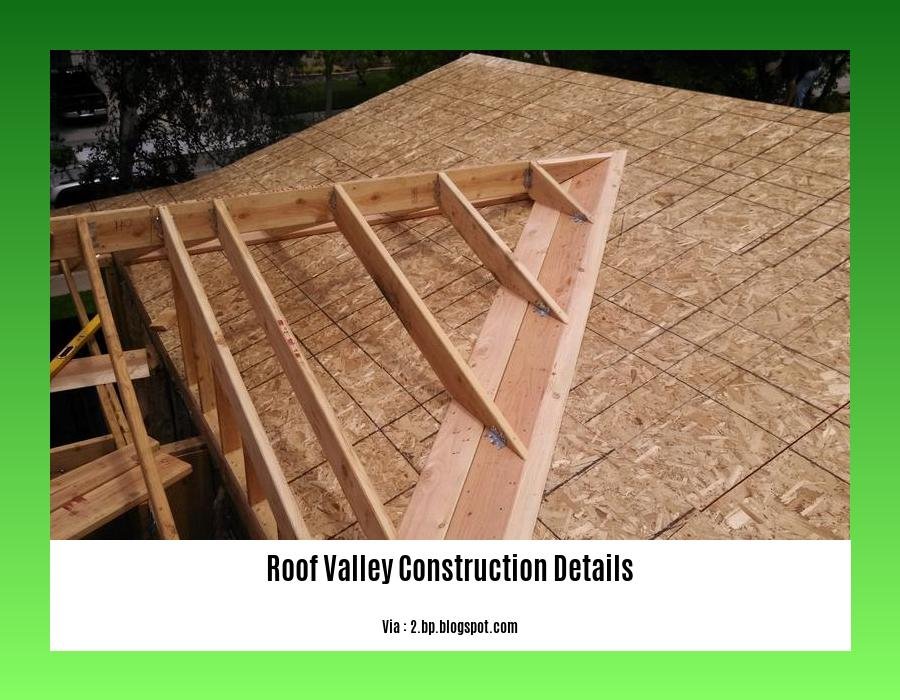
Step-by-Step Guide to Installing a Roof Valley

Installing a roof valley requires precise measurements, proper flashing, and skilled shingle placement. Follow these steps to ensure a watertight and aesthetically pleasing valley:
Key Takeaways:
- Plan meticulously: Determine the valley dimensions and mark them accurately.
- Protect your roof: Install underlayment paper to prevent leaks.
- Secure the flashing: Center the valley flashing over the underlayment and nail it firmly.
- Lay the shingles: Start from the bottom and overlap the shingles slightly, nailing them securely.
- Cut and fit: Measure and cut the shingles to fit the valley shape, leaving no gaps.
- Seal and protect: Nail the cut shingles in place, install a ridge cap, and inspect for any leaks.
Materials:
- Shingles
- Valley flashing
- Roofing nails
- Underlayment paper
Tools:
- Measuring tape
- Chalk line
- Roofing hammer
- Utility knife
Step-by-Step Instructions:
1. Measure and Mark:
– Determine the valley location and size.
– Mark the valley edges using a chalk line or felt.
2. Install Underlayment:
– Apply underlayment paper over the valley area.
– Overlap it and secure it with nails to prevent moisture penetration.
3. Install Valley Flashing:
– Cut the valley flashing to the required length.
– Center it over the underlayment and nail it along the edges and center.
4. Lay Shingles:
– Begin from the valley bottom and lay shingles upwards.
– Overlap the shingles slightly and nail them securely.
5. Cut and Fit Shingles:
– Measure and cut the shingles to conform to the valley shape.
– Use a utility knife for precise cuts.
6. Secure Shingles:
– Nail the cut shingles into the underlayment.
– Ensure they fit flush against the valley flashing.
7. Install Ridge Cap:
– Cut the ridge cap to match the valley ridge length.
– Center it over the valley and nail it in place.
8. Clean Up:
– Remove debris and excess nails from the roof.
– Inspect the valley for any gaps or leaks.
9. Activate Shingles:
– Activate any self-sealing shingles or apply sealant to further enhance the valley’s watertightness.
Citations:
- How to Roof a Valley
- How to Properly Install a Roof Valley
Techniques for Repairing Roof Valleys
Hey there! I’ve been a roofer for over a decade, and I’ve seen my fair share of roof valley problems. Don’t worry; I’ll guide you through some tried-and-true techniques to fix those pesky leaks and restore your roof’s integrity.
Common Roof Valley Issues
- Leaks: Water seeping through can point to damaged flashing or shingles.
- Debris: Leaves and twigs blocking valleys prevent water flow.
- Corrosion: Metal flashing can rust over time, weakening its protection.
- Damaged shingles: Hail or wind can tear shingles, creating entry points for water.
- Loose underlayment: Worn-out underlayment allows water to reach the roof deck.
Repair Methods
- Repair or Replace Damaged Materials: Replace damaged shingles or flashing to seal the roof.
- Tighten Underlayment: Staple or nail loose underlayment to prevent leaks.
- Install Ice and Water Shield: Add extra protection by installing this under the shingles.
- Debris Removal: Regularly remove debris from valleys to avoid blockages.
- Inspect and Caulk: Seal any cracks or gaps in flashing with caulk.
Key Takeaways:
- Common roof valley problems include leaks, debris buildup, corrosion, damaged shingles, and loose underlayment.
- Repair techniques involve replacing damaged materials, tightening underlayment, installing ice and water shield, removing debris, and inspecting and caulking.
- Regular maintenance, including debris removal and inspections, helps prevent costly repairs.
Relevant URL Sources:
- How to Repair a Roof Valley Leak | Roofing Megastore
- Common Problems with Roof Valleys and How to Fix Them
Tips for Ensuring Optimal Performance and Longevity
Hey there, roofing enthusiasts!
Let’s dive into the world of roof valleys and explore how to keep them at their best.
1. Material Matters:
Choosing the right roof valley material is key. Opt for materials that withstand temperature swings, UV rays, and water damage! Corrosion-resistant metals and durable shingles are your best bets.
2. Proper Installation:
Follow these steps for a solid roof valley installation:
- Install underlayment: Ice and water shield underlayment provides extra protection against leaks.
- Valley flashing: Metal flashing covers the valley, directing water away. Nail it securely in place.
- Lay shingles: Overlap shingles on both sides of the valley to prevent water penetration.
3. Regular Maintenance:
Love your roof valleys and they’ll love you back!
- Clear debris: Remove leaves and twigs. Clogged valleys hinder water flow.
- Inspect regularly: Look for cracks, loose shingles, or corrosion. Nip repairs in the bud!
4. Valley Types:
- Closed valleys: Shingles completely cover the valley, offering maximum protection.
- Open valleys: Shingles don’t cover the valley, allowing water to flow through an open gap.
5. Expert Tips:
- Use woven shingle valleys: They’re ideal for three-tab shingles.
- Consider local climate: Adapt construction methods to your area’s weather conditions.
Key Takeaways:
- Choose durable, weather-resistant materials.
- Follow proper installation steps.
- Perform regular maintenance to avoid leaks.
- Understand different valley types, like closed and open valleys.
- Seek professional advice from an experienced roofing contractor to ensure optimal performance.
Relevant URL Sources:
Roof Valley Guide: Comprehensive Information on Roof Valleys
Ensuring Optimal Performance and Longevity of Roof Valleys
FAQ
Q1: What are the different types of roof valleys?
Q2: What materials are used for roof valley construction?
Q3: How is a closed-cut roof valley installed?
Q4: What are the common problems that can occur with roof valleys?
Q5: How can roof valleys be maintained and repaired?

- Doubling 1/3 Cup: Quick Answer and Easy Kitchen Conversions - March 22, 2025
- J Middleton Unit (Abilene, TX): Inmate Search, Visitation, and Contact Information - March 22, 2025
- Ivermectin Dosage for Dogs: A Weight-Based Guide - March 22, 2025