Delving into the intricate world of roof valley gutter construction, this article unravels the secrets of crafting high-performing gutters that safeguard your roof from water damage. Explore essential details, including material selection, optimal sizing, precise placement, and seamless integration with roofing systems. Whether you’re a homeowner tackling a DIY project or a contractor seeking expert insights, this guide to [Essential Roof Valley Gutter Construction Details for Optimal Performance] empowers you with the knowledge to ensure your gutters stand the test of time and weather the storms.
Key Takeaways:
- Minimum roof slope for valley gutters: 12.5 degrees
- Valley gutter side angle: 16.5 degrees
- Maximum catchment area: 20m2
- Girths < 400mm allowed for rainfall intensities < 300 mm/hour
- Minimum valley gutter width for roofs with pitch > 12.5 degrees: 400mm
- Minimum roof covering overhang on each side of the valley gutter: 150mm for roofs with pitch > 12.5 degrees
- Roofs with pitch < 12.5 degrees must be designed as box gutters
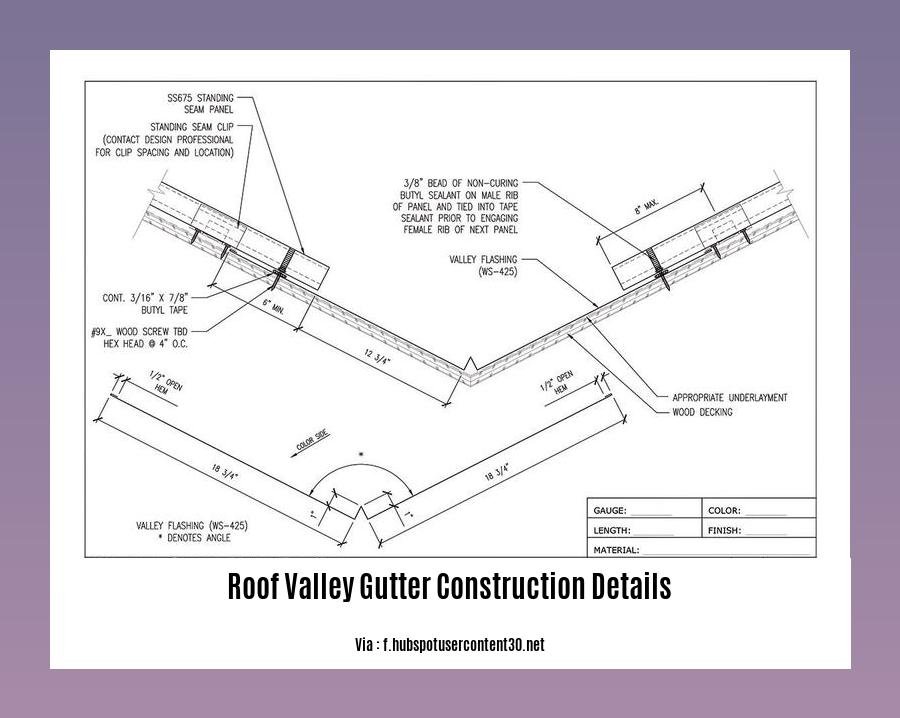
- Effective cross-sectional areas of 400mm, 450mm, and 500mm wide valley gutters with 150mm overhang on each side:
- 400mm: 200cm2
- 450mm: 225cm2
- 500mm: 250cm2
Roof Valley Gutter Construction Details
As a construction professional with years of experience in roof valley gutter construction details, I’ve learned the ins and outs of designing and installing these critical components. Here’s a guide to help you understand and build an effective valley gutter system for your roof.
Valley Gutter Design Considerations
When designing a valley gutter, these key factors come into play:
- Roof slope: The minimum slope for a valley gutter is typically 12.5 degrees.
- Valley gutter side angle: The optimal angle for valley gutter sides is 16.5 degrees.
- Catchment area: The maximum catchment area for a valley gutter is generally 20m2.
Materials for Valley Gutters
Valley gutters can be made from various materials, each with its pros and cons:
- Galvanized steel: Durable, affordable, and widely available.
- Copper: Long-lasting, corrosion-resistant, but more expensive.
- Aluminum: Lightweight, rust-resistant, but slightly weaker than steel.
Valley Gutter Installation Steps
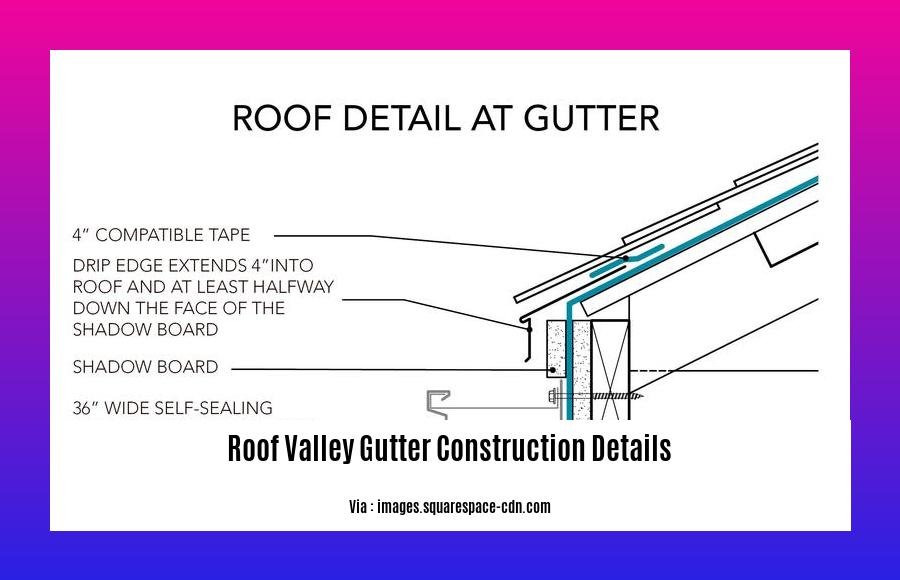
- Prepare the roof: Ensure the roof surface is clean and free of debris. Install drip edge along the eaves and rakes.
- Mark and cut the valley: Determine the center of the valley and mark the location of the valley gutter. Cut the roofing material along the marked line.
- Install the valley gutter: Bend the valley gutter to the desired shape and secure it with nails or screws.
- Overhang and flashing: Extend the valley gutter past the roof edge by at least 150mm on each side. Install flashing under the valley gutter and up the roof to prevent leaks.
- Join gutter sections: If the valley gutter is too long, join the sections together using crimps or rivets. Ensure a watertight seal.
- Connect to downspouts: Install downspouts at the low point of the valley gutter to discharge water.
Troubleshooting Valley Gutter Issues
- Leaking valley gutters: Check for damaged or loose flashing, holes in the gutter, or improper installation.
- Clogged valley gutters: Remove debris and leaves that can obstruct water flow.
- Inadequate water discharge: Ensure the gutter is wide enough and has sufficient downspouts to handle the water runoff.
By following these roof valley gutter construction details, you can create a durable and efficient system that protects your roof from water damage and improves its overall performance. Remember to consult a roofing professional for complex installations or if you encounter any issues.
If you are thinking to build or reconstruct a road, you may already know how expensive this project can potentially be. Therefore, it is in your best interest to get the most out of your investment. Learn more about the latest road construction equipment list that will get the job done in a safe, and timely manner.
The materials that go into building a road can greatly impact its quality and longevity. Before embarking on this journey, it is essential to understand the road construction materials that will be most appropriate for your specific needs.
With a myriad of options available, it can be overwhelming to choose the right road construction service for your project. Fortunately, we have compiled some key tips to aid you in finding the best contractor for your unique requirements.
Whether you’re a homeowner looking to add a new roof or a contractor planning a commercial project, understanding the roof construction process can be highly beneficial. In this comprehensive guide, we’ll walk you through the steps involved and provide insightful tips to ensure a successful outcome.
If you’re looking to add a touch of sophistication and style to your home, roof truss construction is a great option. Not only do they provide excellent structural support, but they also create a visually appealing aesthetic that can enhance any property.
When it comes to designing a roof, the roof valley construction details are crucial to ensure structural integrity and prevent water damage. Understanding the key components, materials, and installation techniques will help you build a robust and reliable roof.
Integration with Roofing System
When integrating valley gutters with your roofing system, it’s crucial to consider these key points for optimal performance:
Key Takeaways:
- Valley gutters should be installed in roof valleys where two roof slopes meet.
- Ensure a minimum valley gutter depth for efficient water drainage.
- Closed-cut valley gutters offer durability by combining underlayment, felt, shingles, or tiles.
Steps for Proper Integration:
-
Valley Location: Identify the valley where the roof slopes intersect and mark the installation area.
-
Underlayment Installation: Install a waterproof underlayment in the valley to prevent leaks.
-
Felt Layer: Layer roofing felt over the underlayment to provide an additional moisture barrier.
-
Valley Gutter Placement: Position the valley gutter in the valley, ensuring it fits snugly and slopes towards the downspout.
-
Securing the Gutter: Fasten the valley gutter securely using nails or other appropriate fasteners.
-
Shingle or Tile Installation: Install shingles or tiles over the valley gutter, overlapping them onto the gutter for complete coverage and watertightness.
-
Flashing Installation: Add flashing around the valley gutter to prevent water penetration and ensure durability.
By following these steps and incorporating the knowledge of valley gutter construction details, you can integrate them seamlessly with your roofing system for enhanced protection and functionality.
Relevant Sources:
- Roof Valley Flashing Specifications and Details
- Navigating the Valleys: A Focus on Efficient Valley Gutter Design
Different Roof Types and Configurations
In residential and commercial properties, there’s no “one size fits all” approach with different roof types and configurations. In fact, the architectural design, local climate, and building codes all play a role in determining the best type of roof for a particular structure.
When it comes to roof valley gutters, their design and installation must complement different roof types and configurations. These gutters are crucial for collecting rainwater and preventing it from seeping into the roof structure, making them an essential component of any roofing system.
Key Takeaways:
- Different roof types and configurations require specific valley gutter designs and installation techniques.
- Understanding the unique characteristics of each roof type is essential for proper valley gutter installation.
- Proper valley gutter installation ensures optimal water drainage and prevents roof damage.
Citation:
1. What is Roof Valley Gutter? (Types, Installation, and More)
2. Design Right Valley Gutters
Installation Tips and Best Practices for Roof Valley Gutters
Here are some valuable tips and best practices for installing roof valley gutters to ensure optimal performance and durability:
Key Takeaways:
- Proper valley gutter design is crucial for efficient water drainage and protection against water damage.
- Material selection should consider factors like durability, cost, and aesthetics to match the specific roofing system.
- Precise installation involves thorough preparation, accurate measurements, and secure fastening to prevent leaks.
- Regular maintenance is essential to keep the valley gutters free of debris and ensure proper water flow.
- Addressing potential issues like leaks or clogs promptly is vital to maintain the integrity of the roofing system.
Professional Installation Steps:
Step 1: Preparation
- Ensure the roof pitch exceeds 8 degrees, meeting the minimum requirement for valley gutters.
- Remove old or damaged valley gutters, and inspect the underlying roof for any repairs.
Step 2: Measurements and Cutting
- Measure the valley accurately to determine the length of the valley gutter required.
- Cut the gutter to the correct size using a sheet metal saw or shears.
Step 3: Installation
- Position the valley gutter in place and secure it using roofing nails or screws.
- Provide proper overhang at the edges to prevent water from spilling over.
Step 4: Joining and Sealing
- Join multiple valley gutter sections together using a sealant or sealant tape.
- Apply flashing around the edges of the valley gutter to prevent leaks.
Step 5: Downspout Connection
- Connect the valley gutter to downspouts to channel water away from the roof.
- Use downspout elbows or bends to direct water where needed.
Maintenance Tips:
- Regularly inspect the valley gutters for clogs or debris that may impede water flow.
- Clean the gutters thoroughly to prevent buildup and potential damage.
- Check for leaks or damage and address them promptly to maintain the gutter’s functionality.
Common Pros and Cons:
Pros:
- Efficient water channeling reduces the risk of roof leaks.
- Extends the lifespan of the roof by preventing water penetration.
- Adds aesthetic appeal to the roofline.
Cons:
- Installation can be complex and time-consuming.
- Regular maintenance and cleaning are required to prevent clogs.
- Potential for leaks if not installed or maintained properly.
Relevant URL Sources:
- Requirements for Valley Gutters
- What is Roof Valley Gutter?
FAQ
Q1: What are the different types of roof valley gutters?
A1: There are two main types of roof valley gutters: open valley and closed valley. Open valley gutters have a V-shaped channel, while closed valley gutters have a flat channel.
Q2: What are the benefits of installing a roof valley gutter?
A2: Roof valley gutters help to prevent water damage by channeling water away from the roof. They can also increase the lifespan of the roof by preventing leaks.
Q3: What are the minimum requirements for a roof valley gutter?
A3: The minimum requirements for a roof valley gutter are that the roof pitch must be greater than 8 degrees, the minimum depth must be 50 mm at the center, and the minimum width must be 250 mm.
Q4: How do I install a roof valley gutter?
A4: To install a roof valley gutter, you will need to measure the valley, purchase an appropriate gutter system, remove the old gutter and inspect the roof, install an underlayment, and install gutter hangers.
Q5: How do I maintain a roof valley gutter?
A5: To maintain a roof valley gutter, you should clean it regularly to remove debris and inspect it for any damage.

- Doubling 1/3 Cup: Quick Answer and Easy Kitchen Conversions - March 22, 2025
- J Middleton Unit (Abilene, TX): Inmate Search, Visitation, and Contact Information - March 22, 2025
- Ivermectin Dosage for Dogs: A Weight-Based Guide - March 22, 2025