Want to add a touch of timeless elegance and architectural charm to your home without breaking the bank? Board and batten wainscoting might be the perfect solution. This comprehensive guide covers everything from the historical roots of board and batten to modern design applications, detailed DIY installation instructions, and inspiring ideas to transform your space. Whether you’re a seasoned DIY enthusiast or just starting your home improvement journey, we’ll empower you to confidently tackle this project and achieve stunning results.
Understanding Board and Batten Wainscoting
What is Board and Batten Wainscoting?
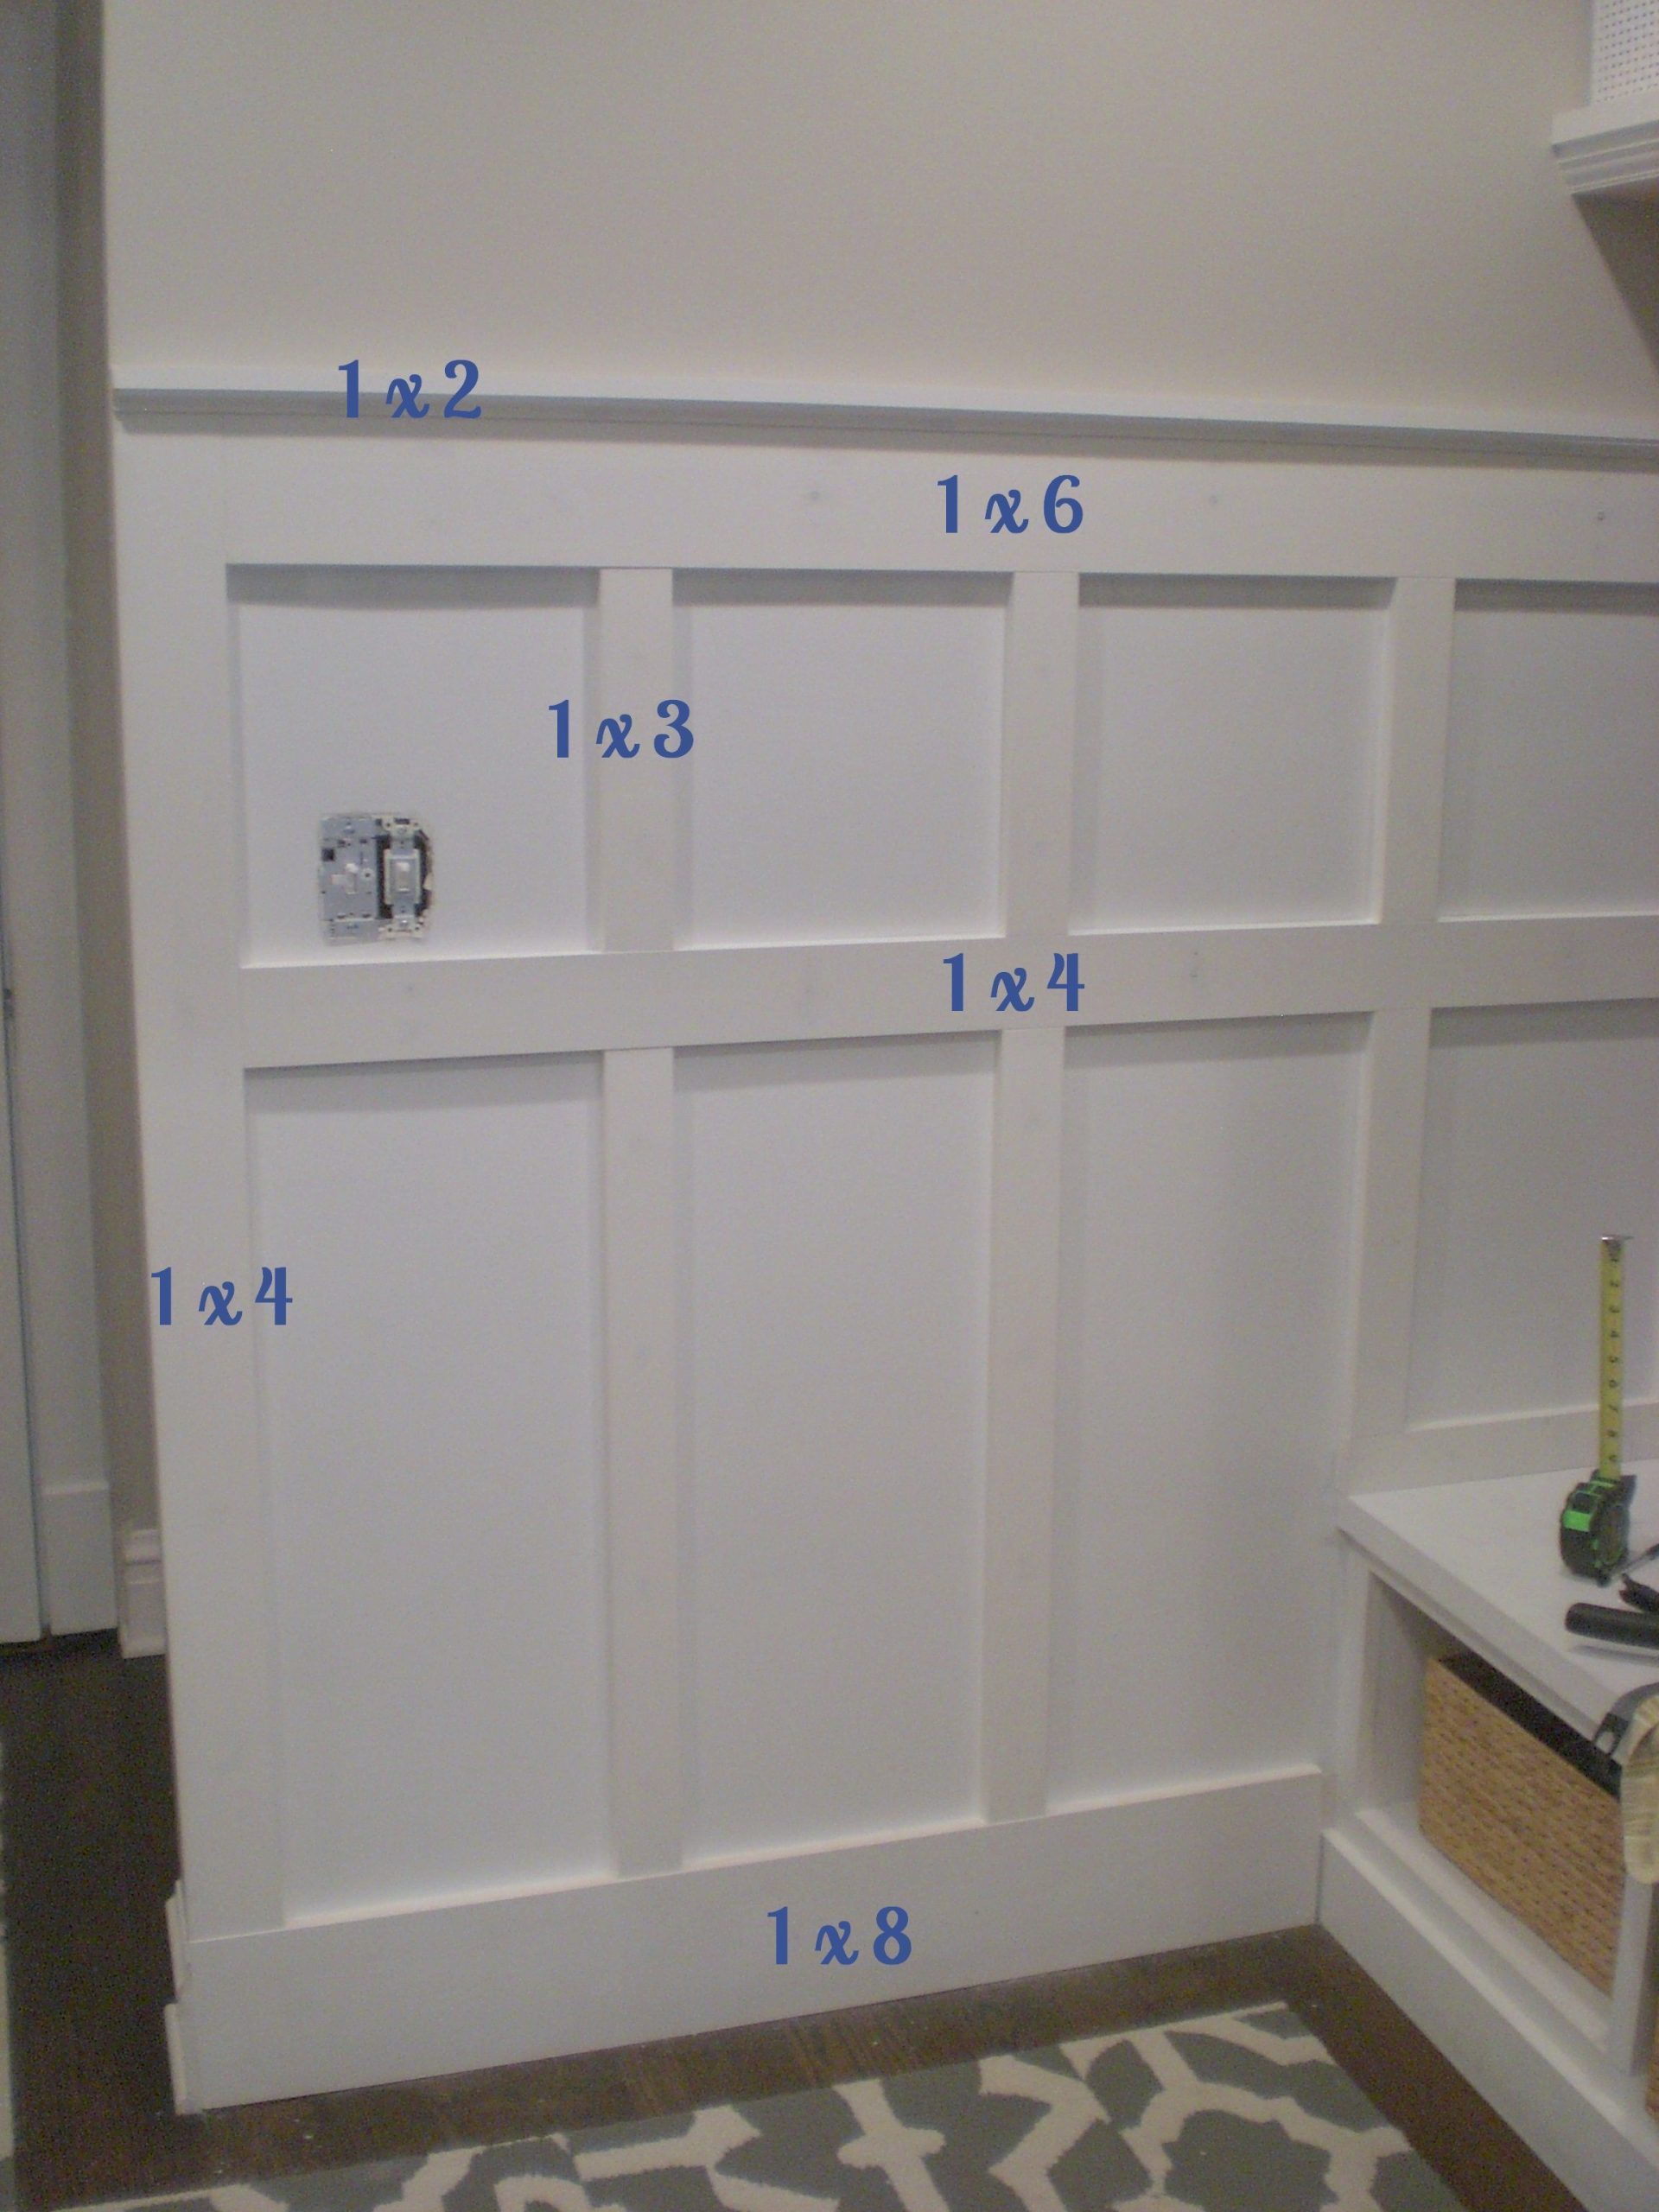
Board and batten wainscoting, a distinctive style of wall paneling, traces its origins back to a time when it served a primarily functional purpose – sealing gaps between uneven wall boards in homes built with simpler construction methods. Commonly found in Craftsman and Shaker-style homes, it’s characterized by vertical wooden boards (the “boards”) adorned with thinner horizontal strips (the “battens”) covering the seams. This creates a clean, defined look that adds depth and texture to walls. Today, board and batten is less about practicality and more about aesthetics, offering a charming, versatile design element suitable for various interior styles.
Why Choose Board and Batten?
Board and batten wainscoting isn’t merely decorative; it offers several practical advantages:
- Wall Protection: It acts as a shield against everyday wear and tear, especially in high-traffic areas like hallways and dining rooms. Imagine kids’ toys bumping against the wall – board and batten can help minimize the damage.
- Enhanced Visual Appeal: It adds architectural interest and dimension to otherwise plain walls, instantly elevating a room’s style.
- Illusion of Height: The vertical lines of the boards can visually stretch a room, making low ceilings appear higher.
- Cost-Effectiveness: It’s a relatively budget-friendly way to upgrade your home’s interior, offering a significant return on investment.
- DIY-Friendly Installation: With basic tools and a little patience, you can likely install board and batten yourself, saving on labor costs.
Designing with Board and Batten
Style Adaptability
One of the greatest strengths of board and batten wainscoting is its versatility. From rustic farmhouse to sleek contemporary, it seamlessly integrates into a wide range of design aesthetics. Achieving different looks is simply a matter of adjusting a few key elements:
- Batten Width and Spacing: Wider battens spaced closer together create a more traditional or farmhouse feel. Narrower battens with wider spacing lend a modern, minimalist touch.
- Board Width: Wider boards can create a bolder statement, while narrower boards offer a more refined appearance.
- Color and Finish: The choice of paint or stain dramatically impacts the overall style. A classic white paint creates a crisp, clean look, while a rich wood stain adds warmth and rustic charm. Bold paint colors offer a modern and playful touch. Consider using contrasting colors for the boards and battens to create a striking visual effect.
Creative Applications
Board and batten wainscoting isn’t limited to just covering the lower portion of walls. Think outside the box and explore these creative applications:
- Full-Wall Installations: Cover an entire wall for a dramatic and cohesive look.
- Accent Walls: Use board and batten to highlight a specific area or create a focal point.
- Stairways and Hallways: Add architectural interest and visual continuity to these transitional spaces.
- Around Windows and Doorways: Frame windows and doorways to enhance their architectural details.
- Combined with Other Materials: Pair board and batten with stone, tile, or wallpaper for a unique and textured look.
- Furniture Integration: Consider incorporating board and batten into furniture pieces like headboards, built-in bookshelves, or kitchen islands for a cohesive design.
Looking to elevate your interiors with a touch of classic charm? Discover the timeless appeal of beadboard paneling and explore the versatile design options offered by bead board panel for a sophisticated upgrade to any space.
DIY Installation: A Step-by-Step Guide
Ready to transform your space with board and batten wainscoting? This step-by-step guide will walk you through the process:
Step 1: Planning and Measuring
Accurate measurements are the foundation of a successful installation. Measure the area to be covered, decide on the desired height of the wainscoting (typically around 32 inches), and determine the spacing for your boards and battens. Sketching your design on paper can help visualize the final result and catch any potential issues before you begin.
Step 2: Gathering Your Supplies
Head to your local hardware store and gather the following materials:
- Boards: MDF (medium-density fiberboard) is a cost-effective and popular choice, but you can also use solid wood. Consider sustainable options like reclaimed wood or FSC-certified lumber.
- Battens: Choose thinner strips of wood or MDF for the battens.
- Adhesive: Construction adhesive is essential for securing the boards and battens to the wall.
- Fasteners: A nail gun makes installation quicker, but you can also use finishing nails and a hammer.
- Caulk: High-quality caulk is essential for creating a seamless and professional finish.
- Paint or Stain: Choose a finish that complements your décor and personal style. Opt for low-VOC paints for a more environmentally friendly option.
- Tools: Measuring tape, level, saw (for cutting boards and battens), safety glasses, dust mask, pencil.
Step 3: Preparing Your Walls
Clean the walls thoroughly to remove any dust or debris. Patch any holes or imperfections with spackle and sand smooth for a flawless finish. If your walls are uneven, use shims to create a level surface before installing the boards.
Step 4: Installing the Boards
Apply construction adhesive to the back of each board and secure it to the wall with nails or a nail gun. Use a level frequently to ensure the boards are perfectly plumb (straight up and down). Maintain consistent spacing between the boards using spacers for uniformity.
Step 5: Attaching the Battens
Measure and cut the battens to the correct length. Apply adhesive to the back of each batten and secure it over the seams between the boards, covering the joints. Again, use a level to ensure they are straight.
Step 6: Caulking and Finishing
Caulk all seams and nail holes to create a seamless, polished look. This also helps prevent moisture damage. Allow the caulk to dry completely before applying your chosen paint or stain. Apply multiple thin coats for a professional finish.
Cost and Maintenance
Cost Considerations
Board and batten wainscoting is generally a budget-friendly upgrade. Factors affecting cost include the materials you choose (MDF is typically less expensive than solid wood), the size of your project, and whether you choose to DIY or hire a professional. DIY installation significantly reduces labor costs, making this project accessible to many homeowners.
Maintenance
Maintaining your board and batten wainscoting is easy. Regularly wipe it down with a damp cloth to remove dust and dirt. For painted surfaces, you can use a mild cleaning solution if needed. Avoid harsh chemicals that could damage the finish.
Comparing Board and Batten with Other Wainscoting Styles
How does board and batten stack up against other popular wainscoting options? Here’s a quick comparison:
| Feature | Board and Batten | Beadboard | Flat Panel | Raised Panel | Shiplap |
|---|---|---|---|---|---|
| Style | Rustic, Farmhouse, Modern, Transitional | Cottage, Traditional | Classic, Versatile | Formal, Traditional | Rustic, Modern |
| Installation | DIY-friendly | Moderate | DIY-friendly | More challenging | Moderate |
| Cost | Typically Lower | Mid-Range | Typically Lower | Typically Higher | Mid-Range |
| Maintenance | Low | Low | Low | Low | Low |
| Appearance | Vertical boards with battens covering seams | Vertical grooves | Smooth, flat panels | Raised panels with bevels | Overlapping horizontal boards |
Addressing Common Questions
What’s the difference between board and batten and wainscoting?
Board and batten is a type of wainscoting. Wainscoting is the broader term for decorative wall coverings applied to the lower portion of a wall. Board and batten is a specific style of wainscoting characterized by its vertical boards and battens.
Can I combine board and batten with other wainscoting styles?
Absolutely! You can mix and match elements from different wainscoting styles to create a unique and personalized look. For example, you could incorporate board and batten on one wall and beadboard on another, or combine board and batten with a chair rail.
Is board and batten outdated?
Definitely not! Board and batten’s classic and adaptable design has enduring appeal. While specific trends within the broader board and batten style might evolve, the core elements of vertical boards and battens provide a timeless foundation that can be adapted to suit changing tastes.
Troubleshooting Tips
- Uneven Walls: Use shims to create a level surface before installing the boards. This is crucial for achieving a professional finish.
- Obstacles (Outlets, Light Switches): Carefully measure and cut the boards to fit snugly around these obstacles.
- Gaps Between Boards: Ensure boards are tightly butted together during installation. Caulk will fill any minor gaps, but larger gaps may require additional wood filler.
“Board and batten will remain a popular wall treatment this year.” – A House in the Hills
With its blend of classic charm and modern versatility, board and batten wainscoting offers a transformative upgrade for any home. By following this guide, you can confidently tackle this DIY project and create a space you’ll love for years to come.
- Memorial Stones for Gardens: A Guide to Creating a Lasting Tribute - April 29, 2025
- Melon Cut Diamonds: A Comprehensive Guide - April 29, 2025
- MarketStreet Lynnfield Stores: A Complete Directory & Shopping Guide - April 29, 2025


