Want to transform your home without a complete renovation? The secret’s above you! Ceiling trim is the key to turning ordinary rooms into stunning spaces. This guide walks you through choosing the perfect trim, expert installation techniques, and styling tips to match your unique taste. Get ready to elevate your ceilings from basic to breathtaking!
Unveiling the Power of Ceiling Trim
Ever wonder why some rooms just feel more finished? Ceiling trim might be the answer! Think of it like a frame for your walls and ceiling, pulling the entire look together.
Instead of a stark line where walls meet the ceiling, trim introduces character and polish. It’s that final touch that elevates the entire space.
A World of Trim Styles Awaits
Ceiling trim comes in a surprising variety of styles, each with its own personality:
- Crown Molding: The reigning champion of elegance, known for ornate details and a timeless, upscale aesthetic.
- Cove Molding: Prefer a subtler touch? Cove molding blends seamlessly into the ceiling, offering a modern yet refined feel.
- Cornice Molding: This style is all about making a statement! Larger and often intricately designed, it commands attention.
- Picture Rail Molding: More than just good looks, this trim sits lower on the wall, providing a stylish solution for hanging artwork without damaging walls.
Why Choose Ceiling Trim?
It might seem like a small detail, but the impact is significant:
- Instant Sophistication: Ceiling trim adds depth and dimension, tricking the eye into perceiving a grander, more luxurious space.
- Increased Home Value: This simple upgrade is a smart investment, potentially boosting your home’s value and appeal to future buyers.
- Design Versatility: Whether your style is classic, modern, or somewhere in between, there’s a ceiling trim to complement your vision.
- Budget-Friendly Transformation: Compared to major renovations, ceiling trim offers a high-impact visual change at a relatively affordable price.
Finding Your Perfect Trim Match
Navigating the world of ceiling trim can feel overwhelming, but considering these factors will guide you to the ideal choice:
- Embrace Your Style: Do you gravitate towards ornate traditional designs or sleek modern lines? Let your personal aesthetic lead the way.
- Room Size Matters: Large rooms can handle bolder, more substantial molding, while smaller spaces benefit from a lighter touch.
- Ceiling Height Considerations: High ceilings offer the freedom to explore dramatic trim styles, while lower ceilings might call for a simpler profile to avoid a cramped feel.
Here’s a quick reference guide:
| Style | Description | Best For |
|---|---|---|
| Traditional | Ornate crown molding with intricate details | Classic and formal spaces |
| Modern | Clean lines and sleek profiles | Contemporary and minimalist homes |
| Minimalist | Simple and understated designs | Small spaces or rooms with low ceilings |
DIY or Call in the Pros?
Installing basic ceiling trim is achievable for many homeowners with the right tools and a little patience. However, if you’re dealing with complex designs or aren’t comfortable with power tools, calling a professional is always a wise choice.
Creative Ceiling Trim Ideas
Don’t be afraid to think outside the box!
- A Pop of Color: Highlight those beautiful trim details with a contrasting paint color for a bold statement.
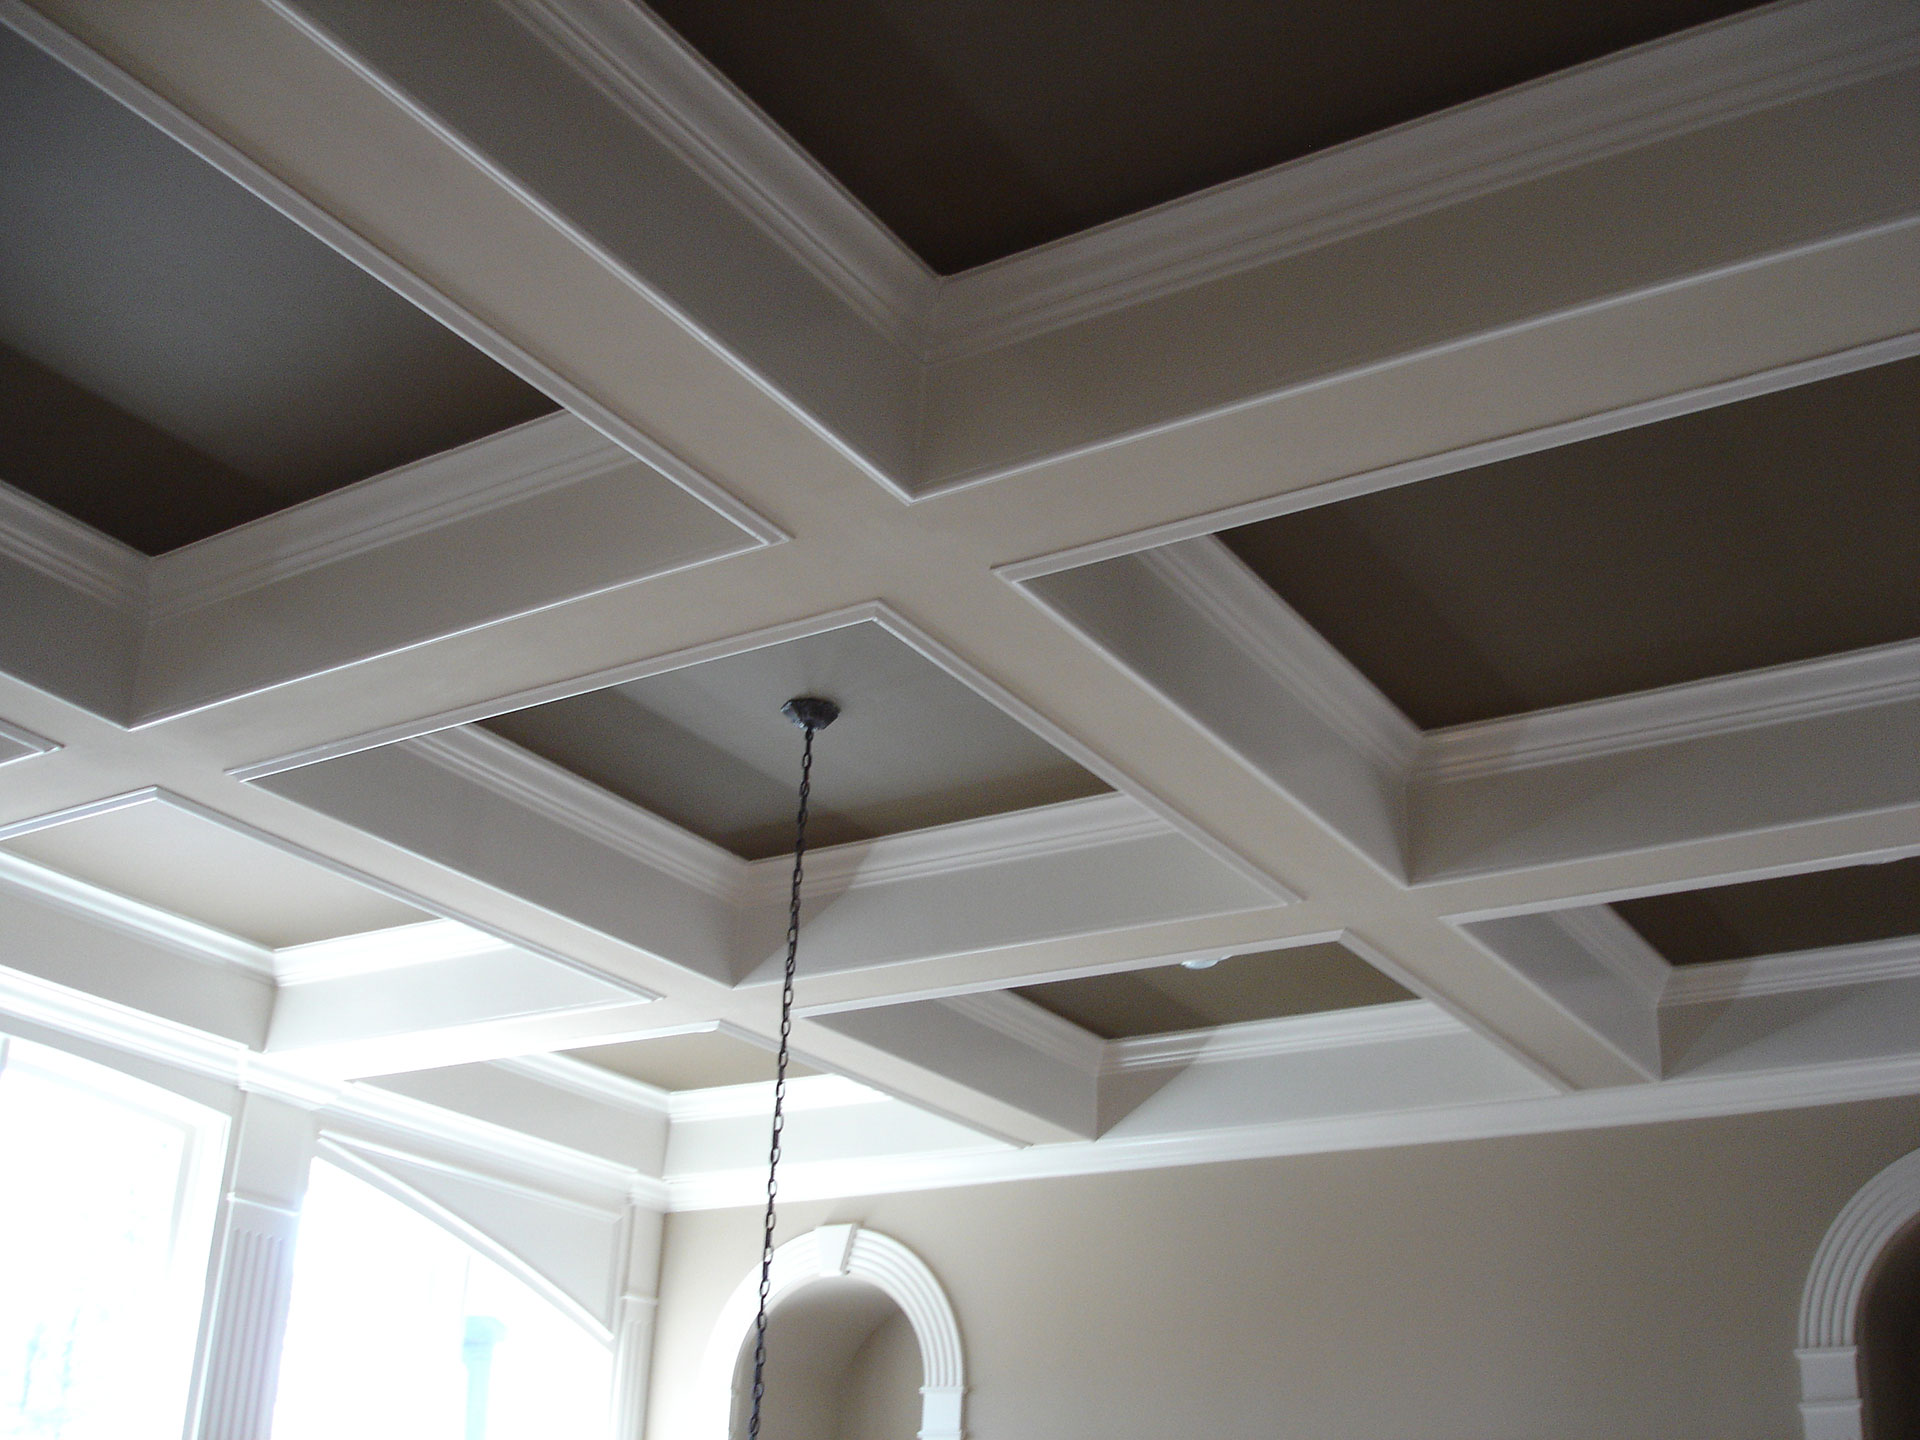
- Coffered Ceiling Dreams: Create a luxurious, architectural feel by installing decorative trim in a grid pattern to form a coffered ceiling.
- The Magic of Cove Lighting: Install cove lighting behind your ceiling trim for a soft, ambient glow that adds warmth and elegance.
Common Ceiling Trim FAQs
- What are some trending ceiling trim ideas? Beyond the classics, explore tin tiles for vintage charm or paint your trim a bold color for a personalized touch. For more inspiration, explore our ceiling decoration ideas gallery.
- How do I find the perfect trim for my home? Consider your personal style, room dimensions, ceiling height, and budget to narrow down the options.
- Is ceiling trim a worthwhile investment? Absolutely! It adds value, enhances beauty, and opens up a world of design possibilities. You can see just how impactful the right ceiling design can be.
Adding ceiling trim is like giving your home a mini facelift—a simple upgrade that can completely transform the look and feel of your space. Take the leap and discover the dramatic difference it can make!
Demystifying Ceiling Trim Terminology
So, you’re admiring that elegant detail where the wall meets the ceiling. But what’s it actually called? Don’t worry, you’re not alone in wondering!
That, my friend, is ceiling trim, sometimes referred to as ceiling molding. Just like a frame elevates a picture, ceiling trim adds that final, polished touch to your rooms. But it’s not just about aesthetics! This clever design element also conceals imperfections where the wall and ceiling meet.
Now, let’s break down the different types you’re likely to encounter:
- Crown molding is the most common type, known for its elegant, often intricate, profile that instantly elevates a room’s sophistication.
- Cove molding offers a more understated approach. Its simple, concave shape adds a touch of elegance without being overly ornate.
- Cornice molding, similar to crown molding, is often used specifically above cabinets, ensuring a smooth transition between the two.
But why bother with ceiling trim at all? Aside from the undeniable visual appeal, there are some key benefits:
- Visual Interest: Walls and ceilings alone can feel static. Ceiling trim injects architectural detail, creating a more dynamic and engaging space.
- Wall Protection: Think of it as a stylish bodyguard for your walls! Trim helps prevent scuffs and scratches, especially in high-traffic areas.
- Master of Disguise: Remember those imperfections we mentioned? Ceiling trim artfully conceals them, ensuring a flawless finish.
When choosing ceiling trim, consider the room’s overall style. Ornate crown molding suits traditional spaces, while sleek cove molding complements modern aesthetics. Room size and ceiling height also play a role. Bolder trim balances high ceilings, while smaller rooms benefit from more delicate moldings.
Now you’re fluent in the language of ceiling trim! Who knew such a simple detail could have such a transformative effect?
Budget-Friendly Ceiling Finishes: Stunning Results Without Breaking the Bank
Dreaming of a ceiling makeover without the hefty price tag? You’re in the right place! It turns out the most budget-friendly solution is often the simplest—a fresh coat of paint.
Paint is incredibly versatile, easily applied to various ceiling materials. And the best part? It’s a project most homeowners can tackle themselves, saving even more money on labor costs.
If your ceiling is in decent condition, a thorough cleaning followed by a fresh coat of paint might be all you need. However, if you spot imperfections, don’t worry! Minor repairs are easily addressed before you pick up a paintbrush.
Let’s get that ceiling prepped and painted:
- Clean Sweep: Grab a damp cloth and give your ceiling a good cleaning to remove dust and cobwebs that can interfere with paint adhesion.
- Patchwork: Don’t let holes or cracks intimidate you! Fill them in with spackling paste (available at any hardware store) using a putty knife.
- Smooth Operator: Once the spackling paste dries, lightly sand it for a smooth, even surface.
- Prime Time: A coat of primer is crucial! It creates a smooth base for the paint, ensuring a more professional-looking finish.
- Color Me Beautiful: Finally, the fun part! Grab a paint roller and apply two coats of your chosen color, allowing ample drying time between coats.
But what if you crave something with a bit more personality? Wallpaper to the rescue! It’s a fantastic way to inject character and style without breaking the bank, and it’s easier to install than you might think.
Wallpapering Your Ceiling: A Step-by-Step Guide
- Clean and Prep: Just like with painting, a clean ceiling is key. Wipe it down thoroughly with a damp cloth.
- Prime Time (Again!): Wallpaper needs a solid foundation too! A wallpaper primer improves adhesion and prevents peeling later on.
- Measure Twice, Cut Once: Carefully measure your ceiling dimensions and cut the wallpaper accordingly, leaving a little extra for adjustments.
- Paste Perfect: Apply wallpaper paste evenly to the back of your wallpaper, following the manufacturer’s instructions for the best results.
- Up, Up, and Away!: Carefully apply the wallpaper to the ceiling, starting from one corner and working your way across.
- Smooth Sailing: Use a wallpaper smoother or a clean cloth to eliminate any bubbles or wrinkles as you go for a flawless finish.
Whether you choose paint or wallpaper, remember that preparation is key! Taking the time to prep your ceiling properly ensures a beautiful, long-lasting result you’ll love for years to come.
Decoding Ceiling Cutouts: A Guide to Types, Names, and Design Inspiration
We’ve covered crown molding, but what about those other intriguing features gracing ceilings? Let’s delve into the captivating world of ceiling cutouts and uncover their secrets!
“Cutout” is a broad term referring to any intentional opening or decorative element that breaks up a flat ceiling, adding visual interest and often functionality. Think of it this way: if it’s not the main ceiling material but is integrated into the design, it’s likely a cutout!
Unveiling the Usual Suspects: Types of Ceiling Cutouts
Let’s explore the most common types of ceiling cutouts you’re likely to encounter:
- Crown Molding: This elegant trim runs horizontally where the wall meets the ceiling, adding a touch of grandeur and sophistication.
- Cornice Molding: Similar to crown molding, but often used specifically where cabinets meet the ceiling for a seamlessly polished look.
- Cove Molding: Imagine a graceful concave curve where the wall and ceiling meet—that’s cove molding. It adds a touch of understated elegance, often found in traditional homes.
- Recessed Lighting: Function meets form! Recessed lighting cutouts house light fixtures, providing illumination and a sleek, modern aesthetic.
- Ceiling Medallions: Often ornate and eye-catching, ceiling medallions are typically centered on the ceiling, drawing attention to a light fixture or serving as a stunning architectural focal point.
- HVAC Grilles/Registers: These essential cutouts might not be the most glamorous, but they’re crucial for a comfortable living environment. They house vents for heating, ventilation, and air conditioning systems.
- Access Panels: These are the hidden heroes of the ceiling world. Concealed cutouts providing access to wiring, plumbing, or other systems for maintenance and repairs.
Choosing the Right Ceiling Cutouts: Key Considerations
Before you break out the tools, consider these factors to select the perfect ceiling cutouts for your space:
- Style Synergy: Your ceiling cutouts, like your decor, should reflect your personal style. Whether you gravitate towards traditional, modern, farmhouse, or another style entirely, ensure your choices complement the overall aesthetic.
- Room Size and Ceiling Height: Scale is key! A grand medallion might overpower a small room, while delicate cove molding could get lost in a larger space. Ceiling height also plays a role, as certain moldings can make a low ceiling feel even lower.
- Form and Function: Always ask yourself, “What is the primary purpose of this cutout?” Is it purely decorative, or will it serve a function, such as housing a light fixture or providing access?
Installation Insights: DIY or Call in the Cavalry?
- DIY vs. Professional: Simple cutouts like adding crown molding to a small room are often manageable for homeowners with DIY experience. However, intricate designs or projects involving electrical or structural work are best left to the professionals.
- Essential Tools: Depending on the cutout, you might need a miter saw for precise angle cuts, a caulk gun to seal gaps, and paint for the finishing touch.
- General Installation Steps:
- Measure Twice, Cut Once: Accurate measurements are the foundation of a professional-looking result.
- Precision Cutting: Use a miter saw to achieve clean, accurate cuts for a seamless fit.
- Secure the Cutout: Attach the cutout securely to the ceiling using appropriate fasteners.
- Seamless Finish: Apply caulk to any gaps for a polished and professional look.
- A Touch of Paint: Paint the cutout to match your ceiling or create a contrasting accent.
Remember, patience and attention to detail are your greatest allies during installation.
Ceiling Cutouts: The Takeaway
- These design elements are like jewelry for your ceilings, adding visual interest, architectural detail, and personality.
- From elegant crown molding to essential access panels, there’s a ceiling cutout to suit every style and purpose.
- When choosing cutouts, consider your style, room size, ceiling height, and the intended function.
- Embrace the power of DIY for simpler installations, but don’t hesitate to call in the pros for more complex tasks.
With this newfound knowledge, you’re ready to confidently navigate the world of ceiling cutouts. Remember, the right cutout can elevate your space from simple to stunning, injecting character and charm. Happy decorating!

- Annapolis Mall Map & Directory: Find Stores, Restaurants & More - March 29, 2025
- Angel of Harmony Statue Vandalized at St. Louis Cathedral Basilica - March 29, 2025
- Amur River Maple ( Acer ginnala): A Comprehensive Guide (Including Invasiveness) - March 29, 2025


