Elevate Your Ceilings with Trim
Ever feel like your ceilings are missing a final touch? Adding ceiling trim molding can be the perfect solution. Think of it as adding a frame to a picture, instantly making it look more polished and elegant.
What Exactly IS Ceiling Trim Molding?
Simply put, ceiling trim molding is a decorative strip installed where your walls meet your ceiling. It instantly elevates the entire look of a room, adding a touch of sophistication.
Diverse Styles of Ceiling Trim
One of the best things about ceiling trim molding is the sheer variety of styles available. Let’s explore some of the most popular options:
-
Crown Molding: For a sense of grandeur and traditional elegance, crown molding is the way to go. Its ornate design adds a touch of sophistication to any room.
-
Cove Molding: Prefer a softer, understated look? Cove molding, with its gentle concave curve, blends seamlessly into the ceiling, creating a smooth transition.
-
Bed Molding: This narrow and simple style is often used in conjunction with crown molding, adding depth and intricacy to the overall design.
-
Flat Trim/Panel Molding: Clean lines and simplicity are the hallmarks of this modern choice. It’s perfect for minimalist spaces or those wanting a sleek, contemporary aesthetic.
-
Flexible Molding: Don’t let curves cramp your style! Flexible molding is specifically designed for arched doorways, curved walls, or any other unconventional architectural features.
Material Matters: Choosing the Right Option
Just as there are many styles of molding, you’ll also have a variety of materials to choose from:
-
Wood: Timeless and elegant, wood molding comes in various species, each with its unique grain pattern and finish.
-
MDF (Medium-Density Fiberboard): This budget-friendly option offers a smooth surface that’s perfect for painting. It’s also very DIY-friendly.
-
PVC (Polyvinyl Chloride): If you live in a humid climate, PVC molding is an excellent choice. PVC resists moisture, making it perfect for bathrooms and kitchens.
-
Polyurethane: Lightweight and incredibly easy to install, polyurethane molding often comes pre-primed, allowing you to skip a step in the painting process.
-
Plaster: Found in many older homes, plaster molding exudes a vintage charm. However, it can be more fragile than other materials and may require a professional for repairs or installation.
Finding the Perfect Molding for Your Space
With so many options available, it’s understandable to feel a bit overwhelmed when selecting your ceiling trim molding. Here are a few key factors to consider:
-
Room Size & Ceiling Height: Large rooms with high ceilings offer more flexibility when it comes to molding. You can opt for wider, more elaborate styles without overwhelming the space. Smaller rooms, on the other hand, may benefit from simpler styles that won’t overpower the overall aesthetic.
-
Architectural Style: Your home’s existing architectural style can guide your decision-making. Traditional homes often lend themselves well to crown or cove molding, while modern spaces might look sharper with flat trim.
-
Personal Taste: At the end of the day, the most important factor is your personal taste! Choose a style of molding that speaks to your aesthetic preferences and complements the overall design of your home.
DIY Installation Tips
While professional installation is always an option, installing ceiling trim molding is a project many homeowners tackle themselves. Here are the basic steps involved:
-
Gather Your Tools: You’ll need a miter saw, nail gun, adhesive, caulk, a measuring tape, and, of course, a bit of patience!
-
Measure Twice, Cut Once: Accurate measuring and cutting are absolutely crucial for seamless corners and a polished, professional look.
-
Secure the Molding: Use a combination of adhesive and nails to securely attach the molding to the wall and ceiling.
-
Add Finishing Touches: Caulk any gaps or nail holes with paintable caulk to achieve a flawless finish. Once the caulk is dry, prime and paint your molding to match your desired aesthetic.
Beyond the Ceiling: Creative Uses for Molding
Ceiling trim molding is transformative, but did you know that similar styles can be used in other areas of your home?
-
Wall Trim: Add dimension and personality to your walls with decorative molding. Use it to create chair rails (both protective and stylish!), picture rails for hanging artwork without putting holes in your walls, or even wainscoting for a classic look.
-
Door & Window Frames: Elevate the look of your doors and windows by framing them with decorative molding. This creates a cohesive and polished look that ties the entire room together.
-
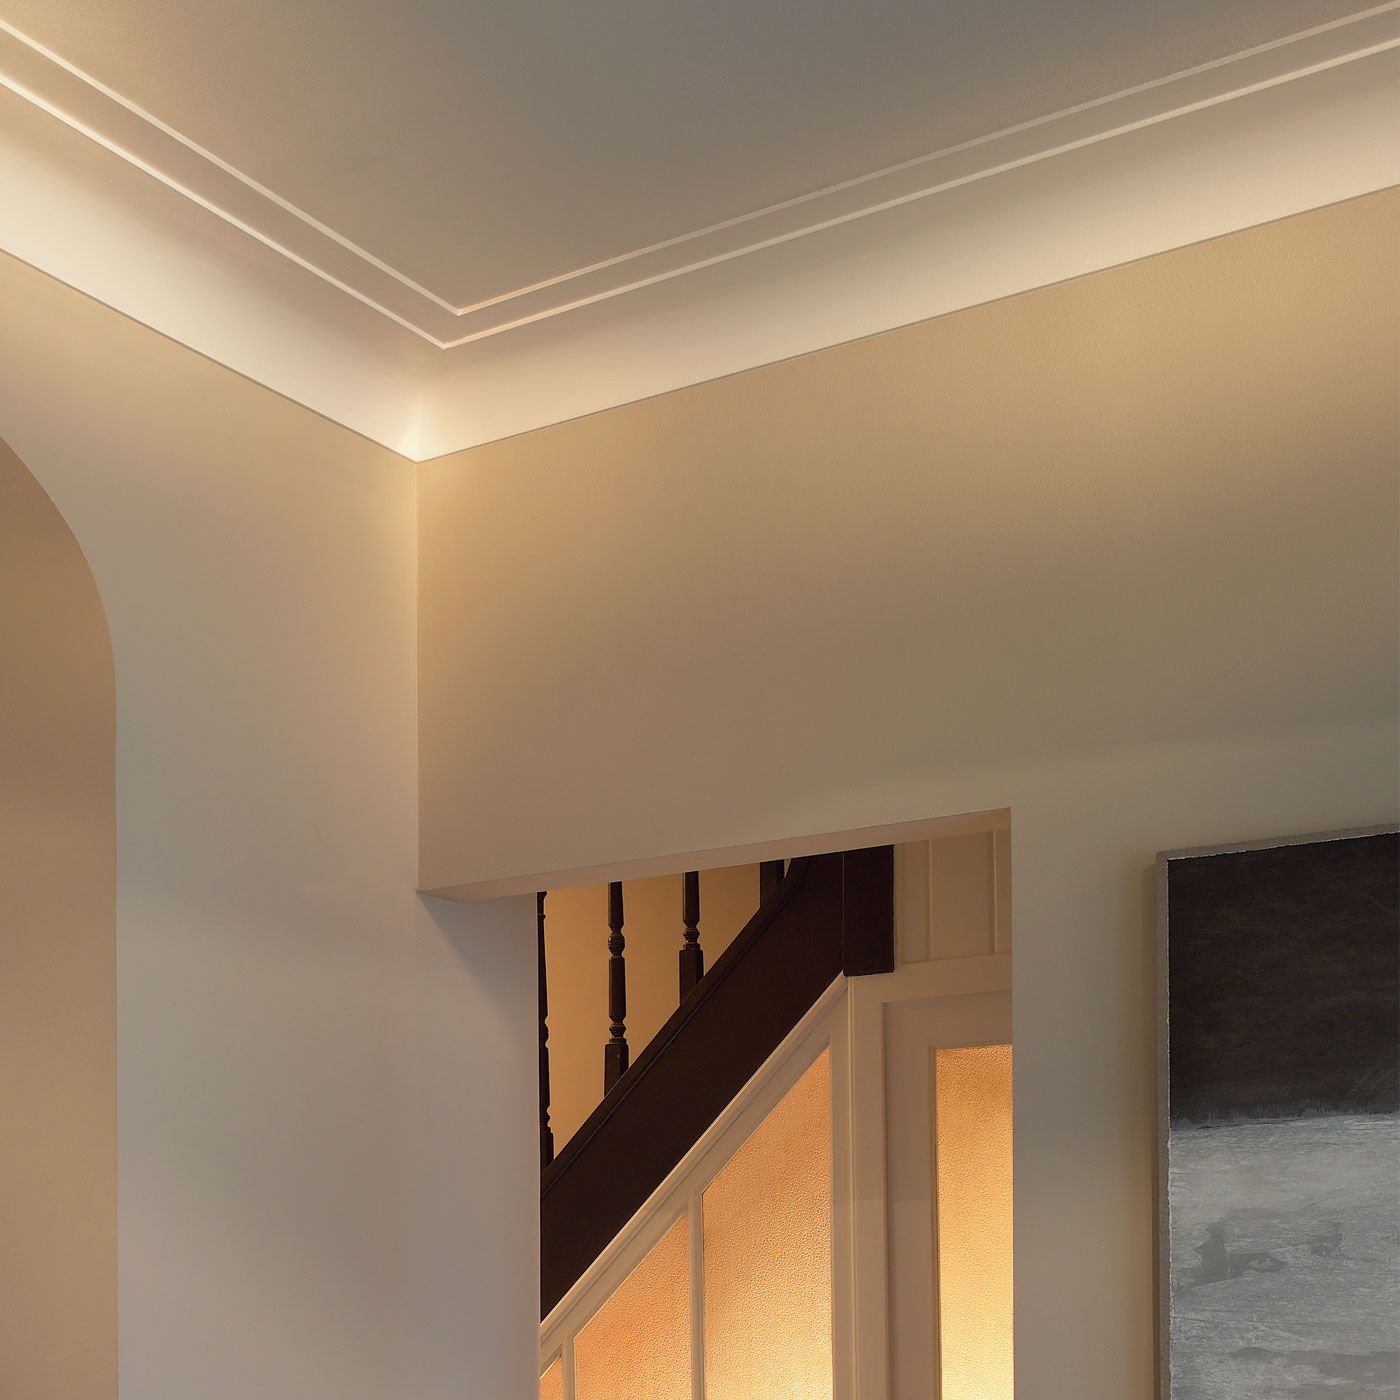
Hidden Lighting: Want to add a touch of magic to your ceilings? Consider concealing LED strip lights within your ceiling trim molding. This creates a beautiful ambient, indirect lighting effect.
Understanding Ceiling Trim Terminology
Now that we’ve covered the basics, let’s dive into some common terminology you’ll encounter when exploring ceiling trim options:
What is the trim on the ceiling called?
The trim installed where the wall meets the ceiling is most often called ceiling trim. However, it’s also commonly referred to as crown molding. While these terms are often used interchangeably, there are some subtle distinctions.
Think of “crown molding” as the more elaborate and ornate category of ceiling trim. It’s like the “Queen Bey” of ceiling trim. “Ceiling trim,” on the other hand, is a more general term.
Here’s a simplified breakdown:
| Type of Ceiling Trim | Description | Vibe |
|---|---|---|
| Crown Molding | Ornate and detailed, makes a statement | Grand ballroom or a fancy library |
| Cove Molding | Simple, smooth, curved inwards | Clean and modern |
| Bed Molding | Adds a secondary layer of detail, often paired with crown molding | Traditional and elegant |
| Dentil Molding | Features a repeating pattern of small, tooth-like blocks | Classic, old-world charm and sophistication |
| Egg and Dart Molding | A repeating pattern of egg shapes and arrow shapes | Timeless and often seen in historic homes |
Material Options for Ceiling Trim
Just like your favorite clothing styles, ceiling trim comes in a variety of “fabrics,” or materials:
- Wood: A classic choice for its durability, natural beauty, and timeless appeal.
- MDF: (Medium-density fiberboard) A more affordable alternative to wood, MDF is easy to work with and provides a smooth surface for painting.
- Plaster: The traditional material for ceiling trim, plaster offers a classic, elegant look.
- Polyurethane: A lightweight and moisture-resistant option, polyurethane is a popular choice for its ease of installation.
DIY or Hire a Pro?
While installing ceiling trim can be a rewarding DIY project, hiring a professional is often recommended, especially for more complex designs or if you’re working with challenging angles.
Why Bother with Ceiling Trim?
You might be wondering if adding ceiling trim is really worth the effort. Here are a few compelling reasons to consider it:
- Elevated Aesthetics: Ceiling trim instantly enhances the visual appeal of any room, creating a more polished and finished look.
- Concealed Imperfections: Ceiling trim effectively hides any imperfections where the wall and ceiling meet.
- Increased Home Value: Adding ceiling trim is often seen as a sign of quality and craftsmanship, potentially increasing your home’s value.
## Simplify Your Installation: Choosing the Easiest Ceiling Trim
Ready to tackle a ceiling trim project but feeling intimidated? Don’t worry! We’ll guide you toward the easiest options:
What is the Easiest Ceiling Trim to Install?
For DIY beginners, lightweight and forgiving materials like PVC, polyurethane, or polyethylene are excellent choices. These materials are easier to cut and more forgiving of minor measuring errors.
Built-up crown molding is another great option for its ease of installation. It comes in pre-cut sections that you simply fit together, eliminating the need for tricky angled cuts.
Tips for Easy Installation:
- Start with the Right Material: Choose lightweight, DIY-friendly materials for a more manageable experience.
- Opt for Built-Up Molding: Simplify your installation process with pre-cut sections that fit together like puzzle pieces.
- Master the Miter Saw: Practice your miter saw skills to confidently tackle both horizontal and angled cuts.
- Consider Ceiling Height: Rooms with standard 8-foot ceilings generally look best with crown molding that has a projection of 5 inches or less.
Trim vs. Molding: Decoding the Difference
While the terms “trim” and “molding” are often used interchangeably, understanding the subtle distinctions can help you make informed decisions about your home’s design.
What is the difference between trim and molding?
Let’s break it down:
- Trim: The broader term, referring to any type of woodwork used to provide a clean, finished edge where walls, ceilings, floors, or other architectural elements meet.
- Molding: A specific type of trim that’s primarily decorative, often featuring sculpted or shaped profiles to add visual interest and architectural character.
In essence: Trim is the essential framework, while molding is the decorative embellishment.
Choosing the Right Millwork
Selecting the right trim and molding can significantly impact a room’s overall style and perceived value. Here are a few key considerations:
- Style: From minimalist to ornate, choose styles that complement your home’s architecture and your personal preferences.
- Material: Consider durability, cost, and maintenance requirements when selecting materials.
- Installation: Be realistic about your DIY skills and the complexity of the project.
Adorn your abode with exquisite ceiling molding to elevate the grandeur and architectural allure of your living space. Enhance the ambiance with an eye-catching cb2 chandelier that complements your interior design and illuminates your room with a touch of sophistication.

- Dora the Explorer Wipe-Off Fun: Safe & Mess-Free Activities for Little Explorers - April 18, 2025
- Does Lemongrass Repel Mosquitoes? Fact vs. Fiction + How to Use It - April 18, 2025
- Do Woodchucks Climb Trees?Fact vs. Fiction - April 18, 2025