Terra cotta pots: the blank canvases of the gardening world! Their versatility is truly inspiring, offering endless opportunities for creative expression. Whether you’re a seasoned DIYer or just beginning your crafting journey, this guide will provide you with a wealth of ideas and step-by-step instructions to transform ordinary terra cotta pots into personalized works of art. So, gather your supplies and let’s get crafting!
Pottery Projects: A Quick Look
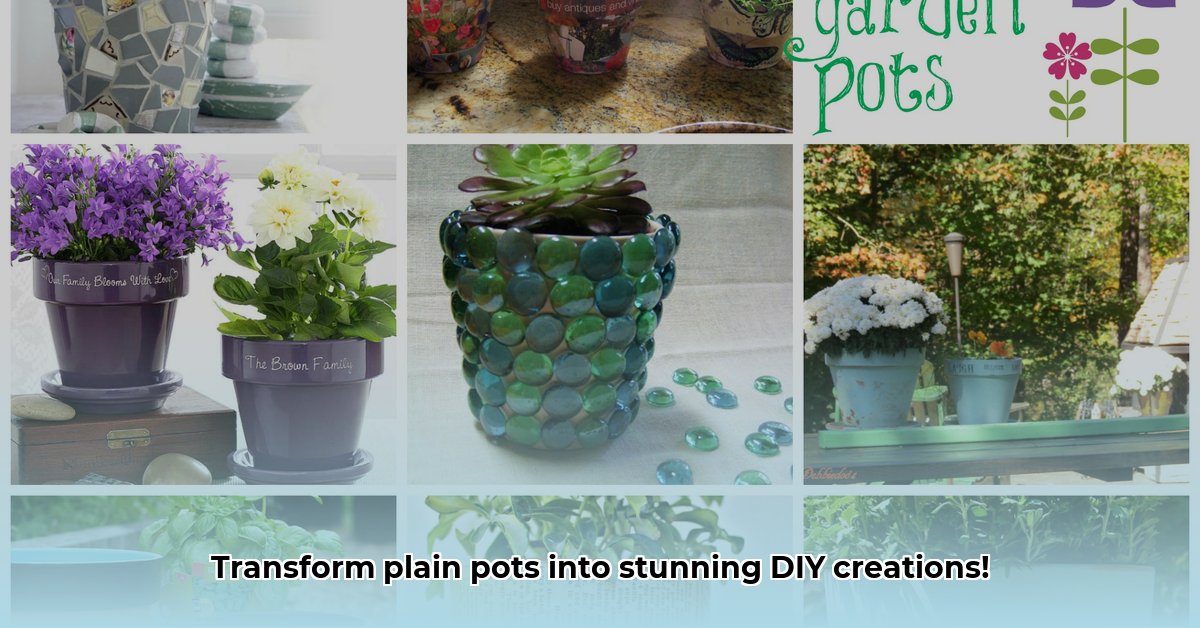
Here’s a sneak peek at the projects we’ll explore:
| Project | Description | Difficulty | Estimated Time | Image |
|---|---|---|---|---|
| Painted Perfection | Add a splash of color with personalized designs. | Easy | 1-2 hours | (Image of painted pot) |
| Rustic Rope Wrap | Create a natural, textured look with rope wrapping. | Easy | 30-60 minutes | (Image of rope-wrapped pot) |
| Decoupage Delight | Transfer pretty paper designs onto your pots. | Medium | 1-2 hours | (Image of decoupage pot) |
| Mosaic Magic | Transform broken tiles into a shimmering masterpiece. | Medium | 2-3 hours | (Image of mosaic pot) |
| Repurposed Planters | Turn old pots into vertical gardens and more. | Easy-Medium | 1-3 hours | (Image of repurposed pots) |
Essential Materials & Tools
Before we begin, let’s gather some likely essential items:
- Terra cotta pots: Various sizes and shapes.
- Acrylic craft paints: A rainbow of colors.
- Paintbrushes: Assorted sizes.
- Primer: For better paint adhesion.
- Sealant: Protects your creations (outdoor sealant recommended for outdoor projects).
- Rope or twine: Jute, sisal, or colorful twine.
- Hot glue gun & glue sticks: For securing embellishments.
- Decoupage medium & sealant: For paper crafts.
- Sandpaper: For smoothing rough edges (optional).
- Scissors: For cutting various materials.
- Mosaic tiles, adhesive, and grout: For mosaic projects.
Project Tutorials
Project 1: Painted Perfection
Give your terra cotta pots a vibrant makeover with a fresh coat of paint.
Materials: Terra cotta pot, acrylic craft paints, paintbrushes, primer, outdoor sealant, painter’s tape (optional), drop cloth/newspaper.
Steps:
- Clean the Pot: Wash with soap and water, dry completely.
- Prime (Suggested): Apply primer, let dry. Some experts believe this step significantly improves paint adhesion.
- Paint: Apply thin coats of acrylic paint, letting each layer dry. Use painter’s tape for crisp lines.
- Seal: Apply outdoor sealant after paint dries.
Project 2: Rustic Rope Wrap
Create a natural look by wrapping your pot with rope.
Materials: Terra cotta pot, rope/twine, hot glue gun & glue sticks, scissors.
Steps:
- Choose Your Rope: Select a rope that complements your style.
- Start Gluing: Apply glue at the bottom, press the rope firmly, and wrap around the pot.
- Secure the End: Cut the rope at the top and secure with glue.
Project 3: Decoupage Delight
Transfer pretty paper designs onto your pots.
Materials: Terra cotta pot, decoupage medium, decoupage sealant, decorative paper, scissors, paintbrush, primer (optional).
Steps:
- Prepare: Clean the pot and prime if desired.
- Cut Designs: Cut out desired designs.
- Apply Medium: Brush decoupage medium onto the pot.
- Position Design: Place the cutout on the wet medium, smoothing out air bubbles.
- Seal: Apply decoupage sealant once dry.
Project 4: Mosaic Magic
Transform broken tiles into a shimmering masterpiece.
Materials: Terra cotta pot, mosaic tiles, tile adhesive, grout, sponge, sealant for tile.
Steps:
- Adhere Tiles: Apply adhesive and place tiles in your desired pattern.
- Grout: Apply grout between tiles after the adhesive dries.
- Clean: Wipe excess grout with a damp sponge.
- Seal: Apply sealant once the grout dries.
Project 5: Repurposed Planters
Give old pots new life.
Materials: Terra cotta pots (various sizes), potting soil, plants, other materials depending on the project (e.g., rope for hanging planters).
Ideas:
- Vertical Garden: Stack pots of decreasing sizes, planting cascading flowers or herbs.
- Hanging Planters: Drill holes and use rope or chains to suspend pots.
- Miniature Fairy Gardens: Create whimsical landscapes inside larger pots using small plants, figurines, and decorative stones.
Troubleshooting
- Peeling Paint: Likely due to a dirty or damp surface. Clean, dry, and repaint.
- Cloudy Sealant: Possibly due to high humidity. Apply in a well-ventilated area.
- Drainage Issues: Add rocks or pebbles to the bottom of the pot.
Tips & Tricks
- Crisp Lines: Use painter’s tape for clean edges.
- Ombre Effect: Use a sponge to blend paint colors.
- Embellishments: Add beads, shells, or other small objects for extra flair.
- Themed Pots: Decorate for seasons or holidays.
Resources
- Local craft stores
- Online tutorials and inspiration (Pinterest, Instagram, crafting blogs)
Conclusion
Transforming terra cotta pots is a rewarding way to unleash your creativity. There’s no right or wrong way to approach these projects. Experiment, have fun, and enjoy the process of creating something beautiful and unique. Share your creations with friends and family, or even online crafting communities. Happy crafting!

- How to Get Rid of Mushrooms in Your Lawn: A Complete Guide - April 24, 2025
- How to Get Rid of Ground Hornets: A Safe and Effective Guide to Eliminating Nests - April 24, 2025
- How to Get Rid of German Roaches Fast: DIY Methods for Quick Control - April 24, 2025