Discover the secrets to crafting effective homemade face masks in [- The Ultimate Guide to Homemade Face Masks: Natural Solutions for a Radiant Complexion]. Dive into the world of natural skincare as we explore the benefits of potent botanicals, clays, and essential oils, guiding you in creating personalized masks tailored to your unique skin concerns.
Key Takeaways:
- Homemade face masks harness natural ingredients to nourish, exfoliate, and soothe skin.
- Targeted masks address specific skin concerns:
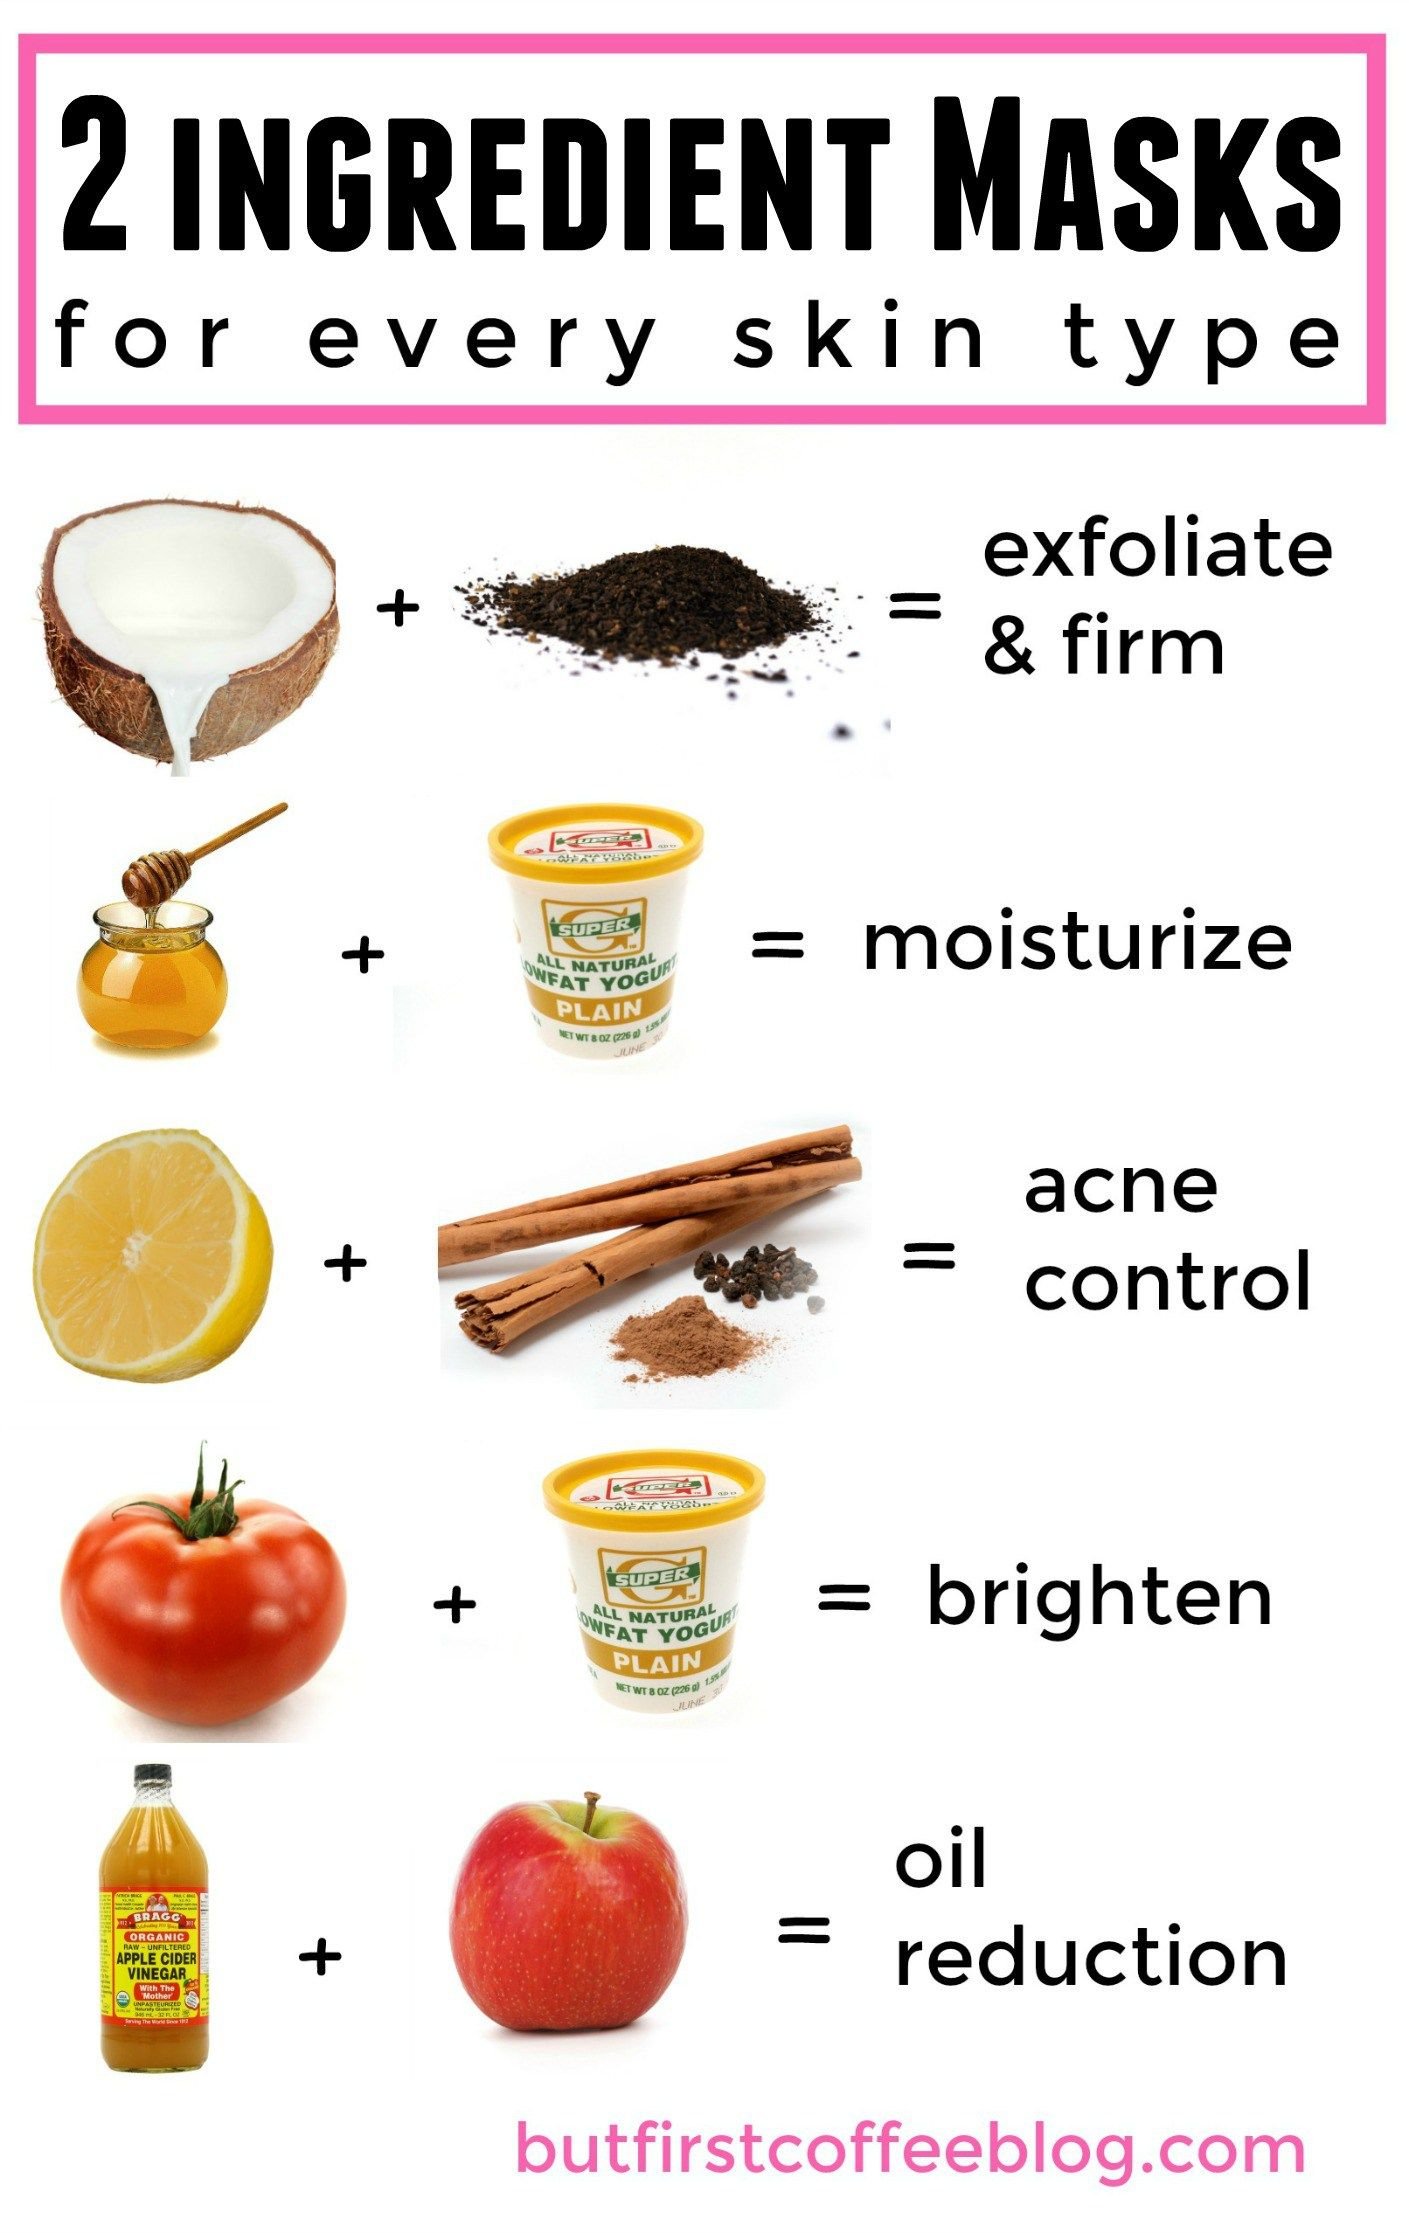
- Brightening and anti-inflammatory: lemon, honey, turmeric
- Oily skin and acne: aloe vera, gelatin, matcha green tea
- Dry skin: avocado, banana
- Sensitive skin: cucumber, turmeric, honey
Homemade Face Masks: Natural Solutions for a Radiant Complexion

Homemade face masks offer a natural and effective way to revitalize and nourish your skin. With carefully selected ingredients, you can target specific skincare concerns and achieve a radiant, healthy complexion.
Benefits of Homemade Face Masks
- Nourishment: Nutrient-rich ingredients, such as fruits, vegetables, and honey, provide essential vitamins and minerals for healthy skin.
- Exfoliation: Masks containing exfoliating agents, like sugar or oatmeal, gently remove dead skin cells, revealing smoother, brighter skin.
- Soothing: Ingredients like aloe vera and cucumber possess anti-inflammatory properties, calming and soothing irritated skin.
Choosing the Right Mask for Your Skin Type
Different homemade face masks are tailored to address specific skin concerns:
Oily Skin and Acne:
- Aloe vera: Soothes inflammation and reduces excess oil production.
- Gelatin: Absorbs excess oil and draws out impurities.
- Matcha green tea: Contains antioxidants that help fight acne.
Dry Skin:
- Avocado: Rich in vitamins and fatty acids to nourish and hydrate the skin.
- Banana: Provides antioxidants and potassium to soften and soothe dry skin.
Sensitive Skin:
- Cucumber: Cools and calms irritated skin.
- Turmeric: Anti-inflammatory properties reduce redness and itching.
- Honey: Antibacterial and moisturizing, suitable for sensitive and acne-prone skin.
DIY Face Mask Recipes
Brightening and Anti-Inflammatory:
- 1 tbsp lemon juice (brightening)
- 1 tbsp honey (anti-inflammatory)
- 1 tsp turmeric (anti-inflammatory)
Exfoliating:
- 1/2 cup sugar (exfoliating)
- 1/4 cup olive oil (nourishing)
- 1 tbsp honey (antibacterial)
Soothing:
- 1/2 cucumber (cooling)
- 1/4 cup aloe vera gel (soothing)
- 1 tbsp yogurt (probiotic)
How to Make and Apply a Homemade Face Mask
- Cleanse your face thoroughly.
- Mix the ingredients in a small bowl.
- Apply the mask evenly over your face, avoiding the eyes and lips.
- Leave the mask on for 10-15 minutes.
- Rinse the mask off with warm water.
- Pat your face dry and follow up with a moisturizer.
Safety Precautions
- Perform a patch test on a small area of your skin before applying a new homemade face mask.
- Discontinue use if you experience any irritation.
- Avoid using masks containing ingredients you are allergic to.
- Store homemade masks in the refrigerator to preserve their freshness.
Planning to make a homemade diet for dogs? We have a wide variety of dog food recipes. Having a fur baby requires a lot of love and care and what better way to do so than to provide them with the best homemade dog treats? Check out our yummy and fun treat recipes for your little friend. In addition to diets and treats, providing them with homemade food is another expression of your love and care for them. Give them a tasty meal that is packed with essential nutrients for a healthy and active life. We also provide additional services such as a homes care agency.
Step-by-Step Guide to Making a Homemade Face Mask:
Crafting a homemade face mask is a delightful experience that empowers you to customize your skincare regimen and achieve a radiant, healthy complexion. Follow these simple steps to create your own natural skincare solution:
Key Takeaways:
- Choose ingredients that align with your skin type.
- Use fresh, organic ingredients whenever possible.
- Test the mask on a small area of skin before applying it to your entire face.
- Leave the mask on for 10-15 minutes, or as directed in the recipe.
- Rinse the mask off with lukewarm water and moisturize your skin.
Step 1: Gather Your Ingredients
Select ingredients that address your specific skin concerns. For oily skin, consider using clay, aloe vera, or green tea. Dry skin may benefit from avocado, banana, or honey. Sensitive skin can be soothed by cucumber, turmeric, or yogurt.
Step 2: Create a Paste
Mash or blend your chosen ingredients until you achieve a smooth, spreadable paste. If the paste is too thick, add a small amount of water or honey to thin it out.
Step 3: Apply the Mask
Cleanse your face and pat it dry. Apply the mask evenly, avoiding the area around your eyes and lips. Relax and let the mask work its magic for 10-15 minutes.
Step 4: Rinse and Moisturize
Rinse off the mask with lukewarm water and pat your face dry. Apply your usual moisturizer to keep your skin hydrated.
Tips:
- Experiment with different ingredients to find what works best for your skin.
- Don’t leave the mask on for too long, as this may dry out your skin.
- Store homemade masks in the refrigerator for up to a week.
Citations:
- How to Make a No-Sew Face Mask at Home
- A Step-by-Step Guide to Making a No-Sew Face Mask with Materials You Have at Home
Tips for Getting the Most Out of Your Homemade Face Mask
Do you love experimenting with homemade face masks but sometimes feel like your efforts aren’t giving you the results you crave? If so, read on! This guide will provide you with the top tips and tricks to elevate your homemade face mask game and achieve radiant, glowing skin.
Key Takeaways:
- Customize your mask to suit your skin’s needs.
- Use high-quality, natural ingredients.
- Pay attention to the consistency and application method.
- Don’t overdo it with frequency and duration.
- Store your mask properly to maintain its freshness.
How to Create Effective Homemade Face Masks
- Identify your skin type: Different skin types require different ingredients. Oily skin benefits from masks with clay or charcoal, while dry skin prefers moisturizing masks with honey or avocado.
- Use fresh, natural ingredients: Avoid using expired or processed ingredients. Fresh fruits, vegetables, and herbs are packed with nutrients that nourish your skin.
- Consider the texture and consistency: A smooth paste is ideal for even application. If your mask is too thick, add a little liquid like water or yogurt. If it’s too thin, add some clay or oatmeal.
- Apply evenly and leave on for the recommended time: A thin, even layer of mask is sufficient. Leave it on for the recommended duration on the recipe, as over-masking can irritate your skin.
- Store your mask properly: Keep homemade masks in airtight containers in the refrigerator for up to a few days. Discard any unused portions to prevent spoilage.
Tips for Maximizing Results
- Exfoliate before masking: Removing dead skin cells allows the mask to penetrate deeper and work more effectively.
- Steam your face: Opening up your pores with steam helps the mask’s ingredients absorb better.
- Follow with a moisturizer: After rinsing off the mask, apply a moisturizer to lock in the benefits and hydrate your skin.
- Be consistent with your routine: Regularly incorporating homemade face masks into your skincare routine helps maintain healthy, radiant skin.
By following these tips, you can create homemade face masks that are tailored to your skin’s needs and provide optimal results. Embrace the power of nature and enjoy the benefits of a glowing, healthy complexion!
Relevant URL Sources:
- DIY Face Masks for All Skin Types
- 5 DIY Face Mask Recipes for Healthy, Glowing Skin
Storage and shelf life of homemade face masks
Homemade face masks are a fantastic way to incorporate natural ingredients into your skincare routine. But how do you store them properly to preserve their effectiveness?
1. General storage tips:
– Use airtight containers or glass jars to prevent contamination and oxidation.
– Store in the refrigerator: this will extend the shelf life by slowing down the growth of bacteria and preserving the ingredients’ potency.
2. Shelf life:
– Most homemade face masks will last for 5-7 days in the refrigerator.
– If you’re making a mask with fresh fruit or vegetables, use it within 2-3 days.
– Discard any mask that has changed color, texture, or smell.
3. Tips for extending shelf life:
- Use distilled water instead of tap water, as it contains fewer impurities.
- Avoid adding essential oils or other ingredients that may spoil quickly.
- Keep the mask in a cool, dark place.
Key Takeaways:
- Store homemade face masks in airtight containers in the refrigerator to extend their shelf life.
- Most masks will last for 5-7 days in the refrigerator.
- Discard any mask that has changed color, texture, or smell.
References:
FAQ
Q1: What are the benefits of using homemade face masks?
A1: Homemade face masks are beneficial because they are made with natural ingredients that nourish and rejuvenate the skin. They can be tailored to address specific skin concerns, such as dryness, oiliness, or acne.
Q2: How often should I use a homemade face mask?
A2: The frequency of use depends on your skin type and needs. Generally, it’s recommended to use a face mask 1-2 times per week.
Q3: Can I use homemade face masks if I have sensitive skin?
A3: Yes, you can use homemade face masks if you have sensitive skin. Be sure to choose ingredients that are gentle and non-irritating, such as oatmeal, honey, or aloe vera.
Q4: How long should I leave a homemade face mask on?
A4: The recommended time to leave on a homemade face mask is 15-20 minutes. However, some masks may need more or less time, so it’s important to follow the specific instructions for the mask you’re using.
Q5: How do I store homemade face masks?
A5: Homemade face masks should be stored in an airtight container in the refrigerator for 5-7 days. Remove the mask from the fridge 15-20 minutes before use to avoid clumping.

- Ceramic Kitchen Wall Tiles: Style and Protection for Your Walls - December 17, 2025
- Kitchen tiling wall: Elevate your kitchen with stylish wall tiles - December 16, 2025
- Gray Kitchen Backsplash Tile: Ideas for a Stylish Upgrade - December 14, 2025