A puddle under your water heater can be alarming, but don’t panic! This guide provides a step-by-step approach to identifying the cause of the leak and taking appropriate action.
Immediate Actions: Stop the Leak Now!
If your water heater is leaking, act quickly:
- Turn off the power. Electric water heater? Flip the breaker. Gas? Turn the gas valve to “off.” This crucial safety step prevents electrical shocks or gas leaks.
- Shut off the water. Locate the cold water supply valve, usually above the water heater. Turn it clockwise to stop the flow. This minimizes water damage and further leaking.
- Contain the water. Use buckets, towels, or a wet/dry vacuum to soak up the spilled water. This protects your flooring and surrounding area.
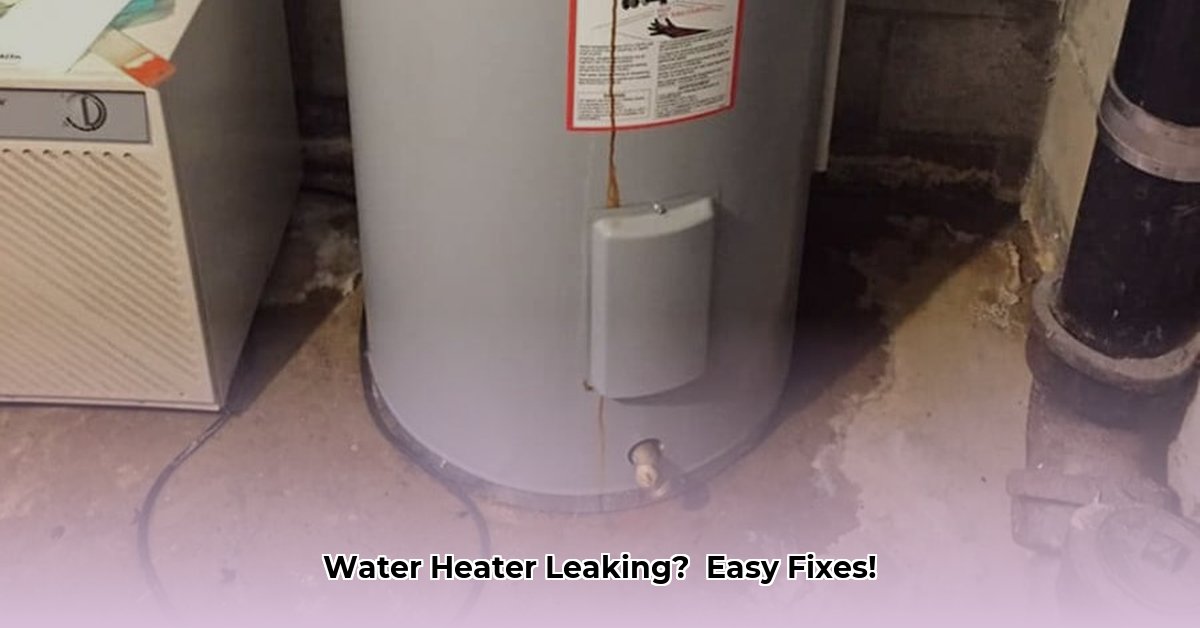
Identifying the Leak: Where’s the Water Coming From?
Several potential culprits could be causing your water heater to leak from the bottom.
1. The Drain Valve
(Visual Aid: Diagram of a drain valve)
- Description: The drain valve, located at the bottom of the tank, is used to flush sediment. It can loosen over time, causing leaks.
- DIY Fix: Try tightening the drain valve clockwise with a wrench. Don’t overtighten!
- When to Call a Plumber: If tightening doesn’t stop the leak, the valve may need replacing. While often a DIY project, if you’re uncomfortable, call a plumber.
2. The Temperature & Pressure (T&P) Relief Valve
(Visual Aid: Diagram of a T&P valve and discharge pipe)
- Description: This safety valve, usually on the side, releases excess pressure. A leak here suggests internal pressure or temperature problems.
- DIY Fix: Do not attempt a DIY fix. A leaking T&P valve requires a plumber’s expertise.
- When to Call a Plumber: Always call a qualified plumber immediately for T&P valve leaks.
3. The Tank Itself
(Visual Aid: Image of a corroded tank bottom)
- Description: Rust, corrosion, or visible cracks on the tank indicate a serious problem.
- DIY Fix: Do not attempt to repair a leaking tank.
- When to Call a Plumber: A leaking tank requires professional replacement. A plumber will assess and recommend the best replacement options for your needs.
4. Inlet/Outlet Pipes
(Visual Aid: Diagram of inlet/outlet pipes)
- Description: Leaks can occur where pipes connect to the tank. Look for drips or corrosion at these connection points.
- DIY Fix: Carefully try tightening the connections with a wrench. Avoid overtightening.
- When to Call a Plumber: If tightening doesn’t work, a plumber can diagnose whether the pipes need repair or replacement.
Troubleshooting at a Glance
| Leak Location | Likely Cause | DIY Potential |
|---|---|---|
| Drain Valve | Loose valve | Likely |
| T&P Valve | Internal pressure/temperature issues | None |
| Tank Itself | Corrosion, cracks | None |
| Inlet/Outlet Pipes | Loose connection, corrosion | Possibly |
Preventing Future Leaks: Proactive Maintenance
Regular maintenance can extend your water heater’s lifespan and prevent leaks:
- Annual Flushing: This removes sediment, a major contributor to corrosion. Many online resources provide DIY flushing instructions.
- Anode Rod Check/Replacement: The anode rod sacrifices itself to protect the tank from rust. Check it every few years and replace as needed. A plumber can assess its condition.
- T&P Valve Test: Regularly test the T&P valve to ensure it’s functioning correctly. Consult your manual or online tutorials for proper testing procedures. Some sources suggest testing the valve as often as once a month, while other recommendations lean toward yearly maintenance; more frequent checks may be a good idea in areas with hard water.
- Water Softener (Consideration): Some believe water softeners reduce mineral buildup, which might contribute to corrosion. However, ongoing research suggests potential drawbacks, such as increased sodium levels in the water.
Getting a New Water Heater: What to Know
If your tank needs replacing, consider these factors:
- Tankless vs. Traditional: Tankless heaters provide on-demand hot water and may be more energy-efficient. Traditional tank water heaters are usually less expensive upfront.
- Energy Efficiency: Look for high Energy Factor (EF) ratings to save on utility bills.
- Warranties: Compare warranty coverage for different models.
- Professional Consultation: A plumber can help you choose the best water heater based on your needs, budget, and local codes.
- Cost: New water heater installation typically ranges from $500 to $2,000 or more, depending on the type, labor costs, and required plumbing modifications. Location, the complexity of the job (e.g., retrofitting for a different type of heater), and the specific plumber all factor into the cost.
When to Call a Plumber: Don’t Hesitate!
If you are unsure about any step or if the problem persists after trying the DIY solutions, call a licensed plumber. Also, always call a plumber for T&P valve leaks or suspected tank leaks. These situations require professional expertise.
Resources
- Your Local Plumbing Association (Replace with your local association link)
- Water Heater Manufacturer’s Website (Replace with relevant manufacturer link)
This guide offers general advice. Always consult your water heater’s manual and adhere to local plumbing codes. Remember, safety is paramount. When in doubt, contact a qualified plumbing professional.

- How to Measure Your Belt Size (for Women): 3 Easy & Accurate Methods - April 27, 2025
- How to Remove Permanent Hair Dye From Hair: Safe & Effective Methods - April 27, 2025
- How to Remove Ink from Leather: Effective DIY Methods and Expert Tips - April 27, 2025