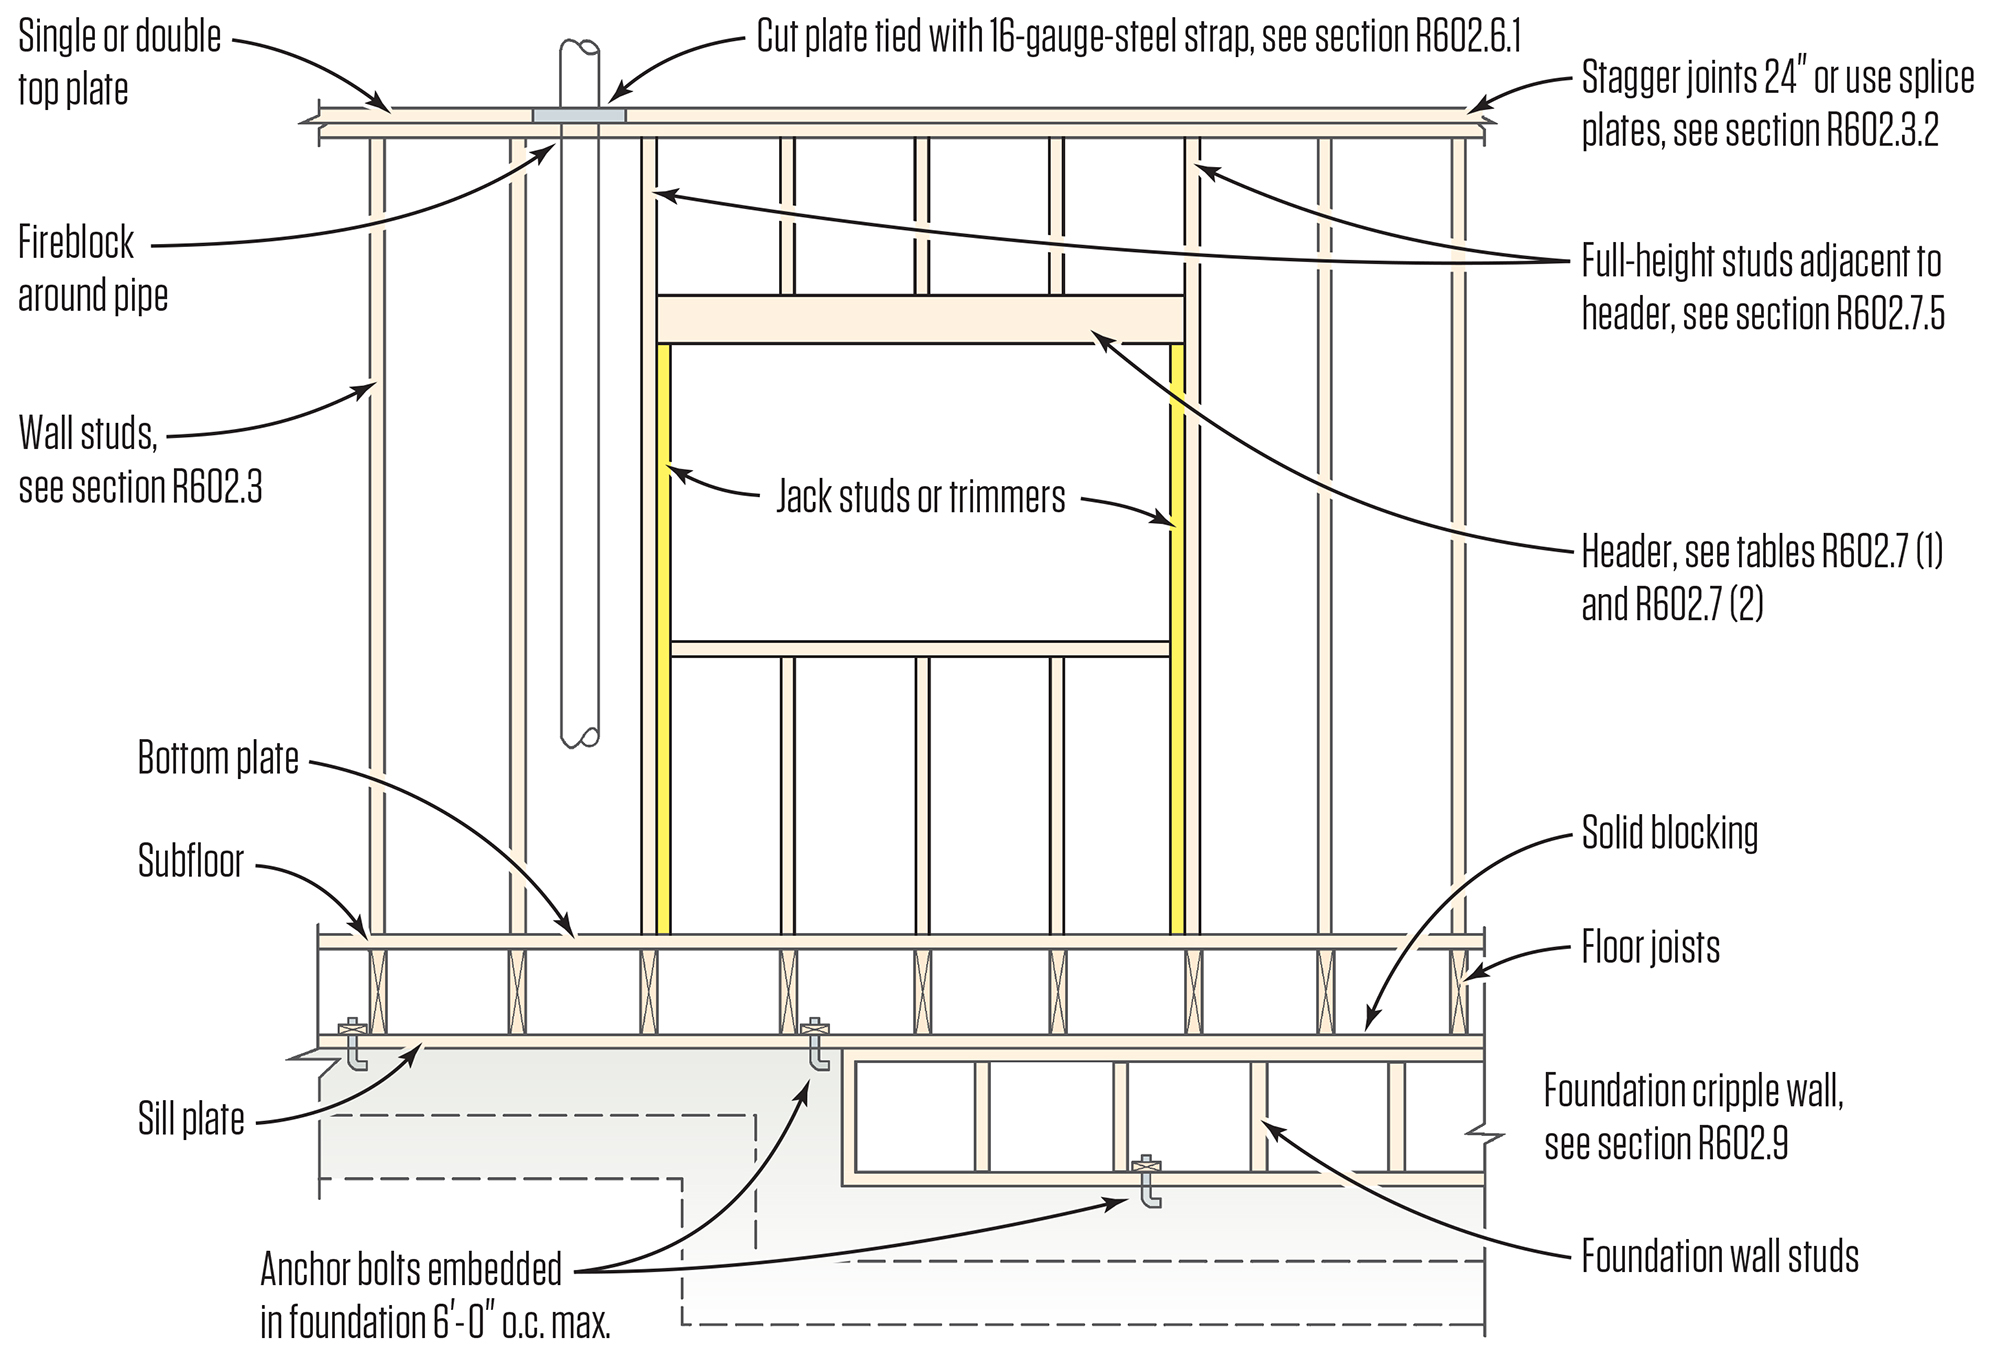
Jack studs are essential for framing doors and windows, acting as the unsung heroes that support the weight above these openings. This guide provides a complete overview of jack studs, from their purpose and types to installation and safety precautions.
What is a Jack Stud?
A jack stud is a short, vertical piece of lumber that supports the header above a door or window opening. This header, a horizontal beam, carries the weight of the wall above it. The jack stud transfers this weight to the framing below, ensuring structural integrity.
Decoding Jack Studs, King Studs, and Cripple Studs
While all vertical framing members may appear similar, they serve distinct purposes:
- Jack Stud: The workhorse that directly supports the header. Its length is determined by the rough opening, header, and sill dimensions. Find it directly beneath the header.
- King Stud: The full-length backbone of the wall, running continuously from top to bottom. It flanks the jack stud and provides additional support.
- Cripple Stud: The smallest of the trio, filling gaps above the header or below the sill, providing a nailing surface for drywall.
| Stud Type | Function | Location |
|---|---|---|
| Jack Stud | Supports header | Beneath the header |
| King Stud | Full-height support, adjacent to jack stud | Sides of the rough opening |
| Cripple Stud | Fills gaps, nailing surface | Above header, below sill |
Installing Jack Studs: A Step-by-Step Guide
- Measure: Accurately measure the rough opening, adding the header and sill thicknesses to determine the jack stud length.
- Cut: Cut the lumber to the precise length determined in step one. Double-check measurements before cutting.
- Position: Place the jack studs snugly beneath each end of the header, against the king stud. Ensure they are plumb (perfectly vertical) using a level.
- Fasten: Securely fasten the jack studs to the header and king stud using appropriate nails, adhering to local building code guidelines for nailing patterns.
Essential Tools and Materials
- Measuring Tape
- Saw (circular or hand saw)
- Level
- Hammer or Nail Gun
- Safety Glasses
- Lumber (typically 2x4s or 2x6s, consult local building codes)
- Nails (size and type determined by lumber and building codes)
Avoiding Common Mistakes
- Incorrect Length: Too short, and the header lacks support; too long, and it interferes with the top plate. Precise measurements are crucial!
- Insufficient Nailing: Proper nailing is vital for structural integrity. Consult local building codes for approved nailing patterns.
- Misplaced Studs: Jack studs must be positioned directly beneath the header ends for optimal load transfer.
Prioritizing Safety
Framing often involves power tools and heights. Always wear safety glasses and gloves. Exercise caution when using saws and nail guns, and ensure a secure platform when working at heights. Is a flickering light bulb dangerous highlights other potential hazards in a home environment.
Adhering to Building Codes and Best Practices
Always consult local building codes before starting any framing project. These codes dictate requirements for lumber size, spacing, and nailing patterns, crucial for safety and structural integrity. Consider using engineered lumber like J Trim for enhanced strength and stability. Staying updated on framing techniques further optimizes installation.
Jack Stud vs. Cripple Stud
The jack stud directly supports the header, transferring its weight to the bottom plate. It’s a structural workhorse. The cripple stud fills gaps above the header or below the sill, providing a nailing surface but not bearing significant loads.
| Feature | Jack Stud | Cripple Stud |
|---|---|---|
| Main Purpose | Supports header | Fills gaps, nailing surface |
| Load-Bearing? | Yes | No |
| Location | Beside opening | Above/below opening |
| Height | Bottom plate to header | Shorter, fills gap |
Understanding this difference is crucial for a structurally sound wall.
Jack Stud vs. Trimmer
In wall framing, “jack stud” and “trimmer” are virtually interchangeable, both referring to the shorter studs supporting the header. While “trimmer” can also describe shortened joists around floor or ceiling openings, in walls, it’s synonymous with “jack stud”.
| Stud Type | Function | Load-Bearing |
|---|---|---|
| King Stud | Full-height support, nailing surface | Yes |
| Jack/Trimmer | Supports header | Yes |
| Cripple Stud | Fills gaps, nailing surface | No |
These studs prevent header sag and subsequent structural issues. Consult local building codes for specific requirements. While established framing principles guide us, ongoing research may refine best practices. This suggests that current standards could evolve, impacting jack stud usage in the future.
How Many Jack Studs for a 6-Foot Opening?
The number of jack studs for a 6-foot opening depends on stud spacing:
- 24-inch on-center: One jack stud per side is likely sufficient.
- 16-inch on-center: Two jack studs per side are probably necessary.
Unusual loads, designs, or local codes may require more. Always consult local building authorities or the International Residential Code (IRC).
| Stud Type | Purpose | Load-Bearing |
|---|---|---|
| King | Frames opening sides | Yes |
| Jack | Supports header | Yes |
| Cripple | Fills gaps, nailing surface | No |
Install jack studs by measuring, cutting, positioning under the header against the king stud, and fastening securely following code-approved nailing patterns. Building codes ensure safety and structural integrity. Always consult them beforehand. While exceeding code requirements can add safety, under-building is never advisable. Understanding these fundamentals is crucial for a strong, lasting structure.
- Dora the Explorer Wipe-Off Fun: Safe & Mess-Free Activities for Little Explorers - April 18, 2025
- Does Lemongrass Repel Mosquitoes? Fact vs. Fiction + How to Use It - April 18, 2025
- Do Woodchucks Climb Trees?Fact vs. Fiction - April 18, 2025


