Want to create a kitchen that’s both stylish and functional? Kitchen islands with cabinets are your secret weapon! In this guide, we’ll explore the world of kitchen islands, covering everything from design styles and materials to costs and expert tips for creating the perfect island for your culinary haven.
Why Choose a Kitchen Island with Cabinets?
Kitchen islands with cabinets are like the Swiss Army knives of kitchens – they can do it all! They offer a multitude of benefits, including:
- Extra Counter Space: Whether you’re a seasoned chef or just need more room to spread out while prepping dinner, a kitchen island provides valuable countertop real estate.
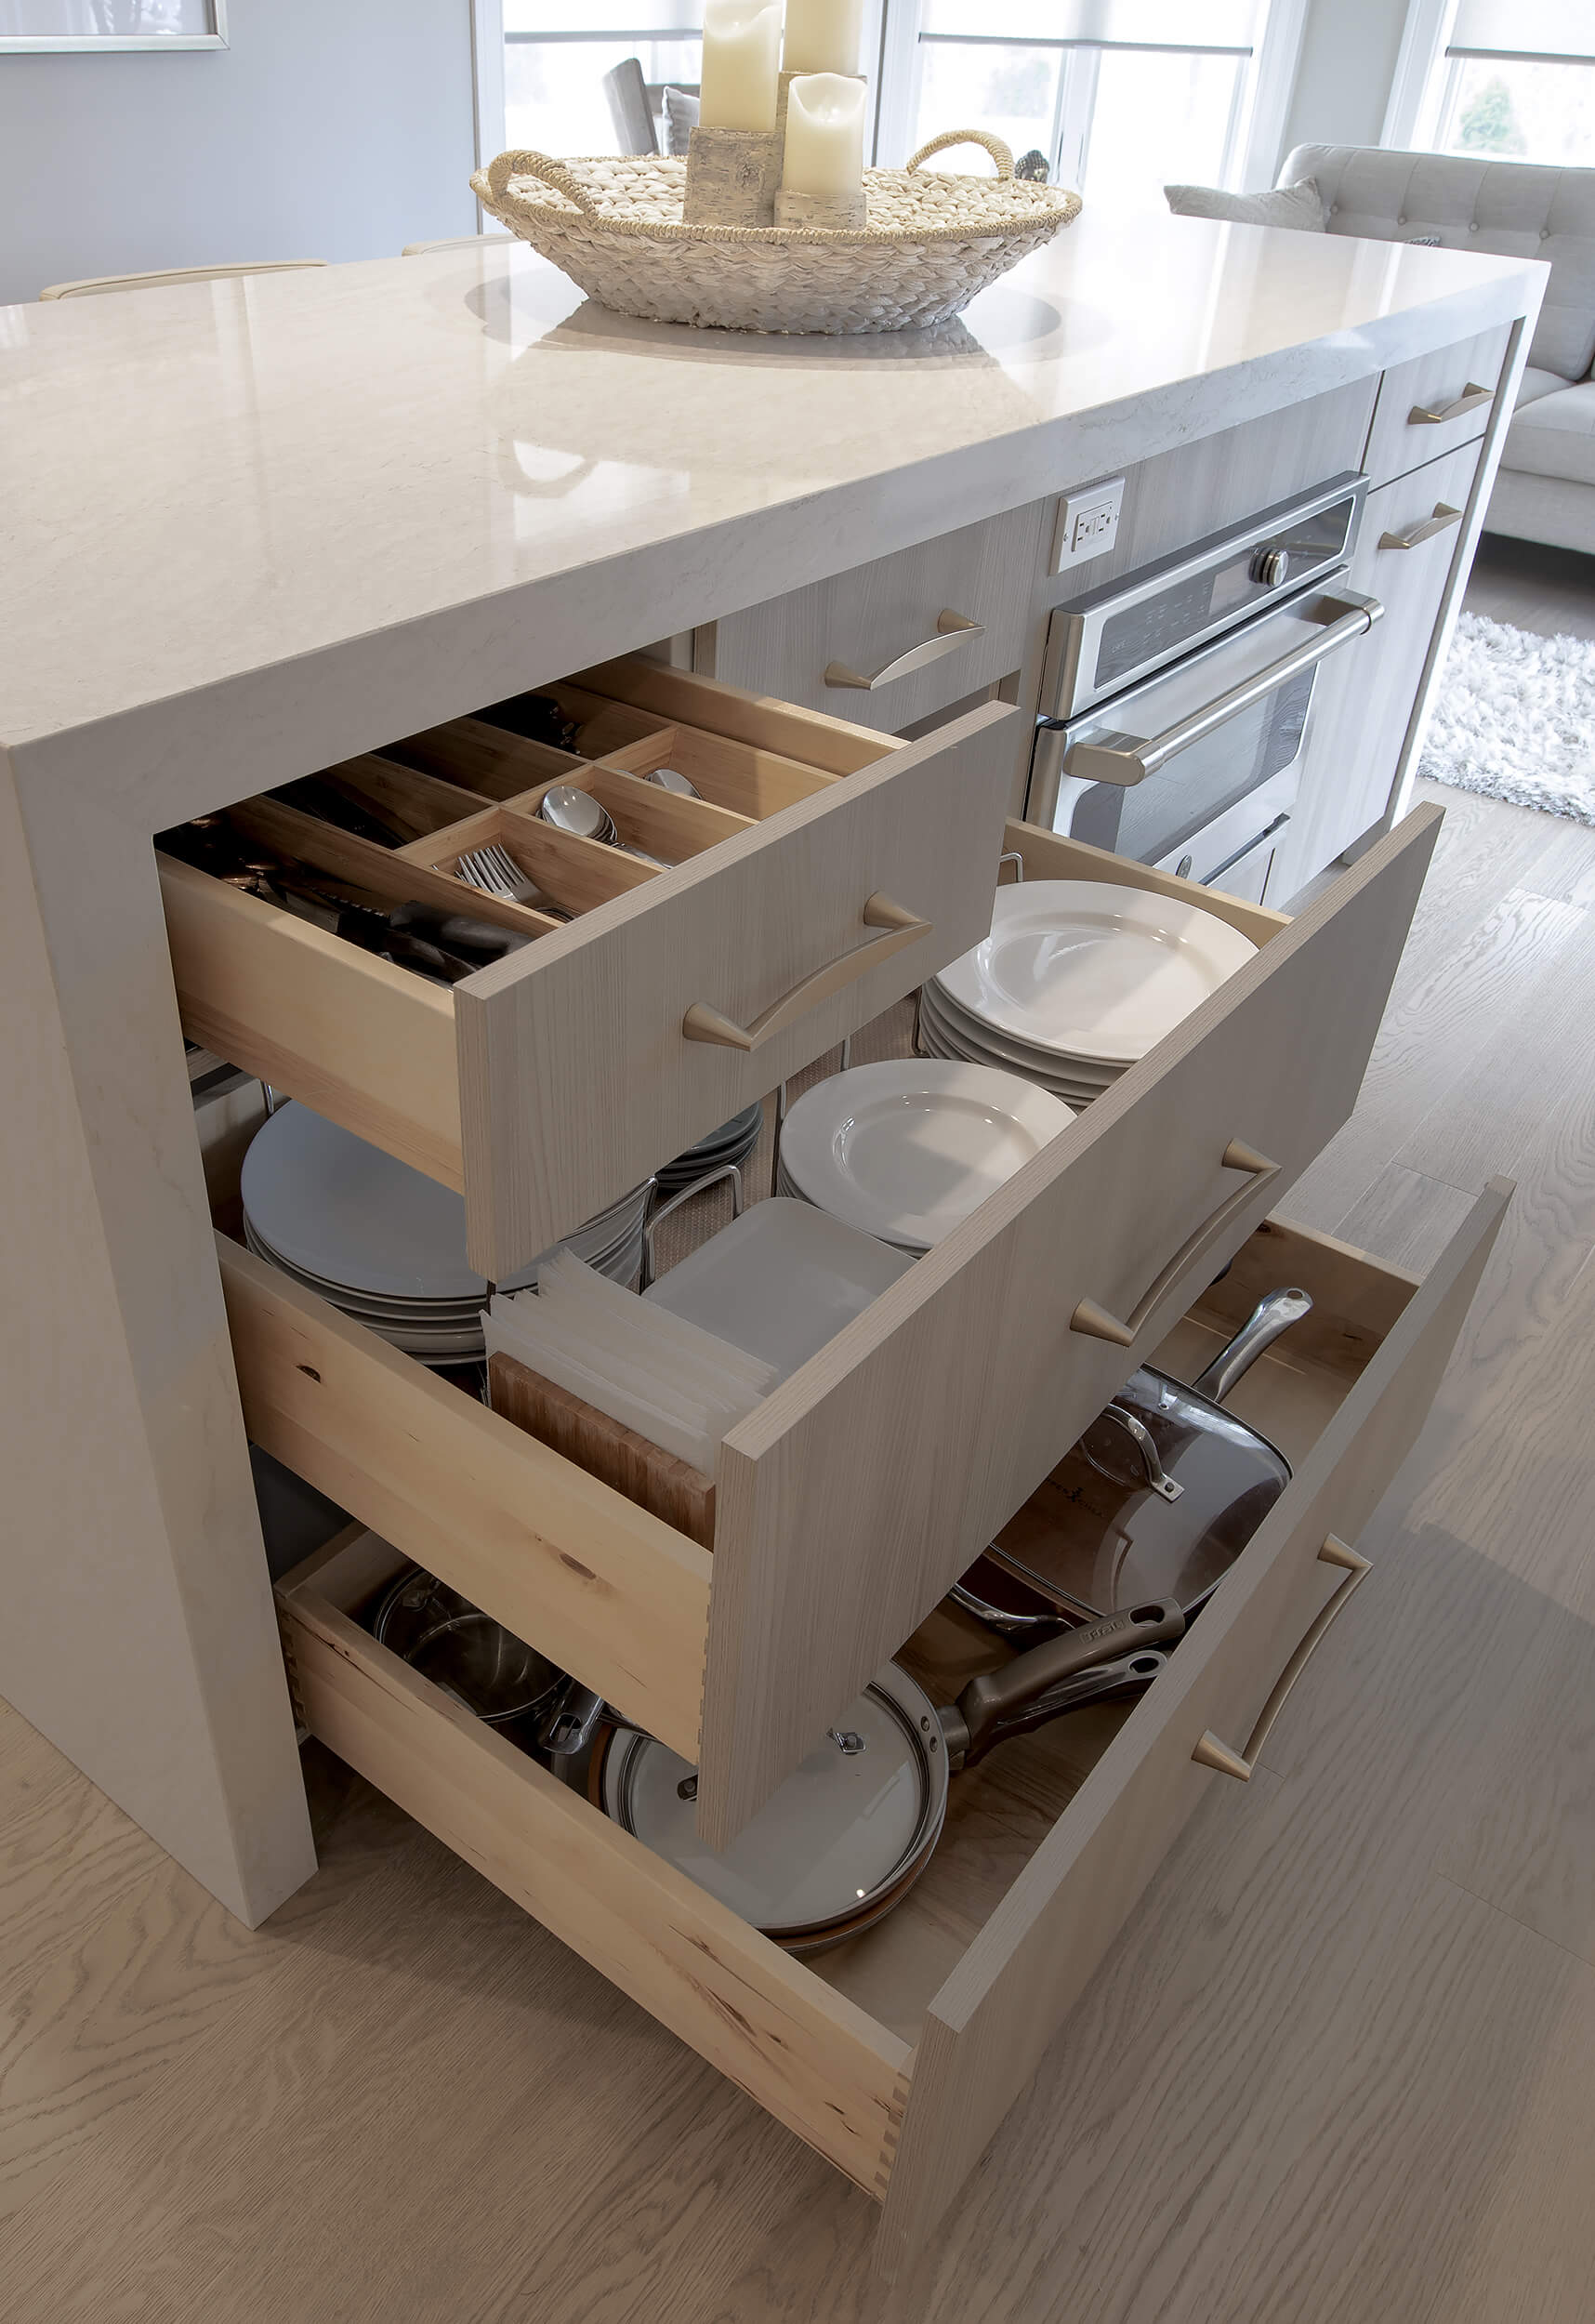
- Ample Storage: Say goodbye to kitchen clutter! Islands with cabinets offer a treasure trove of storage options, from drawers for utensils to shelves for cookbooks and even special racks for your wine collection.
- Casual Dining: Many kitchen islands incorporate seating, creating a cozy spot for casual meals or chatting with friends while you cook.
- Enhanced Functionality: Some islands come equipped with built-in appliances like sinks, dishwashers, or cooktops, streamlining your workflow and maximizing efficiency.
- Focal Point: A well-designed kitchen island can become the visual centerpiece of your kitchen, adding style and personality.
Exploring Different Kitchen Island Styles
Just like your wardrobe, kitchen islands come in different styles to match your kitchen’s vibe.
1. Stationary Islands: The Cornerstone of Your Kitchen
Stationary islands are permanent fixtures that offer the most storage and counter space. They’re ideal for kitchens where you need maximum functionality. You’ll find them in a variety of shapes, including:
- Rectangular: The classic choice, offering a balanced and symmetrical look.
- L-Shaped: Perfect for creating defined zones in larger kitchens, often incorporating a breakfast bar on one side.
- Circular or Oval: A unique and elegant option that softens the lines of a kitchen.
2. Mobile Islands: Flexibility on Wheels
Mobile islands bring a dynamic element to your kitchen. Set on casters, they can be moved around as needed, providing extra prep space or a serving station during gatherings. Consider these advantages:
- Ideal for Smaller Kitchens: Their mobility prevents them from overwhelming compact spaces.
- Changeable Layout: Easily rearrange your kitchen layout for different occasions.
- Additional Features: Look for models with locking casters for stability, drop-leaf extensions for extra countertop space, and built-in cutting boards or wine racks.
3. Cabinet-Based Islands: DIY Charm and Customization
For those who love the character of vintage finds or enjoy tackling DIY projects, a cabinet-based island is a fantastic option. Repurpose old cabinets or build your own using stock or semi-custom cabinets:
- Budget-Friendly: Utilizing salvaged materials or pre-made cabinets can significantly reduce costs compared to custom-built options.
- Design Flexibility: Mix and match cabinet styles, colors, and finishes to create a unique island that reflects your personal style.
- Upcycling Opportunity: Give old furniture a new lease on life and add a touch of history to your kitchen.
Kitchen Island Functionality: Beyond the Basics
Modern kitchen islands have evolved beyond just extra counter space. Here’s a closer look at the features that can transform your island into a multi-functional powerhouse:
1. Storage Solutions for Every Need
- Drawers: Perfect for utensils, cookware, linens, and smaller kitchen gadgets. Consider drawers with built-in dividers or organizers for added efficiency.
- Shelves: Ideal for storing cookbooks, displaying decorative items, or keeping frequently used items within easy reach.
- Wine Racks: If you’re a wine enthusiast, a built-in wine rack adds a touch of sophistication and keeps your favorite bottles organized and accessible.
- Open Shelving: A popular trend that adds visual interest and provides easy access to frequently used dishes or decorative items.
- Pull-Out Bins: Conceal trash and recycling bins within the island for a clean and streamlined look.
2. Seating Options for Casual Dining
- Breakfast Bar Overhang: A classic choice that extends the countertop beyond the base cabinets, creating a casual dining area. Consider factors like legroom, seating capacity, and the material of the overhang.
- Integrated Seating Area: Some islands are designed with a built-in seating area, often on one side or end of the island. This creates a more defined and intimate dining space.
3. Appliance Integration for Maximum Efficiency
- Sinks: A second sink in your kitchen island can be a game-changer, especially if you have a large kitchen or frequently entertain. Consider a smaller prep sink or a full-sized sink with a garbage disposal.
- Dishwashers: Integrating a dishwasher into your island frees up space in your main cabinetry run and optimizes workflow.
- Microwaves: Tucking your microwave into the island keeps it off your countertops and creates a more streamlined look.
- Cooktops: An island cooktop creates a focal point in your kitchen and allows you to face your guests while you cook. Consider ventilation needs carefully when planning an island cooktop.
Are you looking for a convenient way to cook and entertain in your kitchen? Consider installing a kitchen island with stove that seamlessly integrates a cooking surface into your island counter.
4. Lighting to Enhance Functionality and Ambiance
Proper lighting is essential for any kitchen, and your island is no exception.
- Pendant Lights: Pendant lights suspended above the island provide focused task lighting for food preparation and add a stylish touch.
- Recessed Lighting: Installed directly into the ceiling above the island, recessed lighting offers overall illumination.
- Under-Cabinet Lighting: Illuminate your countertops and add a warm glow to your kitchen with under-cabinet lighting installed beneath the island’s countertop.
Kitchen Island Design Styles: Finding Your Perfect Match
Your kitchen island should complement your overall kitchen design aesthetic. Here are a few popular styles to inspire you:
- Farmhouse: Embrace rustic charm with distressed wood finishes, open shelving, apron-front sinks, and vintage-inspired hardware.
- Modern: Create a sleek and sophisticated statement with clean lines, minimalist hardware, and contrasting materials like metal and wood.
- Traditional: Opt for timeless elegance with raised panel cabinets, ornate details, rich wood tones, and classic finishes.
- Transitional: Bridge the gap between traditional and contemporary with a blend of elements, such as Shaker-style cabinets, neutral colors, and a mix of materials.
DIY vs. Buying a Kitchen Island: Weighing Your Options
When it comes to getting your dream kitchen island, you have two main paths: buying a pre-made island or embarking on a DIY adventure. Let’s explore the pros and cons of each approach.
Ready-Made Islands: Convenience and Affordability
Pros:
- Budget-Friendly: Prefabricated islands are generally easier on the wallet, especially compared to fully custom options.
- Convenience: No need to dust off your power tools or decipher complicated assembly instructions.
- Wide Variety: You’ll find pre-made islands in a range of styles, colors, and materials to suit different tastes and budgets.
- Warranty: Most pre-made islands come with a manufacturer’s warranty, providing peace of mind in case of defects or issues.
Cons:
- Limited Customization: You might not find an island that perfectly matches your desired size, layout, or features.
- Potential Size Mismatches: Finding the ideal fit for your kitchen’s dimensions can sometimes be challenging.
- Durability Concerns: Some pre-made islands might not be as sturdy or long-lasting as custom-built options.
Building Your Own Island: Customization and Personalization
Pros:
- Ultimate Customization: Design an island that perfectly reflects your style and meets your specific needs, from the cabinet configuration and countertop material to the hardware and finishes.
- Perfect Fit: Ensure your island integrates seamlessly with your kitchen’s layout and dimensions, maximizing space and flow.
- Cost-Saving Potential: Utilizing salvaged materials, repurposing old cabinets, or carefully sourcing materials can make DIY more budget-friendly.
- Durability: Choose high-quality materials and construction techniques to create an island that’s built to last.
- Sense of Accomplishment: Experience the satisfaction of creating a beautiful and functional piece for your home with your own two hands.
Cons:
* Higher Costs: Depending on your material choices and skill level, building your own island can sometimes be more expensive than buying pre-made, especially if you need to invest in tools or hire help.
* Time Commitment: DIY projects take time, especially if you’re new to woodworking or cabinet installation. Be realistic about your available time and skillset.
* Potential for Errors: Mistakes can happen, especially if you’re not experienced with DIY projects. Factor in the cost of potential errors and the time it takes to correct them.
* No Warranty: If something goes wrong with your DIY island, you’re responsible for repairs or replacements.
Kitchen Island Costs: Setting a Realistic Budget
The cost of your dream kitchen island can vary significantly depending on factors like size, materials, features, and whether you choose pre-made or custom. Here’s a general idea to get you started:
Prefabsricated Kitchen Islands:
- Basic Models: Expect to spend between $800 to $2,500 for a basic pre-made island with standard features and materials.
- Upgraded Features: Islands with higher-end countertops (granite, quartz), additional storage features, or built-in appliances can range from $2,500 to $5,000 or more.
Custom-Built Kitchen Islands:
- Starting Point: Custom-built islands typically start around $3,000 and can easily reach $10,000 or more depending on the complexity of the design, the materials used, and the labor costs in your area.
DIY Kitchen Islands:
- Wide Range: The cost of a DIY island is highly variable, ranging from a few hundred dollars for a simple project using repurposed materials to several thousand dollars if you opt for high-end countertops and finishes.
Budgeting Tips:
- Prioritize Needs vs. Wants: Determine the must-have features and materials for your island and be willing to compromise on less important aspects to stay within budget.
- Shop Around: Get quotes from multiple suppliers or contractors to compare pricing for both pre-made islands and custom builds.
- Consider Alternatives: Explore cost-effective alternatives, such as using butcher block instead of granite for your countertop or opting for open shelving instead of custom cabinetry.
- Factor in Installation: If you’re not comfortable tackling the installation yourself, factor in the cost of hiring a professional.
Choosing the Right Cabinets for Your Kitchen Island: A Closer Look
Cabinets are the backbone of your kitchen island, providing both storage and style. When selecting cabinets for your island, consider these factors:
1. Purpose and Functionality:
- What is the primary function of your island? Will it be mainly for food prep, casual dining, storage, or a combination of purposes?
- How much storage space do you need? Take inventory of your kitchen items and determine the ideal mix of drawers, shelves, and other storage features.
2. Design Cohesion:
- Do you want your island cabinets to match your existing kitchen cabinets, creating a cohesive look, or would you prefer a contrasting style to make a statement?
- Consider the overall style of your kitchen. Are you going for a sleek and modern aesthetic, a cozy farmhouse feel, or something in between?
3. Types of Kitchen Island Cabinets
- Base Cabinets: The workhorses of the kitchen island, offering ample storage space with customizable drawers and shelves.
- Wall Cabinets: Used to create a two-tiered island, providing additional storage or display space.
- Tall Cabinets (Pantry Cabinets): Maximize storage capacity in larger islands, often used to store pantry items, small appliances, or cleaning supplies.
- Custom-Built Cabinetry: Offers the ultimate in design flexibility, allowing you to create cabinets that perfectly match your needs, style, and the quirks of your kitchen.
Essential Tips for Choosing Kitchen Island Cabinets:
- Measure Twice, Order Once: Accurate measurements are crucial for ensuring your cabinets fit perfectly. Measure your space carefully, considering clearances for doors, appliances, and traffic flow.
- Quality Matters: Invest in well-constructed cabinets made from durable materials that can withstand the wear and tear of daily kitchen use.
- Don’t Be Afraid to Mix and Match: Create a unique and personalized look by combining different cabinet styles, colors, or finishes. For example, use contrasting colors for the base and upper cabinets or incorporate open shelving alongside closed cabinets.
- Consider Your Lifestyle: If you have a busy household with children or pets, choose durable and easy-to-clean materials and finishes.
- Seek Professional Guidance: If you’re overwhelmed by the choices or unsure about the best layout for your island, don’t hesitate to consult with a kitchen designer or contractor.
Building Your Own Kitchen Island: A Step-by-Step Guide
Ready to roll up your sleeves and create a custom kitchen island? Here’s a simplified guide to get you started:
1. Planning and Design:
- Measure Your Space: Determine the maximum size for your island based on your kitchen’s dimensions and traffic flow. Allow for ample clearance around the island (ideally, 36-48 inches).
- Sketch Your Design: Create a rough sketch of your desired island shape, size, and cabinet configuration. Consider the location of appliances, seating, and storage features.
- Choose Your Materials: Select durable and moisture-resistant materials for the cabinet boxes, such as plywood or medium-density fiberboard (MDF). Consider the countertop material, backsplash, and hardware as well.
- Create a Detailed Plan: Develop a detailed plan that includes measurements, material lists, and a step-by-step construction outline.
2. Gathering Materials and Tools:
- Cabinetry: Purchase stock or semi-custom cabinets that fit your design or source materials to build your own cabinets from scratch.
- Countertop: Select your countertop material (granite, quartz, butcher block, laminate), keeping in mind your budget and desired aesthetic.
- Hardware: Choose knobs, pulls, hinges, and other hardware that complements your island’s style.
- Tools and Supplies: Gather the necessary tools, such as a saw, drill, level, screws, nails, wood glue, sandpaper, and safety equipment.
3. Assembling the Cabinets:
- Build the Cabinet Boxes: If you’re building your own cabinets, assemble the cabinet boxes according to your plan, ensuring square corners and secure joints.
- Install Shelves and Drawers: Add shelves, drawers, and other storage features based on your design, using appropriate supports and hardware.
- Reinforce for Stability: Reinforce the cabinet structure with corner braces, especially if you plan to incorporate heavy appliances or a seating area.
4. Installing the Countertop:
- Prepare the Countertop: If necessary, have your countertop professionally cut to size and finished.
- Attach the Countertop: Securely attach the countertop to the cabinet base using construction adhesive and screws.
5. Adding the Finishing Touches:
- Install the Backsplash (Optional): Protect your walls from splashes and add a decorative element with a backsplash.
- Attach the Hardware: Install knobs, pulls, hinges, and other hardware for functionality and style.
- Sand and Paint or Stain: Sand any rough edges and paint or stain your island to match your kitchen’s décor.
DIY Kitchen Island Tips:
- Use a Level: Frequently check for levelness throughout the construction process to ensure a sturdy and even island.
- Secure to the Floor: For added stability, especially with larger islands, consider securing the island base to the floor using L-brackets or other appropriate hardware.
- Electrical and Plumbing: If you’re incorporating electrical outlets, lighting, or a sink, consult with a qualified electrician or plumber for proper installation.
- Choose Durable Materials: Opt for materials that can withstand the demands of a busy kitchen, such as moisture-resistant cabinet materials, scratch-resistant countertops, and durable hardware.
- Take Your Time: Don’t rush the process. Work carefully and methodically to ensure a successful and satisfying outcome.
Conclusion: Creating Your Dream Kitchen Island
A kitchen island with cabinets can transform your kitchen into a more functional, stylish, and enjoyable space for cooking, dining, and socializing. Whether you choose a pre-made island, embark on a DIY adventure, or collaborate with a professional, carefully consider your needs, budget, and design preferences to create an island that perfectly suits your lifestyle and enhances your culinary haven.

- LED Retrofit Recessed Lights Upgrade for Energy Efficiency and Style - July 30, 2026
- Recessed Lighting Inserts Bring Versatile Style to Any Room - July 29, 2026
- Led Recessed Trim Modernizing Lighting with Versatile Retrofit Solutions - July 28, 2026