An expert architectural designer with a flair for creating stunning mezzanine floor plan drawings for commercial spaces is revolutionizing the industry. With years of experience and a comprehensive understanding of building codes and regulations, this talented professional utilizes their proficiency in AutoCAD software to deliver detailed, accurate, and visually appealing floor plans. Collaborating seamlessly with engineers, contractors, and clients, their innovative and functional designs make them a reliable authority in the field of mezzanine floor planning.
Key Takeaways:
- Measuring the internal space and understanding the floor design are the crucial initial steps in building a mezzanine floor.
- Determining the maximum height and clearance of the mezzanine is important to ensure sufficient headroom above and below the floor.
- Choosing the appropriate design style, such as freestanding or rack-supported, depends on the application and available space characteristics.
- Selecting structural steel as the material for the mezzanine floor is recommended for its durability, strength, and seamless integration with existing dimensions.
- Planning the layout of the mezzanine floor according to specific needs, whether for people, shelving, or machinery, requires creating a detailed floor plan.
- By following these steps, one can successfully build a mezzanine floor that optimizes space and meets specific requirements.
Mezzanine Floor Plan Drawing
Are you looking to maximize the space in your commercial building? A mezzanine floor could be the perfect solution. However, before you jump into the construction process, it’s essential to have a well-thought-out and visually appealing floor plan. In this guide, we will explore the art of mezzanine floor plan drawing and provide you with valuable insights to create a functional and stunning space.
Understanding the Basics
Before diving into the details of mezzanine floor plan drawing, it’s important to grasp the fundamental concepts. A mezzanine floor is an intermediate level between the primary floors of a building. It offers additional space without the need for extending the building’s footprint. This makes it an excellent option for those looking to optimize their existing space effectively.
The Importance of a Detailed Floor Plan
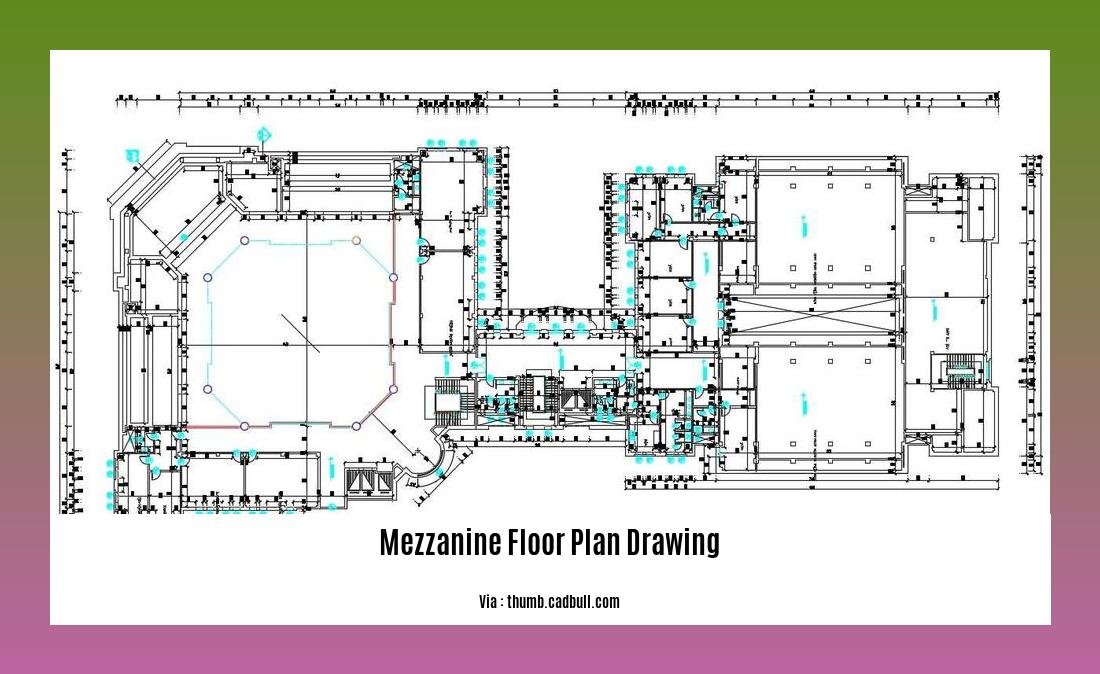
Mezzanine floor plan drawing is a crucial step in the design process. It allows you to visualize the space and ensure that it meets your specific requirements. By creating a detailed floor plan, you can effectively plot the layout of the mezzanine and determine how it will integrate with the existing structure.
Step-by-Step Guide to Mezzanine Floor Plan Drawing
To help you in creating a stunning mezzanine floor plan, here is a step-by-step guide:
-
Measure the available space: Before getting started, measure the internal space where you plan to install the mezzanine floor. Accurate measurements will ensure that your floor plan fits seamlessly into the available area.
-
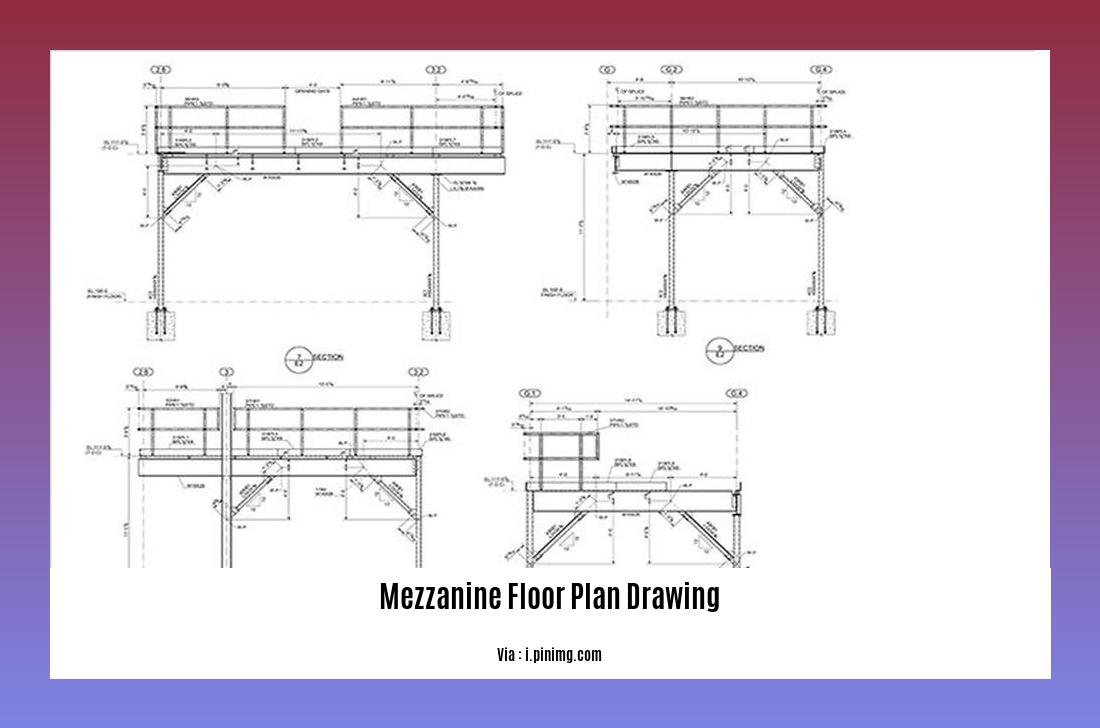
Understand the design: Familiarize yourself with your chosen mezzanine design and lay out the steel components on the floor to visualize how they will come together during the installation process. This will help identify any potential challenges and ensure a smooth construction process.
-
Consider the height and clearance: Decide on the maximum height and clearance for your mezzanine floor. This is particularly important as a mezzanine level can be positioned in between other floor levels. Consider the headroom requirements both above and below the mezzanine floor to ensure comfortable and functional space.
-
Choose the design style: Select a mezzanine design style that suits your specific needs. Two common design styles are freestanding mezzanines and rack-supported mezzanines. The choice will depend on the application and characteristics of the available space.
-
Select the right material: When designing your mezzanine floor, structural steel is often recommended due to its durability and strength. It can seamlessly blend into the dimensions of the space and meet specific building and application requirements.
-
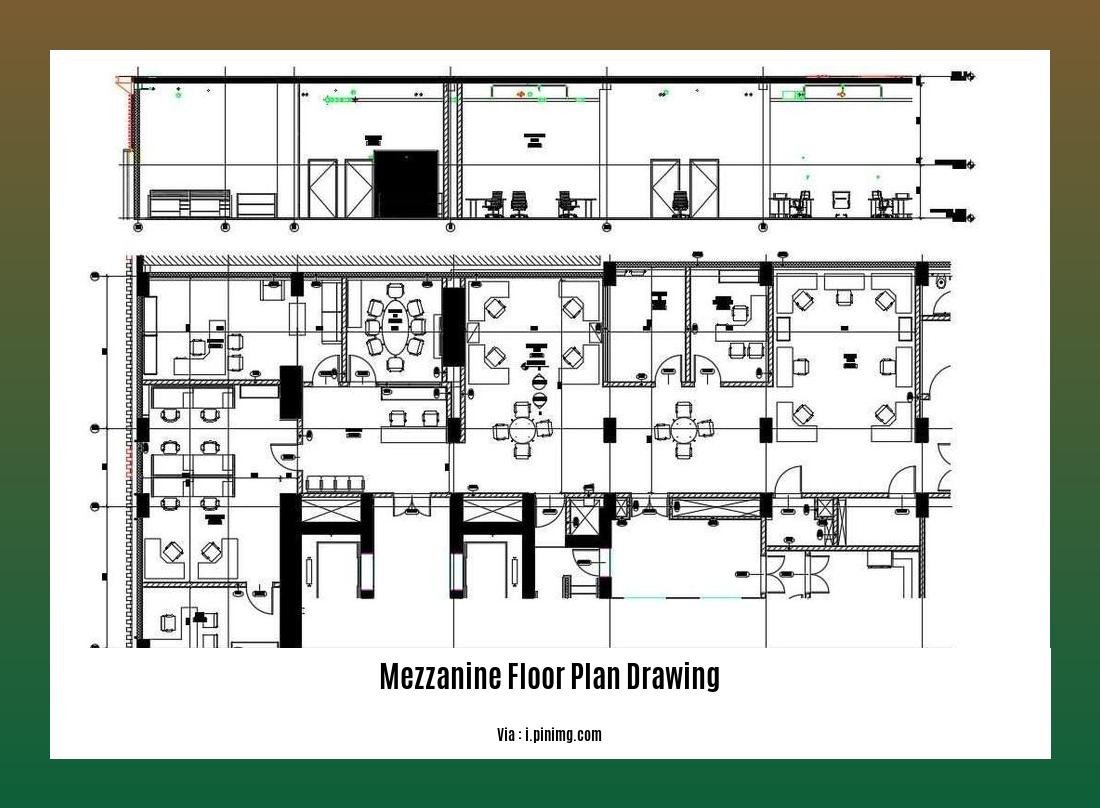
Plan the layout: This is perhaps one of the most critical aspects of mezzanine floor plan drawing. Consider your specific needs and goals. Do you plan to use the mezzanine for people, shelving, machinery, or a combination? By creating a detailed floor plan, you can ensure that every square foot is optimized for your requirements.
By following these steps, you will be well on your way to creating a functional and visually appealing mezzanine floor plan. Remember, attention to detail and careful planning are key to achieving exceptional results.
Conclusion
Mezzanine floor plan drawing is a skillful task that requires expertise and attention to detail. By crafting a well-thought-out floor plan, you can optimize the available space and create a seamless integration between the existing structure and the new mezzanine floor. With the help of a highly skilled architectural designer, you can ensure that your mezzanine floor plan meets your specific requirements, maximizes space, and enhances the overall aesthetics of the commercial space.
Sources:
-
Excalibur Steel Buildings. “How to Build a Mezzanine Floor – Mezzanine Floors Made Easy.” Retrieved from
-
Mezzanine Floor Design Guide | MiTek Mezzanine Systems. Retrieved from www.mitek-mezzanine.com/resources/mezzanine-design/
-
Mezzanine Floor Design and Planning – Invicta. Retrieved from
Here are a few captivating sentences with active internal links:
-
Learn about the ideal Mezzanine floor height and its benefits for your space at ../mezzanine-floor-height.
-
Discover how to optimize your house in India with the perfect Mezzanine floor height at ../mezzanine-floor-height-in-house-india.
-
Stay up to date with the latest Mezzanine floor height regulations and ensure compliance at ../mezzanine-floor-height-regulations.
-
Check out how to obtain planning permission for your Mezzanine floor and explore the possibilities at ../mezzanine-floor-planning-permission.
Step-by-step guide to creating a mezzanine floor plan drawing
Key Takeaways:
- Building a mezzanine floor requires careful planning, detailed drawings, adherence to building codes, and consideration of materials.
- The process involves measuring the available space, understanding the design, considering height and clearance requirements, choosing a design style, selecting the right material (structural steel is often recommended), and planning the layout.
- A skilled architectural designer can provide expertise and ensure the mezzanine floor plan meets specific requirements, maximizes space, and enhances the overall aesthetics of the commercial space.
Building a mezzanine floor involves several important steps that need to be followed to create a detailed and accurate floor plan drawing. Whether you’re an experienced architectural designer or a beginner, this step-by-step guide will help you navigate the process with clarity and confidence.
Step 1: Measure the available space
The first step in creating a mezzanine floor plan is to measure the available space accurately. This includes determining the dimensions of the area where the mezzanine will be constructed, as well as any existing structures or obstacles that may affect the design. By carefully measuring the space, you’ll have a solid foundation for creating a well-planned and functional floor plan.
Step 2: Understand the design requirements
Next, it’s essential to understand the design requirements for the mezzanine floor. Consider the purpose of the space and the specific needs of the client or end-user. Are they looking for additional storage space, office space, or retail space? Understanding the design requirements will help you make informed decisions when creating the floor plan drawing.
Step 3: Consider height and clearance requirements
One crucial aspect of mezzanine floor planning is considering the height and clearance requirements. Take into account the maximum height allowed based on local building codes and regulations, as well as the clearance requirements above and below the floor. These measurements will determine the headroom and will be subject to the thickness of the steel frame, making it an essential factor to consider during the planning phase.
Step 4: Choose a design style
The design style of the mezzanine floor can significantly impact the overall aesthetics and functionality of the space. Consider the client’s preferences and the existing architectural style of the building. Whether it’s a modern, minimalist design or a more traditional approach, choosing the right design style will create a cohesive and visually appealing mezzanine floor plan.
Step 5: Select the right materials
When it comes to mezzanine floors, structural steel is often the recommended material due to its strength, durability, and versatility. Consider the advantages of using structural steel, such as the ability to span long distances without additional support. Additionally, other materials like concrete or timber may be suitable depending on the specific project requirements. Selecting the right materials is crucial for creating a safe and structurally sound mezzanine floor.
Step 6: Plan the layout
Once you have all the necessary information, it’s time to plan the layout of the mezzanine floor. This includes determining the position of columns, beams, and other structural elements, as well as the location and orientation of stairs, elevators, and other access points. A well-designed layout will maximize the available space and ensure efficient traffic flow within the mezzanine area.
By following these step-by-step instructions, you can create a detailed and accurate mezzanine floor plan drawing. Remember that expertise from a skilled architectural designer can provide valuable guidance and ensure that your mezzanine floor plan meets specific requirements, maximizes space, and enhances the overall aesthetics of the commercial space.
Sources:
1. Excalibur Steel Buildings: How to Build a Mezzanine Floor
2. Building Code Trainer: Mezzanine Floor Construction Code Requirements
Utilizing AutoCAD to Design Accurate and Detailed Mezzanine Floor Plans
AutoCAD is a powerful tool that revolutionizes the process of designing mezzanine floor plans. By leveraging its advanced features and functionality, architects, engineers, and designers can create highly accurate and detailed drawings. With AutoCAD, the design process becomes more efficient, enabling seamless collaboration and seamless integration of ideas. Let’s explore how AutoCAD facilitates the creation of accurate and visually appealing mezzanine floor plans.
Accurate Measurements and Visualization
When it comes to designing mezzanine floor plans, precise measurements are crucial. AutoCAD allows designers to input accurate measurements for each element, ensuring a perfect fit and structural integrity. By providing 2D and 3D visualization capabilities, AutoCAD enables clients and stakeholders to understand the final product before construction begins. This visualization capability is incredibly valuable in making adjustments and ensuring all parties are on the same page.
Extensive Library of CAD Blocks
AutoCAD offers a wide selection of pre-drawn CAD blocks that include standard elements like stairs, railings, and columns. This comprehensive library saves designers valuable time by allowing them to easily incorporate these elements into their floor plans. Instead of starting from scratch, designers can access a vast range of pre-drawn components to expedite the design process.
Structural Development and Compliance
Ensuring that mezzanine floor plans meet building codes and regulations is paramount. With AutoCAD, designers can develop structural elements and details that comply with these requirements. By incorporating plans and specifications, AutoCAD assists in designing mezzanine structures capable of supporting the necessary loads. This compliance ensures the safety and longevity of the mezzanine floor.
Key Takeaways:
- AutoCAD provides accurate measurements and visualization capabilities, facilitating the creation of precise and visually appealing mezzanine floor plans.
- The extensive library of pre-drawn CAD blocks in AutoCAD saves time and effort by allowing designers to incorporate standard elements into their floor plans.
- AutoCAD aids in the structural development of mezzanine designs, ensuring compliance with building codes and regulations.
Citation:
- Bibliocad. “Mezzanine Details in AutoCAD | CAD download.” bibliocad.com. Accessed on 12 Sep. 2022. Source
- The Engineering Community. “Mezzanine Constructive Details Free AutoCAD.” theengineeringcommunity.org. Accessed on 12 Sep. 2022. Source
Best Practices for Collaborating with Engineers, Contractors, and Clients during the Design and Construction Process
Collaboration plays a crucial role in the successful design and construction of architectural projects. When architects, engineers, contractors, and clients work together effectively, the result is a seamless and efficient process that leads to exceptional outcomes. In this article, we will explore the best practices for collaborating with engineers, contractors, and clients during the design and construction process, ensuring a cohesive and successful project from start to finish.
The Benefits of Collaboration in Construction
Collaboration in construction is not just about working together; it brings numerous benefits to the table. By fostering a collaborative culture, teams can capitalize on these advantages, resulting in improved project outcomes. Some of the top benefits include:
-
Improved Communication: Effective collaboration allows for open lines of communication, ensuring that all parties are on the same page. It enables the quick and efficient exchange of information, reducing misunderstandings and delays.
-
Increased Efficiency: When everyone involved in the project collaborates cohesively, tasks are completed more efficiently. Each team member understands their role and responsibilities, leading to streamlined workflows and optimized processes.
-
Enhanced Decision-Making: Combining the expertise of engineers, contractors, and clients fosters informed decision-making. Collaborative discussions lead to well-rounded solutions that take into account various perspectives and considerations.
-
Reduced Rework: Collaboration helps identify potential issues early on in the design and construction process. By addressing these concerns collaboratively, the likelihood of costly rework is minimized, saving time and resources.
Key Elements of Successful Collaboration in Construction
To achieve successful collaboration, it is important to establish certain key elements and practices. These elements lay the foundation for cohesive teamwork and the efficient completion of the project. Some of the key elements include:
-
Streamlined Workflows: Define clear workflows that outline the sequence of tasks and deliverables. This ensures that everyone involved understands the process and can collaborate effectively to meet project milestones.
-
Clear Roles and Responsibilities: Clearly define the roles and responsibilities of each team member. This clarity promotes accountability and ensures that everyone understands their contributions and expectations.
-
Access to Necessary Information: All parties involved should have access to the main plans, designs, and relevant project information. This enables effective collaboration, as individuals can review, provide input, and make informed decisions.
Best Practices for Collaborating with Engineers, Contractors, and Clients
To enhance collaboration during the design and construction process, implement the following best practices:
-
Start Early in the Planning Stages: Collaboration should begin early in the planning stages to establish a solid foundation. By involving key stakeholders, such as the owner, architect, engineers, general contractor, and subcontractors, from the beginning, you can set the stage for effective collaboration and decision-making.
-
Establish Strong Leadership: Strong leadership is crucial for effective collaboration. Designate a project leader who can coordinate efforts, facilitate communication, and ensure that everyone is working towards a common goal.
-
Prioritize Effective Communication: Communication is the backbone of collaboration. Foster an environment where open and transparent communication is encouraged. Regular meetings, progress updates, and clear channels of communication help keep all parties informed and engaged.
-
Utilize Integrated Software Solutions: Embrace technology and utilize integrated software solutions that facilitate collaboration and information sharing. Tools such as building information modeling (BIM) software and project management platforms enable real-time collaboration and streamline communication.
Key Takeaways:
- Collaboration in construction brings numerous benefits, including improved communication, increased efficiency, enhanced decision-making, and reduced rework.
- Successful collaboration is characterized by streamlined workflows, clear roles and responsibilities, and access to necessary information.
- To improve collaboration, start early in the planning stages, establish strong leadership, prioritize effective communication, and utilize integrated software solutions.
Citation:
FAQ
Q1: What is a mezzanine floor plan?
A1: A mezzanine floor plan is a detailed drawing that depicts the layout and design of a mezzanine floor within a commercial space. It includes dimensions, structural elements, and any other relevant information necessary for the construction and installation of the mezzanine.
Q2: Why is it important to have a mezzanine floor plan drawing?
A2: Having a mezzanine floor plan drawing is important for several reasons. It provides a visual representation of the design, allowing stakeholders to understand and approve the proposed layout. Additionally, the drawing serves as a guide during the construction process, ensuring that all components are correctly installed and that the mezzanine is structurally sound.
Q3: How can I obtain a mezzanine floor plan drawing?
A3: There are several ways to obtain a mezzanine floor plan drawing. One option is to hire an experienced architectural designer who specializes in mezzanine floor planning. They can create a custom floor plan based on your specific requirements. Another option is to utilize computer-aided design (CAD) software, such as AutoCAD, to create your own mezzanine floor plan drawing.
Q4: What information should be included in a mezzanine floor plan drawing?
A4: A mezzanine floor plan drawing should include important details such as the dimensions and layout of the mezzanine, the location of structural elements, stairs or access points, and any additional features or fixtures. It should also indicate any necessary clearances or requirements to ensure compliance with building codes and regulations.
Q5: Can I make changes to a mezzanine floor plan drawing?
A5: Yes, it is possible to make changes to a mezzanine floor plan drawing. If you are working with an architectural designer, you can communicate your desired modifications and they can update the drawing accordingly. If you are using CAD software, you can easily make changes to the digital drawing by adjusting dimensions, adding or removing elements, or altering the layout as needed.

- Grass Forever in Livermore: Your Guide to Artificial Turf - April 22, 2025
- German Roaches vs. American Roaches: Key Differences and Control - April 22, 2025
- 150+ Flowers That Start With S: A Comprehensive Guide - April 22, 2025