Are you embarking on a construction project and grappling with the intricacies of project scheduling? If so, this extensive article, “Sample construction schedule in MS Project: A Step-by-Step Guide”, is custom-made for you! This guide will take you through every step of creating a practical project timeline using the powerful features of Microsoft Project. Brace yourself for an enlightening journey into the world of construction scheduling!
Key Takeaways:
- Utilize sample Microsoft Project templates specifically designed for construction scheduling.
- Customize the schedule columns to align with project requirements.
- Establish a project start date and add tasks and activities accordingly.
- Define relationships and order tasks logically to optimize the schedule.
- Regularly review and update the schedule to maintain accuracy and reflect project progress.
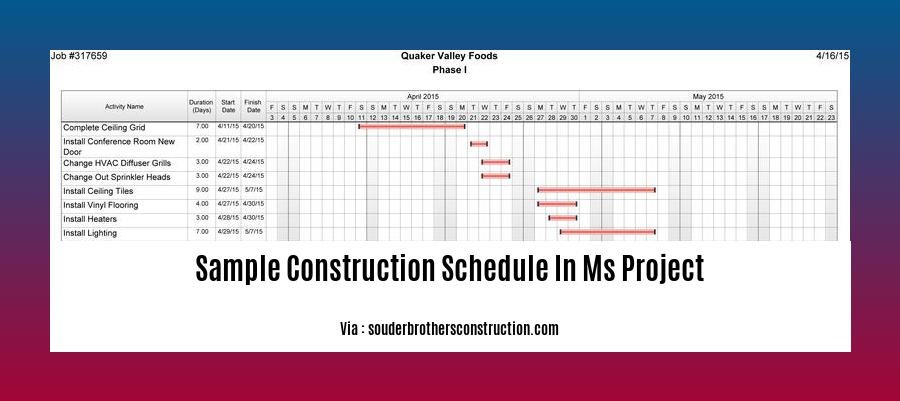
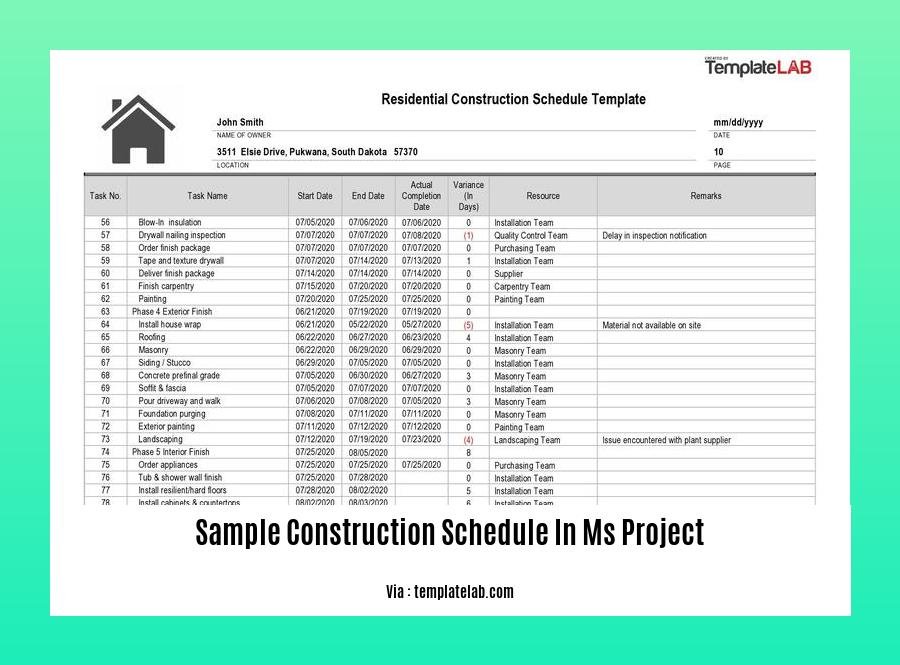
Sample Construction Schedule in MS Project
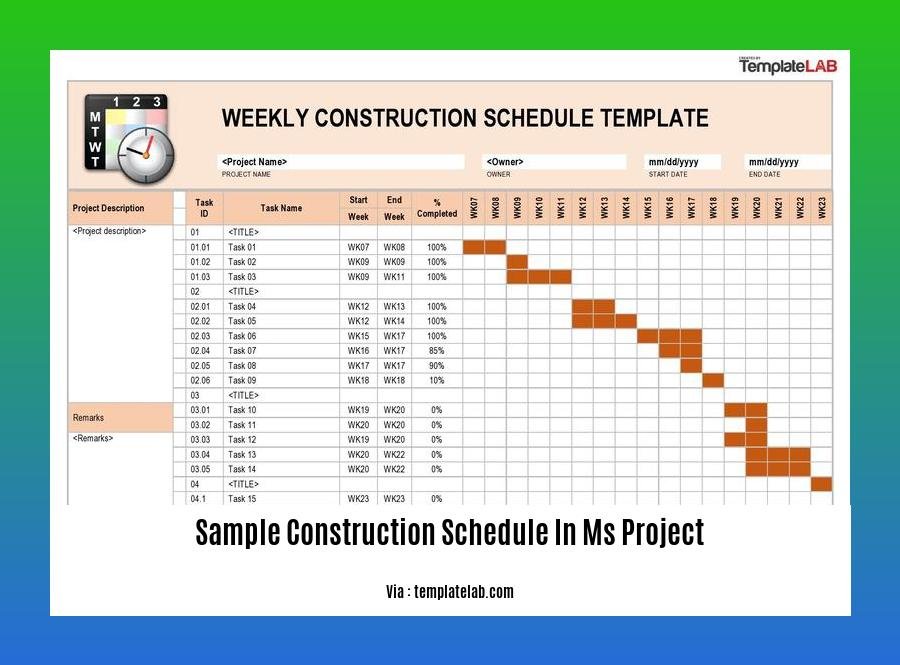
Crafting a sample construction schedule in MS Project is crucial for successful project management. Follow these steps to create an effective schedule:
Setting Up MS Project for Construction Scheduling
1. Choose a Template: Use industry-specific templates for construction projects. MS Project offers tailored templates for different construction types.
2. Set Start Date: Establish a clear start date for your project. This serves as the anchor point for scheduling.
Scheduling Project Tasks
1. Define Tasks: Break down your project into smaller tasks, including milestones and deliverables.
2. Establish Relationships: Link tasks logically using dependencies. This helps MS Project calculate task durations and interrelationships.
Editing the Construction Schedule
1. Adjust Schedule Columns: Customize columns to display relevant information such as task names, dates, resources, and costs.
2. Add Calendars: Create project-specific calendars to account for holidays, work shifts, and other non-working days.
Monitoring and Maintaining the Schedule
1. Track Progress: Regularly compare actual progress against the scheduled plan. Make adjustments as needed to keep the project on track.
2. Update the Schedule: As the project progresses, update the schedule to reflect changes in scope, resources, or timelines.
Benefits of Using MS Project for Construction Scheduling
- Accurate planning and scheduling
- Improved project visibility and communication
- Resource optimization and cost control
- Enhanced collaboration among stakeholders
- Risk identification and mitigation
Ensure the construction industry adheres to the latest safety standards by exploring our comprehensive guide on safety standards in construction industry.
For an in-depth understanding of the roles and responsibilities of safety supervisors in construction, delve into our detailed article on safety supervisor roles and responsibilities in construction.
Obtain a professional-looking profile for your construction company by downloading our sample construction company profile PDF.
Setting Task Durations and Dependencies
Let’s dive into the crucial task of setting task durations and dependencies in your construction project using Microsoft Project. This step is vital for creating a realistic schedule that accurately reflects the flow of your project.
Key Takeaways:
- Task duration refers to the estimated time it takes to complete a task.
- Task dependencies establish the order in which tasks must be completed.
- Setting accurate durations and dependencies helps avoid project delays and ensures a smooth workflow.
Steps:
- Estimate Task Durations: Start by estimating the time each task will take to complete. Consider factors like the complexity of the task, resources required, and potential delays.
- Set Task Durations: Input the estimated durations for each task in the “Duration” column. Microsoft Project offers various duration options, such as hours, days, or weeks.
- Identify Dependencies: Analyze the project plan and identify the tasks that depend on others. For instance, the task “Pouring Concrete” depends on “Excavation” being completed first.
- Create Dependencies: Use the “Predecessors” column to define dependencies between tasks. Enter the ID or name of the predecessor task for each dependent task.
- Types of Dependencies: Microsoft Project supports various dependency types, including Finish-to-Start, Start-to-Start, and Finish-to-Finish. Choose the appropriate type based on the project logic.
- Review and Adjust: Once the dependencies are set, review the schedule to ensure the logical flow of tasks. Adjust durations and dependencies as needed to create a realistic and achievable project plan.
Benefits:
- Accurate project planning and scheduling
- Improved coordination and communication among team members
- Reduced project risks and potential delays
- Enhanced project visibility and control
External Sources:
- Microsoft Project for Construction Projects: The Ultimate Guide
- Flexible Duration Tasks in Microsoft Project
Assigning Resources and Costs
Managing resources and costs is crucial in any construction project. Microsoft Project provides robust features to help you efficiently assign resources and track costs. Let’s dive in:
Adding Resources and Costs
- Create Resources: Use the “Resource Sheet” to create a list of human resources, equipment, or materials required for your project.
- Add Costs: Define cost rates for work resources and costs for materials. This includes fixed costs (assigned to specific tasks) and per-use costs (incurred each time the resource is used).
Using Cost Resources
Cost resources represent expenses like airfare or catering that aren’t directly tied to labor or equipment. They can be assigned to multiple tasks and add to the overall project cost.
Key Takeaways:
- Resources are essential for planning and scheduling project tasks.
- Track resource costs to monitor project expenses and optimize resource allocation.
- Microsoft Project’s cost resource feature provides flexibility in managing project expenses.
Relevant URL Sources:
- Enter costs for resources – Microsoft Support
- How to Add Resources to a Project using the Resource Sheet – YouTube
Customizing Views and Reports to Enhance Construction Project Management
Do you want to get the most out of Microsoft Project for your construction projects? Customizing views and reports is key! Here’s how:
Creating a Custom View
- Group: Organize tasks by category, such as phase or discipline.
- Sort: Order tasks chronologically or by priority.
- Filter: Hide tasks that don’t meet specific criteria, like status or due date.
Customizing a Report
- Select a Template: Choose a built-in report or create your own.
- Add Fields: Include the information you need, such as task names, durations, or resources.
- Format: Adjust the layout, font, and colors to improve readability.
Key Takeaways:
- Custom views allow you to focus on specific aspects of your project.
- Custom reports provide tailored information for stakeholders.
- Microsoft Project offers powerful tools for managing construction projects.
Relevant URL Sources:
- Customize views – Microsoft Support
- Create or edit a report – Microsoft Support
FAQ
Q1: How do I create a sample construction schedule in Microsoft Project?
A1: First, create a new project and adjust the schedule columns to suit your construction needs. Set a start date, add tasks and activities, and establish their logical order and dependencies. Regularly review and update the schedule to ensure accuracy.
Q2: Are there any pre-made construction schedule templates in Microsoft Project?
A2: Yes, there are sample Microsoft Project templates available specifically for construction scheduling. These templates can provide a foundation for creating your own construction schedules.
Q3: How do I add resources and costs to my construction schedule?
A3: Use the “Resource Sheet” to create and assign resources to tasks. Define cost rates and costs for resources based on their type (work or cost). Cost resources can represent expenses not directly tied to labor or equipment and can be assigned to multiple tasks.
Q4: How do I define task durations in my construction schedule?
A4: Utilize Microsoft Project’s advanced task scheduling tools to create comprehensive construction schedules. You can use Hammock Tasks to make the duration of a task dependent on another task or set up task dependencies to reflect the sequence of tasks within the project.
Q5: How do I ensure my construction schedule is accurate and up-to-date?
A5: Regularly monitor and update your construction schedule to ensure accuracy. Review the schedule against actual progress, make necessary adjustments, and communicate updates to stakeholders to keep the project on track.