Does the thought of water damage, rot, and mold creeping into your walls send shivers down your spine? It should! But fear not, because window flashing is here to save the day (and your home). Think of it as a superhero cape for your windows, deflecting water and preventing costly repairs. This ultimate guide covers everything from choosing the right flashing to troubleshooting pesky leaks, making you a window-weatherproofing warrior.
Why Flashing Matters: Protecting Your Investment
Imagine your house is a ship braving a storm. You wouldn’t set sail with holes in the hull, would you? Similarly, window flashing acts as a sealant, preventing water from invading your walls. It’s a crucial defense against rot, mold, and structural damage—issues that can quickly drain your wallet. Without it, you’re essentially inviting water damage in, with potentially disastrous results.
Types of Flashing: Choosing the Right Shield
Just like a knight selects the right armor, you need the proper flashing for your windows. Each type has its strengths and weaknesses, so let’s explore the options:
| Flashing Type | Pros | Cons | Best Use |
|---|---|---|---|
| Self-Adhering | Easy to install, molds to irregular shapes. | May be less durable than metal, not ideal for high heat. | Perfect for small gaps, unusual shapes, quick fixes. |
| Metal (Aluminum/Steel) | Extremely durable, long-lasting. | Can be trickier to work with, requires proper tools. | Ideal for roofs, chimneys, and areas needing maximum protection. |
| Bituminous | Cost-effective, handles various climates. | Can be messy to apply. | General purpose, sloped roofs, and good budget option. |
| Fluid-Applied | Seamless, ideal for intricate details, excellent for repairs. | Requires precise application, longer drying time. | Complex shapes, repairs, around pipes and other penetrations. |
| Butyl Flashing Tape | Flexible, creates a watertight seal. | May not last as long as metal flashing. | Great for sealing around other flashing types, particularly tricky areas and seams. |
While metal flashing is generally considered the most durable, some experts suggest that a combination of flashing types often provides the most comprehensive protection. Ongoing research explores new flashing materials and techniques, so staying informed about the latest advancements is beneficial.
Installing Flashing: A Step-by-Step Fortress
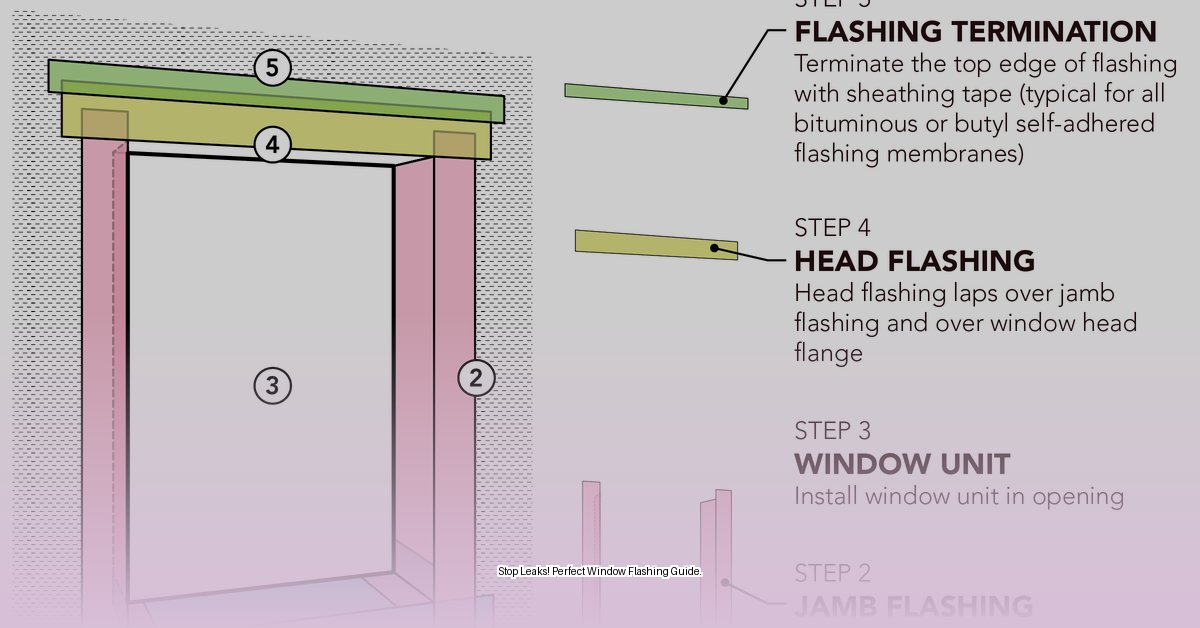
Proper installation is key for effective flashing. Think of it as building a fortress wall—every brick must be perfectly placed. Here’s how to do it right:
- Prep the Opening: Clean the window opening thoroughly, ensuring it’s level and free of debris. Install a sloped sill pan (if required). This pan acts like a miniature waterslide, directing any water away from the window.
- Sill Flashing: Apply your chosen flashing to the sill, extending it beyond the window frame on both sides. This overlap is crucial for redirecting water runoff.
- Jamb Flashing: Apply flashing to the sides (jambs), overlapping the sill flashing. This creates a shingle effect, preventing water from seeping between layers.
- Head Flashing: Apply flashing to the top (head), overlapping the jamb flashing. For added protection, fold the housewrap flap (if applicable) down over the head flashing.
- Integrate with Housewrap: Ensure the flashing integrates seamlessly with your home’s weather-resistant barrier (housewrap) for complete protection. This step is often overlooked but is vital.
- Install the Window: Follow the manufacturer’s instructions precisely for proper window installation.
- Seal and Finish: Seal any remaining gaps or seams with a high-quality sealant compatible with your flashing material. This provides a final, airtight seal against the elements.
Research suggests that meticulous attention to detail during installation significantly reduces the likelihood of future problems. It’s like building a solid foundation—essential for long-term success.
Troubleshooting: Fixing Flashing Failures
Even with perfect installation, issues can arise. Here’s how to diagnose and fix common problems:
- Leaks: Inspect for gaps, tears, or missing sections of flashing. Sealant can patch small gaps, but larger damaged areas probably require replacement. Recurring leaks might signal a more serious underlying issue, like improper installation or structural problems.
- Condensation: Condensation often points to insulation or ventilation problems, not necessarily a flashing failure. Check your window’s insulation and ensure adequate airflow. Ongoing research explores the link between window condensation and indoor air quality.
- Drafts: Feeling a draft? Gaps around the window frame are likely the culprit. Caulk or foam sealant can effectively seal these air leaks.
Regularly checking your windows for signs of damage or wear and tear is a proactive way to prevent bigger problems.
Where to Buy Window Flashing
Window flashing is readily available at most home improvement stores. Don’t skimp on quality; it’s a small price to pay for the protection it provides. Remember to consult local building codes, as they may have specific requirements for window flashing. If you’re uncertain about any aspect of this project, consulting a qualified professional is always recommended. Their expertise can provide tailored solutions for your specific situation.
This comprehensive guide provides valuable insights based on current best practices, but building science is continually evolving. Staying informed about the latest research and recommendations empowers you to make the most informed decisions for your home. With proper installation and maintenance, your window flashing will protect your house from the elements for years to come.
- Dora the Explorer Wipe-Off Fun: Safe & Mess-Free Activities for Little Explorers - April 18, 2025
- Does Lemongrass Repel Mosquitoes? Fact vs. Fiction + How to Use It - April 18, 2025
- Do Woodchucks Climb Trees?Fact vs. Fiction - April 18, 2025


