Light Switch Wiring: A Comprehensive Guide
This guide provides clear, step-by-step instructions for wiring various types of light switches, adhering to NEC 2023 standards. Safety is paramount, so always turn off the power at the breaker box before starting any electrical work. Double-check with a non-contact voltage tester to confirm the power is off. If you’re unsure about any step, consult a qualified electrician.
Single-Pole Switches: One Switch, One Light
Single-pole switches are the most common type, controlling one light from one location. There are two main wiring scenarios:
1. Power at the Switch (Most Common)
- Connect the Hot (Black) Wire: Attach the incoming hot wire from your electrical panel to the black screw on the switch.
- Switch to Light: Run a black (hot) wire from the other screw on the switch to the black (hot) wire on the light fixture.
- Neutrals Together: Connect the white (neutral) wires from the panel and the fixture together.
- Ground It: Connect the bare copper or green ground wires from the panel, switch, and fixture together.
(Diagram: Single-pole switch, power at switch – Zoomable)
2. Power at the Light
- Hot to Light: The incoming hot (black) wire connects to the black wire on the light fixture.
- Switch Leg: Run a black (hot) wire from the light fixture to the switch. This is the “switch leg”.
- Switch to Light: Run another wire (often black or red) from the other switch terminal to the light fixture.
- Connect at Fixture: Connect this wire to the remaining black wire from the light.
- Neutrals & Ground: Connect neutrals and grounds as in the previous scenario.
(Diagram: Single-pole switch, power at light – Zoomable)
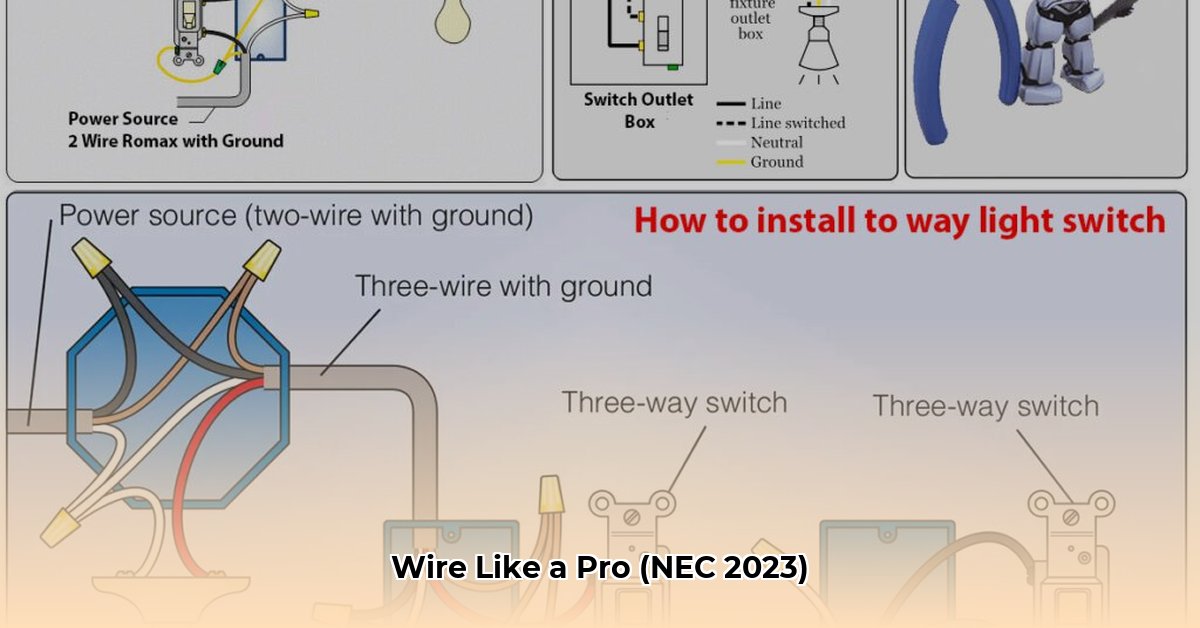
Three-Way Switches: Two Locations, One Light
Three-way switches control a single light from two locations, using “traveler” wires (typically red and black) to communicate.
Wiring a 3-Way Switch
- Identify the Common Terminal: The common terminal is usually a different color screw or marked “COM.”
- Travelers: Connect the two traveler wires between the two three-way switches.
- Common to Source/Light: Connect the common terminal of one switch to the incoming hot (black) wire, and the common terminal of the other switch to the black (hot) wire going to the light.
- Neutrals & Ground: Connect neutrals and grounds as usual.
(Diagram: 3-way switch wiring – Zoomable, showing all possible power source locations)
Four-Way Switches: Three or More Locations
Four-way switches extend three-way switching. They are placed between two three-way switches.
Wiring a 4-Way Switch
- 3-Way Ends: Ensure you have three-way switches at the beginning and end of the circuit.
- 4-Way Middle: The four-way switch goes between the two three-way switches.
- Traveler Connections: Connect the traveler wires from one 3-way switch to one pair of screws on the 4-way, and the travelers from the other 3-way to the other pair on the 4-way.
- Complete the Circuit: The remaining connections are the same as a 3-way setup. This is where having neat and appropriately colored wires is crucial.
(Diagram: 4-way switch wiring – Zoomable)
Dimmer Switches: Controlling Brightness
Wiring a dimmer is similar to a single-pole switch, but ensure compatibility with your bulbs. Always follow the manufacturer’s instructions. Some dimmers require a neutral wire connection.
(Diagram: Dimmer switch wiring – Zoomable, including smart dimmer variations)
Switched Outlets: Powering Outlets from a Switch
Standard Switched Outlet
- Identify the Hot Wire: The hot (black) wire comes from the switch.
- Connect to Outlet: This hot wire connects to the brass screw on the outlet.
- Neutral and Ground: Neutrals and grounds connect as usual.
Split Outlet: One Switched, One Always On
- Break the Tab: Break the metal tab connecting the two brass screws on the outlet to isolate the switched side from the always-on side on the receptacle.
- Hot to Switch Side: Connect the hot (black) wire from the switch to the brass screw on the side you want switched.
- Hot to Always-On: Connect a hot wire from the power source directly to the other brass screw.
- Neutrals & Ground: Connect neutrals and grounds as usual.
(Diagram: Switched outlet and split outlet wiring – Zoomable)
Multiple Lights/Switches: Advanced Configurations
Multiple Lights, One Switch
Connect the hot wires from all the lights together, then connect this bundle to the switched hot wire from the switch. Neutrals and grounds are also bundled together.
Multiple Switches, One Box
Each switch gets its own hot wire and connects independently to its respective light.
(Diagram: Multiple lights/switches wiring – Zoomable)
Troubleshooting
| Problem | Likely Cause(s) | Suggested Solutions |
|---|---|---|
| Light not working | Burnt-out bulb, tripped breaker, faulty switch, loose connection | Replace bulb, reset breaker, replace switch, check connections, examine switch leg |
| Dimmer issues | Incompatible bulb, faulty dimmer | Use compatible dimmer, ensure correct wattage, replace dimmer |
| 3/4-Way problems | Incorrect traveler wire connections, faulty switch | Double-check wiring, identify and fix loose connections, replace faulty switch |
| Switched outlet not working | Incorrect wiring, faulty outlet, broken tab | Verify wiring, ensure outlet tab is broken appropriately, replace outlet |
Smart Switches: Modern Lighting Control
Smart switches offer advanced control via apps, voice assistants, and home automation. Wiring is similar to traditional switches, but they typically require a neutral wire. Consult the manufacturer’s instructions carefully.
Safety Precautions
- Always turn off the power at the breaker box before working on any electrical wiring.
- Use a non-contact voltage tester to confirm the power is off.
- Wear appropriate safety glasses and gloves.
- Consult a qualified electrician if you are unsure about any aspect of the project.
- Follow NEC 2023 guidelines and local electrical codes.
Ongoing Research and Future Developments
Research in areas like energy-efficient lighting controls and smart home integration continues to evolve, suggesting that future wiring practices might change. Keep up-to-date with the latest advancements and safety standards.
This guide provides comprehensive information for common light switch wiring scenarios, but it is essential to acknowledge the complexities of electrical systems. Individual situations may vary, and ongoing research constantly refines best practices. Consulting a licensed electrician is always recommended for complex projects or if you’re uncertain about any part of the process. Remember, prioritizing safety and adhering to local electrical codes are crucial for a successful and safe wiring project.

- Dora the Explorer Wipe-Off Fun: Safe & Mess-Free Activities for Little Explorers - April 18, 2025
- Does Lemongrass Repel Mosquitoes? Fact vs. Fiction + How to Use It - April 18, 2025
- Do Woodchucks Climb Trees?Fact vs. Fiction - April 18, 2025